Working with BOM on Prototypes |
  
|
Working with BOM on Prototypes |
|
Mechanism of BOM creation used in the earlier program versions will be described below. Unlike BOM on templates mechanism, BOM on prototypes mechanism is left inside the program for compatibility reasons only and is not recommended for usage for the new projects due to its limitations.
This mechanism also provides tools for automating bill of materials (BOM) composition in the formats recommended by various standards and in customized user-defined formats.
To work with this mechanism you need to use the set of commands from Tools > Reports / BOMs text menu or options from BOM main toolbar.
You can use standard BOM prototypes or custom prototypes when creating BOM.
The prototype is a BOM with empty records. It defines table contents and the rules for its formatting. The prototype also defines text type for the BOM. The text can be of two types:
-Multiline text (text is not translated to another line cause of growing strings number);
-Paragraph text ( text can be translated to a new page or a new area on the existing page cause of growing strings number)
User defines columns number and their data in BOM properties. You need to select standard fields for the BOM table from the list and to create additional BOM table fields. Information for the table is taken from fragment files or is inserted manually.
For automatic filling of the BOM table, it is necessary that:
●BOM data is defined in the Product structure window of the fragment documents (otherwise the string of the table that corresponds the fragment without data will be empty);
●The parameter Include in product structure in the fragment properties is set to one of the options:
-Without Embedded Elements – the fragment data is included into the product structure. The elements that are embedded in the fragment drawing are not included;
-With Embedded Elements - the fragment data and the embedded elements data are included into the product structure;
-Embedded Elements Only – only embedded elements are included into the product structure.
Each assembly fragment corresponds to the table record when you create a BOM. Additional strings are added manually when the table is edited. For manual editing you need to unselect ![]() Automatic field option for a cell/column/string in which you need to enter a new data.
Automatic field option for a cell/column/string in which you need to enter a new data.
Text formatting parameters, strings height and columns width are specified in the table properties.
The table header is a fragment, which contains text with the header table. That is why you need to make corresponding changes in the headers table if table columns content or columns width were changed.
BOM sections structure is stored in the database file. The name and the path to the file can be specified in SO: Set System Options on the tab Bill of Material (“BOM groups.mdb” file is specified by default).
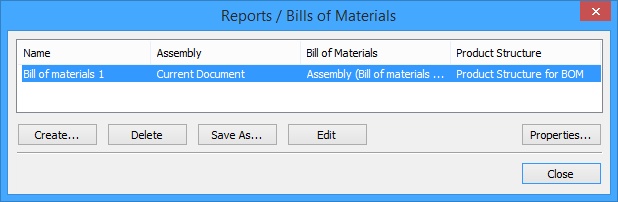
Upon calling this, the dialog box appears on the screen with the list of all reports and BOMs existing in the document. This dialog box allows creating a new BOM, deleting an existing one (by selecting from the list) or viewing its properties.
It also allows renaming a BOM file if it was created as a separate document. If such BOM was selected, the graphic button [Save As…] becomes enabled, allowing the name and folder change.
Note! It is required the separate document file and the current document file to be saved.
To create a new BOM, use the command “BC: Create Bill of Materials”. The command can be called by one of the following means:
Keyboard |
Textual Menu |
Icon |
|---|---|---|
<BC> |
Tools >> Report/Bill of Materials >> New… |
|
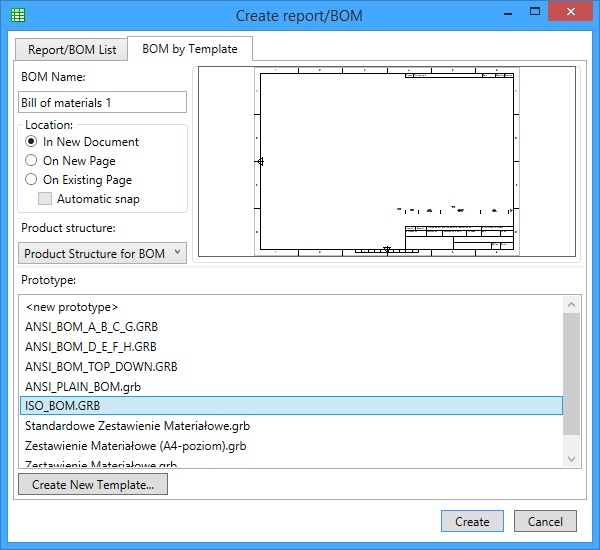
Upon calling the command, the dialog box “Create report/Bill of Materials” will come up on the screen. Use this dialog to create the BOM table either in a new document or as a new page in the current document. This command also allows creating a new prototype based on an existing one.
The delete BOM from the current document, use the command BX: Delete Bill of Materials:
Keyboard |
Textual Menu |
Icon |
|---|---|---|
<BX> |
Tools >> Report/Bill of Materials >> Delete… |
|
Should multiple BOMs exist in the current document, a dialog box comes up for selecting the BOM to be deleted.
Another command is BI: Include in Bill of Materials:
Keyboard |
Textual Menu |
Icon |
|---|---|---|
<BI> |
Tools >> Report/Bill of Materials >> Elements… |
|
The command is intended for maintaining a binding between BOM and respective fragments. Call to this command results with the dialog box that comes up on the screen and contains the list of all existing fragments in the document. The controls provided by this dialog let you set or modify the method of inserting any fragment into the BOM.
The BOM table and callouts can be updated following the assembly modifications by the command BRA: Update Bills of Materials and Callouts:
Keyboard |
Textual Menu |
Icon |
|---|---|---|
<BRA> |
Tools >> Report/Bill of Materials >> Update All |
|
Should the callouts position numbers change in BOM (as, for instance, a result of changing the rules of sorting records), the command BRP: Update BOM Callouts lets updating the callouts in the assembly:
Keyboard |
Textual Menu |
Icon |
|---|---|---|
<BRP> |
Tools >> Report/Bill of Materials >> Update Callouts |
|
To set callouts in assembly, use the command BL: Create BOM Callout:
Keyboard |
Textual Menu |
Icon |
|---|---|---|
<BL> |
Tools >> Report/Bill of Materials >> Callouts |
|
For editing an existing BOM, use the command BE: Edit Bill of Materials:
Keyboard |
Textual Menu |
Icon |
|---|---|---|
<BE> |
Tools >> Report/Bill of Materials >> Edit |
|
The command allows modifying the contents and parameters of the BOM table (see the section “Editing BOMs”). If several BOMs exist, the dialog for BOM selection appears first.
Next is the command BT: Toggle: Assembly/BOM Pages:
Keyboard |
Textual Menu |
Icon |
|---|---|---|
<BT> |
Tools >> Report/Bill of Materials >> View Assembly/BOM |
|
The command allows switching between the assembly and the BOM, if the BOM is located on another page or in a separate document. If several BOMs exist, the dialog appears first for selecting the BOM to switch to.
The command BG: Edit BOM Sections:
Keyboard |
Textual Menu |
Icon |
|---|---|---|
<BG> |
Tool >> Report/|Bill of Materials >> Sections… |
|
This command allows modifying a database file containing information about BOM sections (the default file is "BOM Group.mdb"). The name and the path to the database sections can be defined/modified by the command SO: Set System Options >> Bill of Material (see the section “Editing BOM sections”).
Command BS: Export BOM:
Keyboard |
Textual Menu |
Icon |
|---|---|---|
<BS> |
Tools >> Report/Bill of Materials >> Export… |
|
This command allows you to export the BOM data or the BOM itself to the Excel file (xls). The export is carried out by a special macro located in the folder “…/Program/BOMExport”.
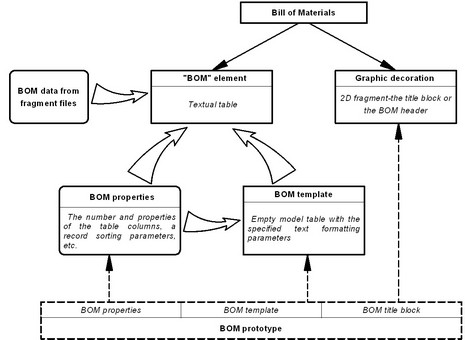
BOM composition
Any BOM is composed of the following elements:
●A BOM template is a textual table with a certain number and type of columns. The table properties defined formatting of the BOM columns. The table is created based on the "Text" element type ("Paragraph text" or "Multiline text"). The text parameters define the behavior of the BOM as it is being filled with information: the direction of the BOM "growth", the capability of continuation on the new page. Thus, for instance, a prototype based on a "Multiline text" template element does not support multipage BOMs.
●A fragment with the title block image or just the BOM header (depending on the BOM type).
The parts of the template used when creating a title block fragment or a BOM header depend on the type of the BOM. If the BOM is located on the drawing page, then the table fragment is used that describes the image of the table header with the column titles only. Such a fragment is described in the BOM properties as the table header or footer. Since the table height is unlimited in this case and depends on the number of records in the BOM, the table grid lines are defined in the template properties as the table boundaries. Besides, automatic continuation to the new page is not supported for BOMs created on the drawing page.
If the BOM is located on a separate page or in a separate document, the table size and appearance are predefined and do not depend on the actual number of records in the BOM. In this case, the fragment is inserted in the BOM page that contains the full image of the BOM title block, including the header, the main text and the table grid. The table boundaries are not specified in the template in this case. What is required in this case is that the distance between the horizontal lines of the table grid in the fragment was equal to the height of the template cells. In this case, the template (the textual table) is applied "over" the fragment and is tied to its nodes.
Such a BOM is allowed to occupy several pages. Once the table is filled up on one page, the BOMs continuation is automatically created on the new page. The BOM title block fragment inserted in the new page is defined in the BOM prototype under the command "ST: Set Document Parameters", the "Fragments" tab.
When creating a BOM, the template and the title block are created automatically according to the selected BOM prototype. The BOM prototype is a document containing the empty BOM only. It has the BOM template defined (the latter being the empty paragraph text with a table of certain type and formatting), BOM properties and the title block fragment. The drawing settings define which title block fragment to insert when continuing on the new page (for automatic creation of additional BOM pages). All these data are obtained from the mentioned prototype when creating a BOM. In future, when working with the created BOM, the user can manually change the BOM template, its properties and the title block.
Creating BOM
To create a BOM based on prototype, use the command BC: Create Report/Bill of Materials:
Keyboard |
Textual Menu |
Icon |
|---|---|---|
<BC> |
Tools >> Report/Bill of Materials >> New… |
|
Upon calling the command, the dialog box “Create Bill of Materials” will be displayed. Use the controls provided by the dialog box and create BOM table either in a new document or on a new page of the current document, or else on the current drawing page.
When creating a BOM, one can select a BOM prototype describing the structure of the columns and sections of the table being created. The list of prototypes is provided in the Prototype pane.
To create an individual BOM tables and new BOM prototypes, use the “<Empty Template>” template.
System offers BOM templates in various standards that are based on the paragraph text functionality. The “Preview” pane allows previewing the image of the selected prototype.
When creating a BOM on menu or the current page, it is assigned a unique name “Bill of materials 1”, “Bill of materials 2”, etc. The name of a BOM created as separate document includes the name of the respective assembly. For example, if the assembly is named “Assembly 1”, then its BOM created in a new document will be named “Assembly 1 (Bill of materials 1)”. The latter name can be modified in the command BM: Bills of Materials.
When creating a BOM, we recommend setting the parameter ‘Transparent’ Text editing (ST: Set Document Parameters command, View tab), that allows entering BOM editing mode by simply clicking ![]() one of the records.
one of the records.
Creating BOM on New Drawing Page or New Document
Call the command BC: Create Report/Bill of Materials. In the coming up dialog box set parameter On New Page and select a prototype (for example, “ISO_BOM.grb”). Press [OK]. As a result, a new page will be created in the document, displaying the BOM being created in editing mode (subsequent BOM pages are also created automatically).
If any data was specified for inserted fragments and they were included in the assembly product structure, this data will be added to the product structure after its updating. The data will be automatically added to the BOM.
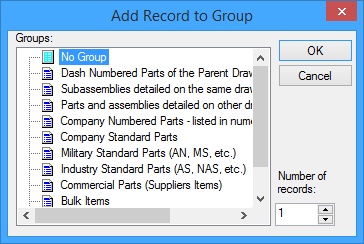
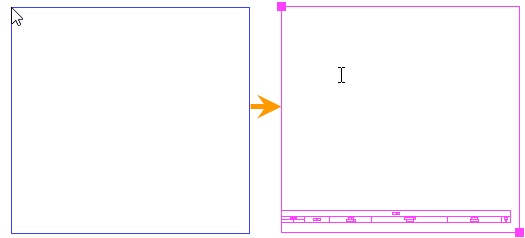
In the cases, when the data was not defined or relation with fragments was not established, an empty BOM is displayed on the screen. In this case, the dialog box Add record to section will be displayed. This dialog box appears any time when editing an empty BOM. By using this dialog, you can add the desired records to any of the sections. If the specified group does not exist in the BOM, it will be created automatically. You can abort BOM creation by pressing the button [Cancel].
|
|

An edit mode is activated after BOM creation.
Display options and sorting rules of the BOM table will be taken from the prototype.
More information about BOM editing can be found in section “Editing BOM”.
BOM creation is confirmed by option:
|
<F5> |
Finish input |
Alternatively, you can right click ![]() , with the pointer being outside the BOM table area.
, with the pointer being outside the BOM table area.
Creating BOM on Existing Drawing Page
Call the command BC: Create Report/Bill of Materials. In the coming up dialog box set parameter On Existing Page and select the desired prototype. To automatically position the BOM prototype on the drawing, check the optional parameter “Automatic snap” (recommended). Usually, such BOMs are created on the drawings with their title blocks already in place.
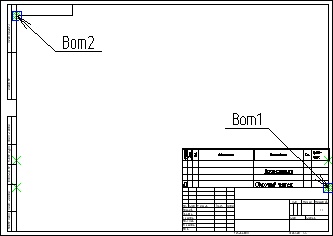
If using the automatic snap, the system will automatically search for snapping nodes when creating the BOM. The standard title block fragment has the default nodes defined, with the reserved names “bom1” and “bom2”. In this case, the BOM will be positioned above the title block. If such nodes do not exist on the title block, the system will search for them among other drawing elements. You can create such nodes manually. What is important is that the nodes are not aligned vertically nor horizontally, with the horizontal distance between them sufficient for fitting the BOM prototype in between. |
|
For a BOM prototype based on a multiline text, just one node, “bom1”, is sufficient. If the nodes not found, the system displays the respective message and switches to the mode of manual snapping point input.
In the case of manual BOM positioning, a box rubber bands on the screen defining the BOM boundaries. Position the box as desired and click ![]() . Note that in this case the BOM table is Lower Limit-justified and will grow upwards as records are added.
. Note that in this case the BOM table is Lower Limit-justified and will grow upwards as records are added.
For confirming the BOM creation use the option:
|
<F5> |
Finish input |
Creating BOM from Empty Prototype
By selecting the prototype named <Empty Template>, you will be independently creating a BOM based on an empty drawing. This is different from creating a new prototype (see the section “BOM prototype”) in that the parameters and BOM properties being defined will be used in the current document only. An empty prototype-based BOM can be used as a prototype for creating other BOMs only by saving the current document in the folder “…\Program\Template\BOM”.
Switching Between the Assembly and BOM Document
The command BT: Toggle: Assembly/BOM Pages allows opening a BOM from the current assembly that is located on a different page or in a different document:
Keyboard |
Textual menu |
Icon |
|---|---|---|
<BT> |
Tools >> Report/Bill of Materials >> View Assembly/BOM |
|
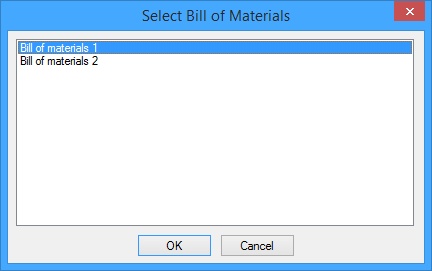
If the document contains several BOMs the dialog box Select Bill of Materials appears.
Select the BOM to open and press [OK]. The selected BOM document will open. The returned to the assembly, called the command BT: Toggle: Assembly/BOM Pages again.
When creating a BOM in a separate document, there is yet another way of switching to the assembly drawing. You can select the item Assembly in the BOM context menu.
If several BOMs exist in the document, one of which is placed on the first page of the assembly drawing, then any other BOM created on a separate page or in a separate document will have to be opened manually.
Filling in BOM Title Block
A BOM title block can be filled in by two ways:
1. Since the BOM table title block is a fragment, the title block can be filled using this fragment variables. To do this, call the command EFR: Edit Fragment.
Then select the BOM table fragment with the mouse. A dialog box will come up on the screen representing the title block of the BOM page that you selected. Alternatively, this dialog box can be called as follows. While the system is in the command-waiting mode, move the pointer over the BOM table fragment and right click ![]() . In the coming up menu, select the item “Variables”.
. In the coming up menu, select the item “Variables”.
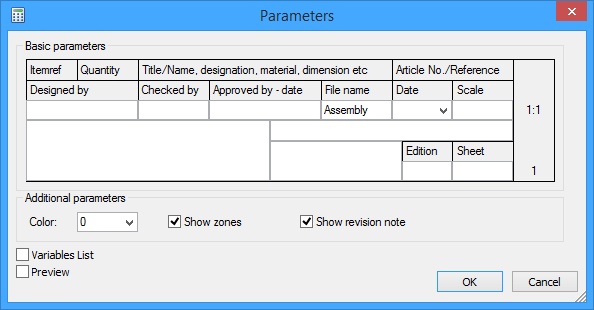
Fill in all required entries of this dialog box. Upon confirming by pressing the graphic button [OK], the records from this dialog box will be entered in the title block of the BOM page you have selected.
2. Another way of filling in the title block is by direct input in the drawing, without calling the fragment variables. To do so, set the textual pointer inside the title block box to be filled, and click ![]() . Start typing the text as soon as you see the blinking cursor in the specified box. The button with an arrow appears to the right of the box allowing selecting values from the list. In usually, the list is empty (except for the entries in the “Date” column). If it is necessary to fill in the list for selecting values from the list in future, fill the box with the desired text, and then in the context menu called by right clicking
. Start typing the text as soon as you see the blinking cursor in the specified box. The button with an arrow appears to the right of the box allowing selecting values from the list. In usually, the list is empty (except for the entries in the “Date” column). If it is necessary to fill in the list for selecting values from the list in future, fill the box with the desired text, and then in the context menu called by right clicking ![]() , select the item “Add Value to List”.
, select the item “Add Value to List”.