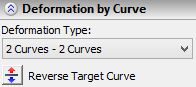
Deformation by Curve |
  
|
Deformation by Curve |
|
General Information
The law of the deformation by curve is determined by two space curves (source and target). The source curve is identified with the deformed body in its initial state; the target curve – in the resulting state. The space transformation law is constructed in such a way as to provide the transformation of the source curve to the target one.
In general case, the source and the target curves can have arbitrary shapes. Most often, a line (for example, one of the edges of the deformed body or a straight 3D path) is used as the source 3D curve.
When constructing the deformation law, in each point of the two curves the auxiliary LCS1(s) and LCS2(s) (s – the curve parameter) are calculated whose pairwise superposition allows a user to define more precisely the space orientation of the resulting body. The auxiliary LCS are computed by the system in the following way: the tangent to the source/target curve at the current point is taken as the X-axis, the normal to the auxiliary surface at the given point of the same curve is taken as the Y-axis, the Z-axis is the vector product of the X and Y axes.
The auxiliary surfaces for the source and target curves can be constructed differently depending on the selected algorithm of the deformation by curve:
-3D Curve – 3D Curve;
-Curve – Spiral;
-Pair of Curves – Pair of Curves.
3D Curve – 3D Curve
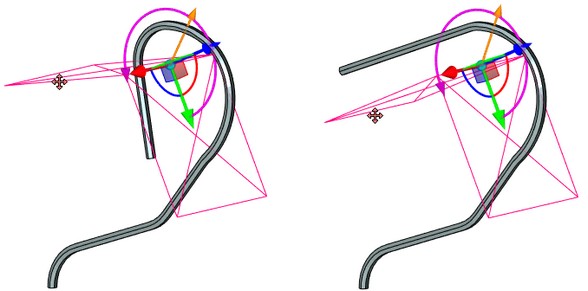
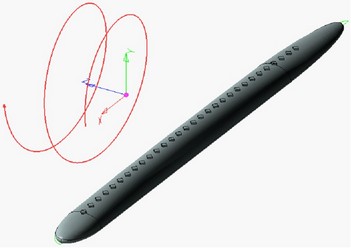
When using this algorithm, a user specifies an auxiliary direction vector for each of the curves (source and target). For this purpose, a user defines the LCS one of the axes of which will define the direction vector.
The auxiliary surface for both curves (source and target) is formed by moving the direction vectors along the corresponding curves by using the minimum twist method.
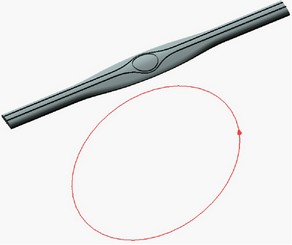
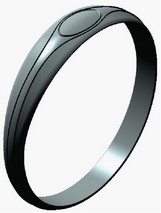
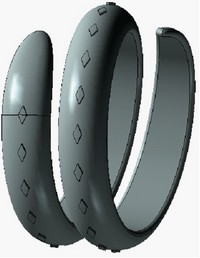
As an example of using this algorithm, consider one of the typical problems solved by this algorithm – wrapping the source body into a ring. The resulting body can be closed.
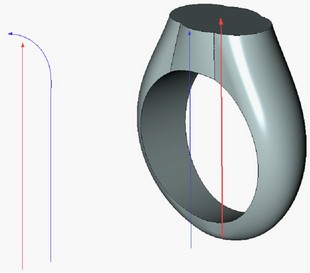
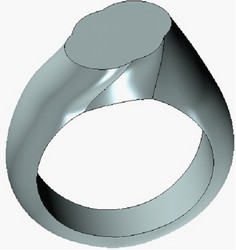
3D Curve – Spiral
This algorithm is based on the assumption that the target curve resembles a “spiral”, that is, there is a space axis around which this curve is “wound”. The use of this algorithm of the deformation by curve allows a user to “wind” bodies around the axisymmetric curves in the most natural way.
In this algorithm, a user defines an additional direction vector for the source curve (by selecting LCS and one of its axes). The auxiliary surface for the source curve is formed in the same way as in the previous case by moving the given direction vector along the curve by using the minimum twist method.
A user also defines the axis of the target curve by selecting the LCS and the desired axis. For the target curve the auxiliary surface is formed as a set of vectors directed from each point of the curve at the axis along the shortest distance.
Pair of 3D Curves – Pair of 3D Curves
In this algorithm, for each of the main curves (source and target) an additional 3D twist curve is specified.
When calculating the transformation law, the auxiliary surfaces for the source and target curves are formed as the set of vectors directed from each point of the source/target curve at the corresponding to it point of the twist curve.
Creating Deformation by Curve
For creating deformation by curve, the following command is used “3DRV: Deformation by Curve”:
Icon |
Ribbon |
|---|---|
|
3D Model → Special → Deformation → Deformation by Curve |
Keyboard |
Textual Menu |
<3DRV> |
Operation > Deformation > Deformation by Curve |
The first step after invoking this command is the selection of the deformed body:
|
<O> |
Select Body to Deform |
This option is turned on by default upon the entry into the command. The deformed body is selected with the help of After selecting the deformed body, in the command's properties window the desired deformation algorithm has to be selected. To do it, use the drop down list of the parameter “Type”. Depending on the deformation algorithm selected, the following steps sequence will vary. |
|
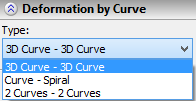
Creating Deformation of Type “3D Curve – 3D Curve”
If in the list of the parameter “Type” a user selects the value “3D Curve – 3D Curve”, then in the automenu the following option becomes active:
|
<O> |
Select Body to Deform |
This option is turned on by default upon the entry into the command. The deformed body is selected with the help of ![]() in the 3D window or in the tree of the 3D model. The selected body is highlighted.
in the 3D window or in the tree of the 3D model. The selected body is highlighted.
After that, the system will prompt a user to select the source curve:
|
<T> |
Select Source Curve |
The drop down list of this option contains the list of the 3D elements capable of defining a 3D curve. The selected curve is marked in the 3D scene.
Cancellation of the source curve selection can be done with the help of the option:
|
<H> |
Cancel Source Curve Selection |
After selecting the source curve, a user needs to specify the LCS one of the axes of which will serve as the direction vector for the source curve:
|
<L> |
Select Source LSC |
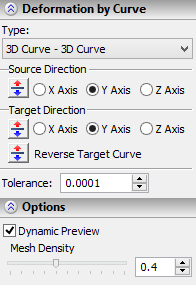
In the command's properties window, specify the axis of the LCS which will serve as the direction vector for the source curve (parameter “Source direction”). In the dialog one or two axes of the LCS can be unavailable for the selection which means that the selection of the corresponding direction vector will not be possible for the selected source and target curves. On the basis of the defined direction vector the system automatically computes the auxiliary surface for the source curve and the auxiliary LCS at each point of the curve. For clearness, in the 3D window the auxiliary LCS will be shown for the start point of the source curve. The button |
|
To cancel the selection of the LCS, which specifies the direction vector of the source curve, the following option is used:
|
<C> |
Cansel LSC selection |
The target curve and its direction vector are defined similarly with the help of the following options:
|
<B> |
Select Target Curve |
|
<D> |
Cancel Target Curve Selection |
|
<M> |
Select Target LSC |
|
<N> |
Cansel LSC selection |
By changing axes which specify the direction vectors for both curves as well as the directions of these axes, it is possible to find the desired choice of the transformation. For obtaining the desired result, it is also possible to use the button [![]() Reverse Target Curve], which allows a user to change the direction of the selected target curve.
Reverse Target Curve], which allows a user to change the direction of the selected target curve.
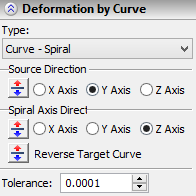
Creating Deformation of Type “Curve – Spiral”
If in the list of the parameter “Type” a user selects the value “Curve – Spiral”, then in the automenu the following option becomes active:
|
<O> |
Select Body to Deform |
The deformed body is selected with the help of ![]() in the 3D window or in the tree of the 3D model.
in the 3D window or in the tree of the 3D model.
After that, the system will prompt the user to select the source curve:
|
<T> |
Select Source Curve |
Cancellation of the source curve selection can be done with the help of the option:
|
<H> |
Cancel Source Curve Selection |
After selecting the source curve, a user needs to specify the LCS the axis of which will serve as the direction vector for the source curve:
|
<L> |
Select Source LSC |
In the command's properties window, specify the axis of the selected LCS which will serve as the direction vector for the source curve (parameter “Source Direction”). In the 3D window the auxiliary LCS will be shown for the start point of the source curve. The button To cancel the selection of the LCS, which specifies the direction vector of the source curve, the following option is used: |
|
|
<C> |
Cansel LSC selection |
The target curve and its axis are selected similarly with the help of the following options:
|
<B> |
Select Target Curve |
|
<D> |
Cancel Target Curve Selection |
|
<M> |
Select Target LSC |
|
<N> |
Cansel LSC selection |
As in the previous case, for obtaining the desired result, it is also possible to use the button [![]() Reverse Target Curve], which allows a user to change the direction of the selected target curve.
Reverse Target Curve], which allows a user to change the direction of the selected target curve.
Creating Deformation of Type “Pair of Curves – Pair of Curves”
When choosing the option “Pair of Curves – Pair of Curves”, the following option becomes active in the automenu:
|
<O> |
Select Body to Deform |
The deformed body is selected with the help of ![]() in the 3D window or in the tree of the 3D model.
in the 3D window or in the tree of the 3D model.
After that, the system will prompt the user to select the source curve:
|
<T> |
Select Source Curve |
Cancellation of the source curve selection can be done with the help of the option:
|
<H> |
Cancel Source Curve Selection |
After that, it is necessary to define the twist curve for the source curve of deformation:
|
<K> |
Select Source Twist Curve |
This curve is selected in the 3D window or in the tree of the 3D model.
To cancel selection of the source twist curve, use the option:
|
<L> |
Cancel Source Twist Curve Selection |
The target curve and its twist curve are selected similarly with the help of the following options:
|
<B> |
Select Target Curve |
|
<D> |
Cancel Target Curve Selection |
|
<M> |
Select Target Twist Curve |
|
<N> |
Cancel Target Twist Curve Selection |
In addition, in the dialog of the command's properties the button [ |
|
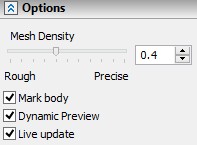
Options in Deformation Operations
In the process of specifying/editing parameters of deformation, the future result of the current operation is dynamically shown in the 3D window. For speeding up the work, the dynamic preview can be turned off by taking off the flag “Dynamic Preview” in the command's properties window.
An additional parameter “Mesh Density” controls accuracy of the mesh used for visualization of the result of the deformation. The increase in the mesh density leads to slower regeneration of the bodies in the scene but increases accuracy of the drawing. |
|
If you disable option Mark body, the body is no longer highlighted in the scene, which simplifies visual perception of the deformed object.
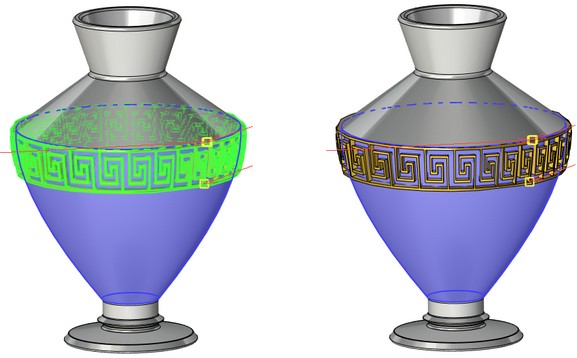
On |
Off |
The Live update option allows to watch deformations of the body in real time. Deactivating the option accelerates recalculation because solid body updating is not required.