Working with Active Workplane


Working with Active Workplane |
  
|
The mode of drawing on the active workplane is intended for placing 2D elements on a plane in the three-dimensional space and their further use in creation of the 3D model. Let's review this working mode in details.
Workplane activation
A workplane can be activated in several ways. All possible ways of activating a workplane are listed here:
1. Drawing on the selected plane. Point the mouse to a workplane and click ![]() . The selected workplane gets highlighted. At this moment, you can start creating elements, using 2D drafting commands. Activate a 2D command. This will activate the workplane. The active workplane control toolbar will then appear on the screen, along with the options of the activated 2D command.
. The selected workplane gets highlighted. At this moment, you can start creating elements, using 2D drafting commands. Activate a 2D command. This will activate the workplane. The active workplane control toolbar will then appear on the screen, along with the options of the activated 2D command.
2. Activation from the context menu. Select a workplane in the 3D window or in the model tree and right click 3. Activation from the list. While the system is in the command waiting mode, point the mouse to an empty space in the 3D scene and right click |
|
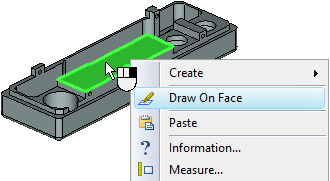
4. Activation after creation. When creating a workplane on a face of a solid body, this workplane can be activated automatically. For this, point the mouse to the face to create the workplane on, and right click ![]() . In the coming up context menu, select the item "Draw On Face". A workplane will be created based on the selected face, along with the page to contain all elements belonging to the workplane. The created workplane will be activated.
. In the coming up context menu, select the item "Draw On Face". A workplane will be created based on the selected face, along with the page to contain all elements belonging to the workplane. The created workplane will be activated.


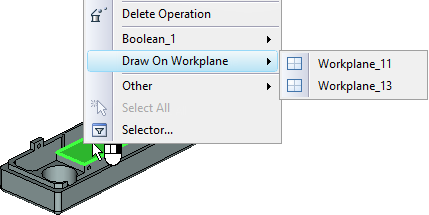
5. Activation from the context menu with plane selection. This is activation of an existing workplane created based on a body face. Point the mouse to a face of the body and right click ![]() . If there are workplanes created on this face, then the coming up context menu will have the item "Draw On Workplane". Selecting this command displays the list of workplanes created on the current face. The workplane selected in this list will be activated.
. If there are workplanes created on this face, then the coming up context menu will have the item "Draw On Workplane". Selecting this command displays the list of workplanes created on the current face. The workplane selected in this list will be activated.

Active Workplane Control
Upon activating a workplane, on the main toolbar (if it is not locked) the button set “Workplane” will be shown. The options on this toolbar allow performing the following actions:
|
Rotate Active Workplane Orthogonal To View Direction |
If the whole 3D scene needs to be rotated while working with the active workplane, use the option:
|
Rotate 3D Seen/Select 3D Elements |
You can also rotate the 3D scene by the mouse while holding down the <Alt> key. While in the 3D scene rotating mode, you can select 3D elements (as for projecting on the workplane, etc.). To continue drawing on the active workplane, turn off this mode.
If you prefer working in the 2D window, you can open the 2D drawing page corresponding to the active workplane. This is done by the option:
|
Open 2D Window With Active Workplane |
The page is displayed in the full-screen mode. It also contains the projection of the selected face. All constructions made on this page are automatically carried over the active workplane. To return to the 3D window, turn off this option.
If you need to project some model elements on the workplane, use the option:
This option is available only when working in the 3D window. Upon selecting this option, the icons appear in the automenu for selecting 3D model elements (operations, faces, edges) that you need to project on the active workplane. Upon finishing the selection, confirm the projection creation with the icon ![]() .
.
A special option is provided for projecting a 3D node or a body vertex on the active workplane
|
Create Projection of 3D Node or Vertex |
Upon activating this option, simply select the nodes or vertices to project on this workplane.
If the projected elements fall beyond the displayed bounds of the active workplane, their projection on the active workplane will not be displayed in the 3D window. In such a case, it may be convenient to use the 2D window of the active workplane. Alternatively, you can change the size of the workplane.
To align the cutting plane with the active workplane (see the chapter "Working in the 3D view window"), set the option:
|
Move Cutting Plane To Active Workplane |
Additional control over the cutting plane is provided when using the option ![]() .
.
To finish drawing on the active workplane, press the icon:
|
<Shift><End> |
End Drawing On Active Workplane |
If the 3D window is active, you can also point the mouse to an empty area in the 3D scene and right click ![]() . The coming up context menu will have the item "End Drawing On Active Workplane".
. The coming up context menu will have the item "End Drawing On Active Workplane".
While working in the active workplane mode, you can use any construction and 2D element creation commands. If the workplane was created on a body face, then the face projection on this workplane will be automatically created on the drawing page linked to this workplane. While working with 2D drafting commands, you can snap construction and graphic elements to the lines of the projection and their joint points.
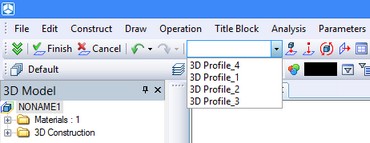
In the “Workplane” and “Workplane (draft)” sets of the main toolbar of T-FLEX CAD, the element of control with the list of 3D profiles constructed by graphic lines of the given plane is available. If one of the profiles is selected from this list, the graphic lines that form this profile are automatically displayed on the screen in large size and newly created graphic lines are assigned the color of the selected profile.

Upon finishing working on the active workplane, the system automatically creates a 3D profile, using the following elements: hatch contours, graphic lines and TrueType-font text. If several hatches or text were created on the 2D page of the workplane, then multiple 3D profiles are automatically created (by the number of identified hatches and/or text).
To finish working on active workplane without creating a 3D profile, use the option:
|
<Alt><End> |
Cancel Drawing On Active Workplane |
While working in the active workplane mode, you can call 3D operation creation commands. In such a case, the system finishes drawing on the workplane, and automatically highlights the created profile if the operation requires profile selection.