Editing Copy or Array


Editing Copy or Array |
  
|
All elements obtained by moving or non-associative copying can be edited as normal construction or graphic elements.
The associative copies created using the copying commands are edited by the command "EY: Edit Copy Operations". The command can be called by one of the following means:
Keyboard |
Textual Menu |
Icon |
<EY> |
"Edit|Draw|Copy" |
|
Upon calling the command, select the copies to be edited. To select one copy, you can use ![]() . Multiple selection can be done by box selection or selection by <Shift>+
. Multiple selection can be done by box selection or selection by <Shift>+![]() , <Ctrl>+
, <Ctrl>+![]() or by the automenu option:
or by the automenu option:
![]() <*> Select All Elements
<*> Select All Elements
When the copies are selected, both the selected and the original elements are highlighted, as well is the transformation vector (or the attachment point in the cases of scaling, rotating or creating a circular array).
Upon multiple selection of copies or arrays, the option is available in the automenu:
![]() <Del> Delete selected Element(s)
<Del> Delete selected Element(s)
Selection of a single copy or array makes the following options available in the automenu:
|
<Enter> |
Finish Editing |
|
<P> |
Set selected Element(s) Parameters |
|
<O> |
Explode Copy |
|
<G> |
Explode Copy keeping relations |
|
<H> |
Select Clipping Hatch (available only for translated, rotated and scaled copies) |
|
<K> |
Cancel selection of clipping Hatch (available only for copies clipped by a hatch) |
|
<S> |
Edit copied elements list |
|
<I> |
Select Other Element |
|
<Del> |
Delete selected Element(s) |
When selecting a copy (an array), the property window displays the dialog for editing the copy parameters, similar to that used at the time of the copy creation. It allows modifying the copy parameters. You can use the parameters dialog box for this purpose as well, called using the option ![]() .
.
The two options - ![]() and
and ![]() - are provided for breaking up copies, that is, for converting those into a set of independent elements. The copy (array) itself as a T-FLEX CAD element is deleted at this moment. The result of applying these options corresponds with the respective modes of the copy (array) creation. To delete a copy altogether, you can use the option
- are provided for breaking up copies, that is, for converting those into a set of independent elements. The copy (array) itself as a T-FLEX CAD element is deleted at this moment. The result of applying these options corresponds with the respective modes of the copy (array) creation. To delete a copy altogether, you can use the option ![]() .
.
The option ![]() is provided for editing the list of the original elements of the copy (array). In this mode, you can add the new elements to the list of the objects to be copied and delete some of the elements from the list of selected.
is provided for editing the list of the original elements of the copy (array). In this mode, you can add the new elements to the list of the objects to be copied and delete some of the elements from the list of selected.
The option ![]() is accessible for copies created by the commands "XM: Create Copy", "XT: Copy and Rotate", "XA: Copy and Scale", “XE: Copy with Translation and Rotation”. It allows clipping the image of the copy by a hatch. To do this, upon calling the option, select the desired hatch by clicking
is accessible for copies created by the commands "XM: Create Copy", "XT: Copy and Rotate", "XA: Copy and Scale", “XE: Copy with Translation and Rotation”. It allows clipping the image of the copy by a hatch. To do this, upon calling the option, select the desired hatch by clicking ![]() .
.
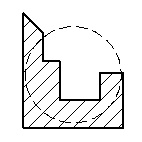
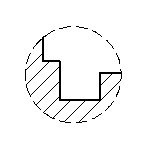
If the clipping hatch is used for this purpose only, we recommend setting its flag "Invisible". The diagram shows a copy image before and after selecting an invisible hatch for clipping. In addition to the described capabilities, the attachment points can be redefined for the selected copy (array).
To do this, select one of the transformation vector ends or an attachment point by clicking ![]() it (in the cases of scaling, rotating and the circular array). After that, specify the new attachment point(s). At this moment, the following options will be available in the automenu:
it (in the cases of scaling, rotating and the circular array). After that, specify the new attachment point(s). At this moment, the following options will be available in the automenu:
![]() <T> Create Node at point
<T> Create Node at point
![]() <N> Select Node
<N> Select Node
After defining the new attachment point, the element being edited will be drawn according to the applied changes.
The commands for editing a copy or an array, or their elements, are also accessible via the context menu. Simply select one of the elements of a copy/array and right click You can change the properties of the selected element of a copy/array (the default properties are copied from the parent element). You can also delete the selected element of a copy/array (without deleting the copy itself). In this case, the copy/array itself maintains the information about the deleted element, so that it can be restored in the future. In the context menu of graphic lines obtained by copying, the “Shorten/extend” command is also available. This command allows us to modify the length of the visible part of the line. This function is described in more detail below. |
|
The editing commands for the copy/array itself are grouped in the context menu into a submenu, named according to the copy type (such as, "Move Copy", as shown on the diagram). An additional command is provided among the copy/array editing commands, "Restore deleted elements", specifically for restoring all deleted elements of the copy.
Changing length of visible part of a line obtained by copying
The “Shorten/extend” command, which is available in the context menu of graphic lines obtained by copying, allows us to modify the length of the visible part of the line. It is possible both to shorten and extend the line of the copy. However, the function of extension is only available for segments and arcs.
The part of the line that is to be changed is indicated by 2D nodes. At first when you work with the command it is required to indicate the part of the line which must be modified, then – the node which defines the new end point of the line. For closed lines it is necessary to indicate two nodes and the part of the line which must remain. The 2D nodes, which are being used, can be located on the line itself or at some distance away from it. In the latter case the end point of the line is defined as a point on the line that is the closest to the selected node.
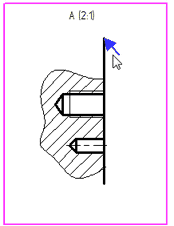
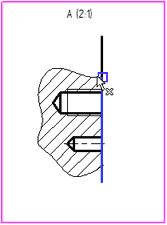
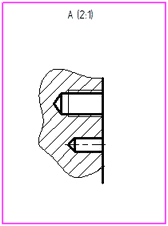
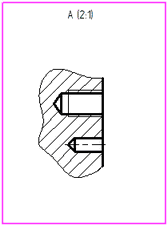
The context menu for the line modified with the help of the “Shorten/extend” command contains the “Reset” command. It allows us to quickly restore the original appearance of the line-copy.
Removing original objects of copy/array
When deleting an original element of the copy/array, two variants of the system's response are possible depending on the option selected in the dialog of the command of deletion.
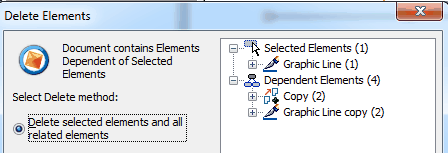
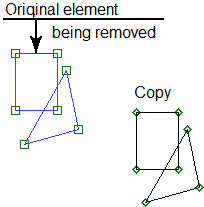
If the “Delete selected and dependent elements” option is chosen, the element that is being removed is simply excluded from the set of original elements of the copy/array. As a result, the view of the copy/array will change: the elements obtained by copying of the element that has been deleted will disappear.
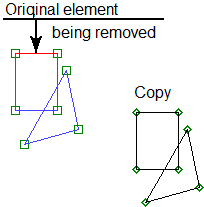
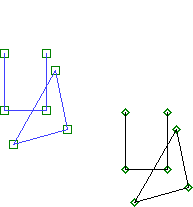
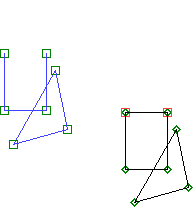
When the “Delete only selected elements by changing the way of specifying the dependent elements” option is selected, the element that is being removed is also excluded from the original set of the copy/array. But, in addition, instead of copies that have been disappeared, identical externally free objects are created. This means that the result of copying visually does not change.
Copying between pages with different scales
The dialog of parameters of the already created 2D copy (by translation, rotation, scaling – except symmetry) contains two additional flags: “Correction for a scale of model” and “Compensate scales of pages”. These flags are taken into account when copying between pages is performed. The “Correction for a scale of model” flag is available only for translations created automatically upon construction of taken out elements. |
|
Description of this flag can be found in the “Drawing views. Taken out elements” chapter.
The “Compensate scales of pages” flag allows us to achieve the correct ratio between the dimensions of the elements on the original page and the resulting page of copying when the scales of these pages are different. When this flag is enabled, to obtain the scale of the copy, the scales of both pages are taken into consideration:
Resulting scale of the copy |
= |
Given scale of the copy* Scale of target page of copying |
Scale of original page of copying |
By default, this flag is enabled.
Particulars of handling variable arrays
When modifying the number of copies in a linear or circular array, adding or deleting copies occurs in the position immediately before the last copy in the array. This feature helps, for instance, keeping the dimensions between the outer elements of the array throughout modifications to the number of copies in the array. The dimensions set on "inner" copies of the array may disappear as the total number of copies is reduced. The same is true for any 2D constructions: the elements attached to the outer copies of an array will always maintain the correct position, regardless of the changes to the array.

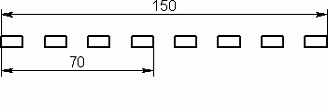
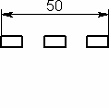
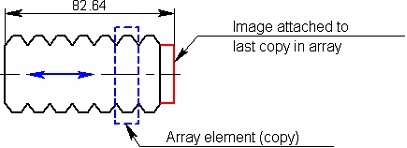
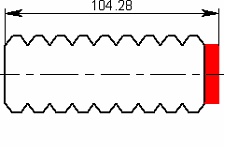
When creating a hatch based on an array elements, hold on to the following technique: before creating the hatch, set the maximum necessary number of copies in the array. The hatch should be defined using the automatic contour search mode. In this case, the hatch will behave correctly in the future and will not "break" under any modifications to the number of copies in the array (within the initially defined range).
In the three-dimensional modeling mode, a 2D array placed on a workplane can be used for creating a 3D profile. The profile can be created based either on the graphic lines directly, or on the hatch constructed by those graphic lines. When using an array with a variable number of elements, use of an intermediate hatch (based on the lines of the array) for the profile creation makes sense only in the case when you know the maximum number of copies in the array. In all other cases, the 3D profile should be created based on the graphic lines of the array. In the course of future construction, keep in mind that indexing of geometrical items within the resulting 3D element (such as edges, vertices, etc.) will be changing, as you modify the number of copies in the array that defines this 3D element.