New Capabilities of T-FLEX CAD Version 15


New Capabilities of T-FLEX CAD Version 15 |
  
|
T-FLEX CAD new release delivers a robust package of impactful additions to improve design efficiency and get your work done faster and easier than ever before. Many of the innovations came in response to customers’ requests.
Main focus has been given to:
●Usability and new intuitive user interface
●Optimized window management for operating with parts and assemblies
●Overall system performance and significant acceleration of projections
●Advanced tools for editing elements of drawings and 3D models
●Assembly design with the new mechanism of unloading modified parts
●3D Model Tree and Library Explorer
●3D modeling functionality with the help of new commands and options
New Face of the Program
System’s interface has undergone profound rework. The program has become more efficient, comfortable and intuitive.
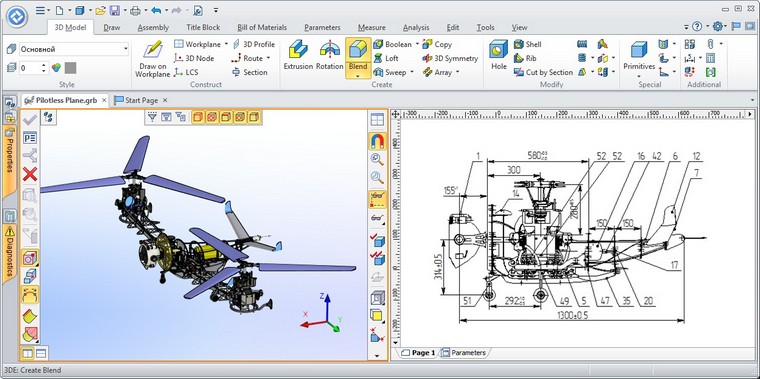
Ribbon
Commands and operations are now easy to find visually. They are distributed by tabs and groups on the Ribbon, enabling extremely fast navigation. Both beginner and experienced user can navigate in the tabs and find required commands without problems. A significant advantage of the new interface is that most of the commands and operations can be activated with just one click.
Ribbon adapts to the current mode. For example, when switching between 2D and 3D views, tabs are also switching between “Draw” tab and “3D Model” tab, so that the required operation or parameter is always close at hand.
Ribbon remembers the tab where the last selected command was located. If you choose a command from the "Measure" tab in 3D view, and then continue working in 2D view, the next activation of the 3D view will re-enable the "Measure" tab.
Quick Access Toolbar with main commands for document management (save, undo, etc.) is located in the header. These commands are always available and do not depend on the active tab. Document Parameters ![]() command, as well as some other often used commands, are also located there.
command, as well as some other often used commands, are also located there.

«File» button ![]() is similar to the command File in the text menu and has the same functionality.
is similar to the command File in the text menu and has the same functionality.
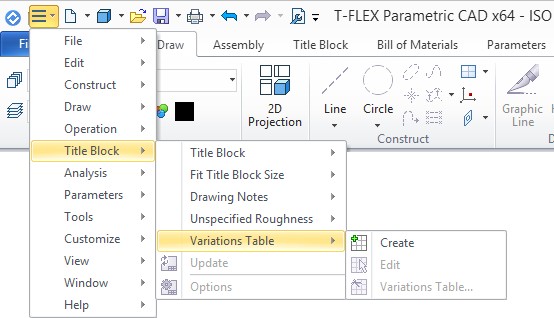
Text menu, which contains a full set of commands, can be accessed by clicking the ![]() button.
button.
In the upper right corner you may find: field for displaying integration with T-FLEX DOCs ![]() , drop-down menu of help information
, drop-down menu of help information ![]() , drop-down menu of system settings
, drop-down menu of system settings ![]() , command for the start page displaying
, command for the start page displaying ![]() , command for the full screen mode activation
, command for the full screen mode activation ![]() .
.

It is possible to set up visibility of different ribbon tabs in the drop-down menu ![]() .
.
The dropdown menu of system settings ![]() contains most of commands of the Customize dialog of the classical text menu.
contains most of commands of the Customize dialog of the classical text menu.
You can hide Ribbon by double-clicking on any tab to release workspace. Ribbon appears again in case of any of its tabs selection. It is possible to recover Ribbon by double-clicking again.

Tabs can be switched by means of a mouse wheel if you put the cursor at them and rotate the wheel.

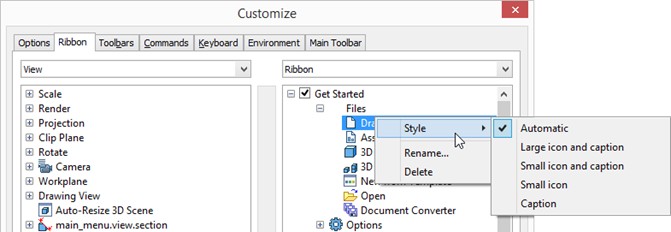
For custom setup it is possible to edit the existing tabs and to create your own tabs with custom set of commands and operations on Ribbon tab of Customize command. You can also change commands icons size for ribbon here.
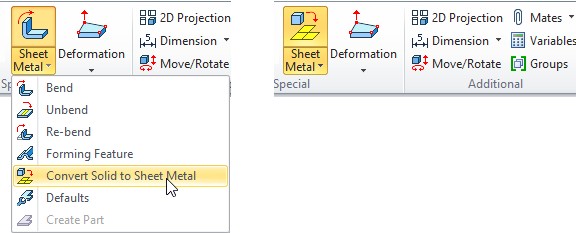
If some same type commands in Ribbon are united in the drop-down list, the last chosen command is remembered and displayed in Ribbon.
 .
.
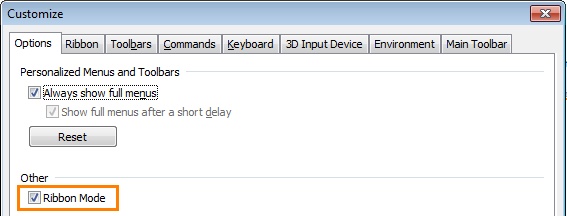
You can always return to the classical interface which was used in previous versions of the system. For this purpose it is necessary to turn off the Ribbon mode in the Customize window on the Options tab.

You may select the interface on the first system start.
![]()
Improving Efficiency of Working with Multiple Windows
The efficiency of working with multiple views is improved. Filters toolbar, View toolbar and automenu now appear at the boundaries of the active window. This innovation allows to get rid of excess cursor movements and freed drawing workspace.
You can change toolbars location using corresponding options in the Document parameters window.
Support for high-resolution monitor is improved.
The active window is now highlighted with an orange frame.
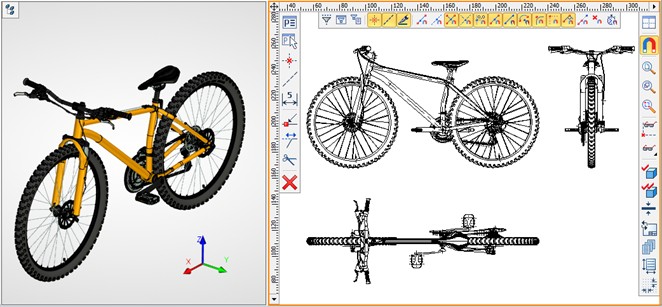
View Toolbar
The content of the View Toolbar depends on the window in which it is open. There are different sets of commands in 2D, 3D and Photorealistic View windows. Moreover, the View toolbar now contains some frequently used commands.
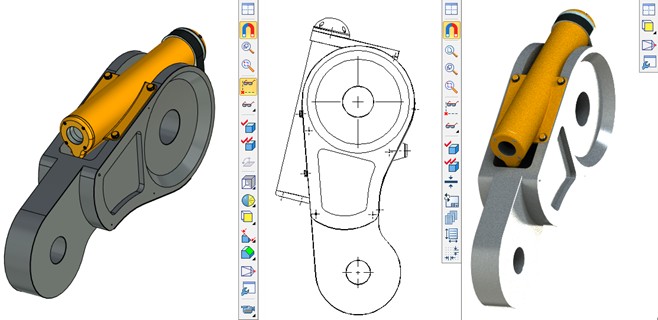
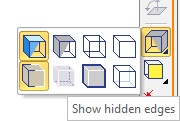
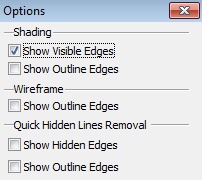
Three new modes of elements display are added to the View toolbar of the 3D window: Show outline edges, Show hidden edges, Show edges. They duplicate the 3D view settings options, providing convenient and quick access to them.
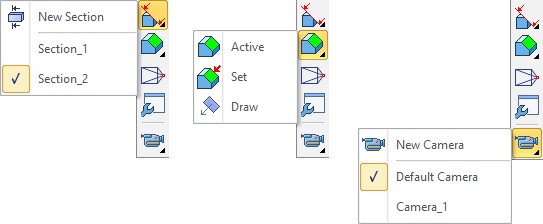
You can select camera, clip plane and section from the drop-down list on the View toolbar.
3D model visualization quality can be changed using the special drop-down list.
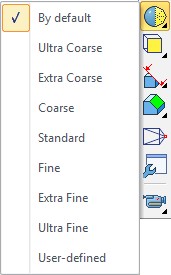
When you a select value from the list it defines quality for all bodies in the scene, if there are no selected bodies. If there are selected bodies, the option changes only their quality.
By Default. Value “from document parameters” will be set for the bodies, values “from the fragment document” will be set for the fragments, etc.
If the selected bodies or all bodies in the scene have the same quality, the quality will be marked with the flag in the list. If their quality is different, there will be no flag.
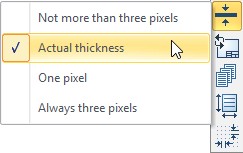
Lines width can be set on the View toolbar of the 2D view.
Dynamic Toolbar on Element Selection
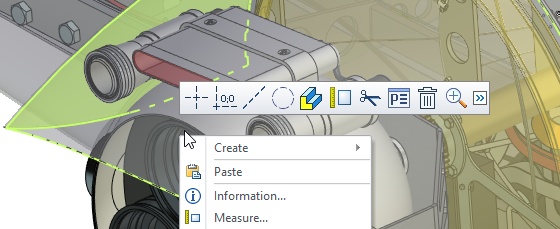
Now when you call the context menu by clicking the right mouse button at some element, a dynamic toolbar appears. This toolbar contains frequently used commands and in contents depends on the type of the selected element.
Large Icons
Additional set of large icons was added for working at high resolution monitors. You can select this set in the Customize command.

3D Model Tree
Functionality of 3D Model window was expanded. New features simplify operations with models and reduce frequency of context menu usage.
Now model tree can be also displayed directly in the 3D scene that is convenient in situations when the 3D Model window is not visible. The model tree can be displayed with ![]() icon in the upper left corner of the 3D scene and can be hidden at any time.
icon in the upper left corner of the 3D scene and can be hidden at any time.
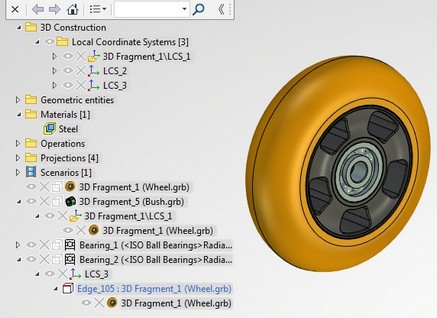
When working with 3D model the model tree automatically reveals in the 3D scene if 3D Model service window located in the left pane becomes at some moment unavailable. Such situations occur, for example, when you enter modeling commands and system overlaps model tree window with properties dialog. If you don’t need such functionality with automatic model tree appearance in 3D window use ![]() button, and system will remember this status.
button, and system will remember this status.
Model tree in 3D scene has the toolbar, which can be hidden by clicking on a special button.
![]()
The tree area can be expanded horizontally. For this purpose, it is necessary to place the cursor on the right edge of the toolbar and move it with the pressed mouse button.

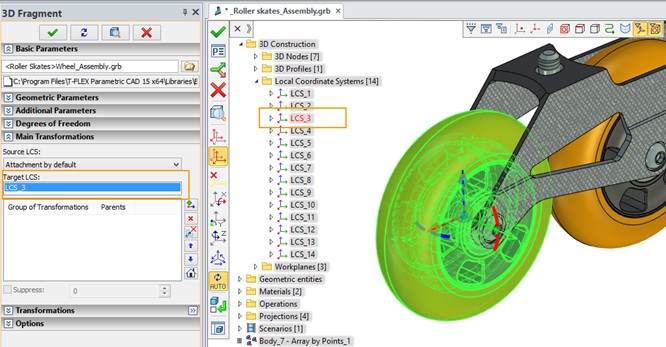
Due to the model tree in 3D scene both the parameters dialog of the current operation and the model tree can be available at the same time. This helps to avoid switching between windows if selection of particular object in model tree is required for the operation.
For example, in case of fragment insertion it is possible to select the coordinate system for its fixing directly from the model tree.
Analogous toolbar was added also to the model tree in 3D model window. This toolbar includes: options for window status switching, drop-down list of columns and search bar.
![]()
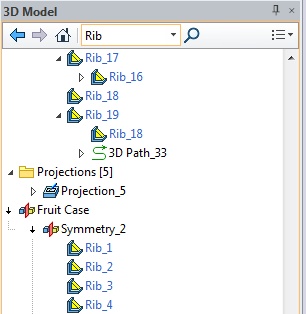
Search bar allows you to find elements in the model tree by name or part of the name. After search completion, only elements with the appropriate names are displayed in the tree.
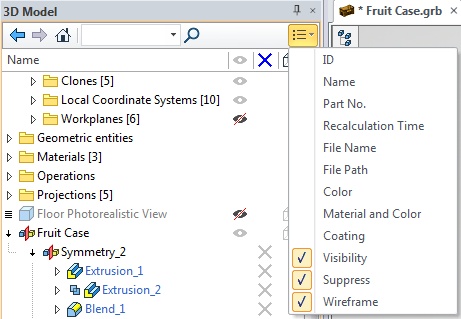
New possibility to display some element parameters in the special columns of 3D Model window was added. The columns allow you to change those elements parameters and have quick access to certain information about elements without usage of editing commands or context menu. You can also change settings for multiple selected items.
For example, if you want to hide several workplanes, you do not need to use context menu of each workplane anymore. You can simply select all desired workplanes in the model tree and click on the ![]() icon in the "Visibility" column.
icon in the "Visibility" column.

If element parameter can’t be changed, the icon does not appear in the column. You can customize set of columns to display in the model tree window using drop-down list. Items of 3D model tree can be sorted by clicking appropriate column heading.
New commands were added to the context menu of the model tree: Go to elements, Open in new window, Hide Element.
Only selected elements will be displayed in the tree after using Go to elements command. Buttons ![]() ,
, ![]() ,
, ![]() are used to switch between display modes and return to the original mode.
are used to switch between display modes and return to the original mode.
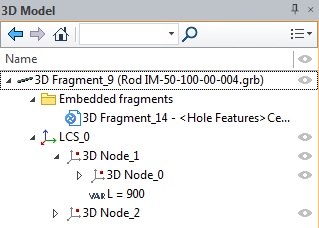
You can create a separate window for selected elements using Open in new window command. This window can be moved around the screen. It retains all functionality of the 3D Model window. This window helps to reduce cursor movement across the screen when selecting elements in the model tree.
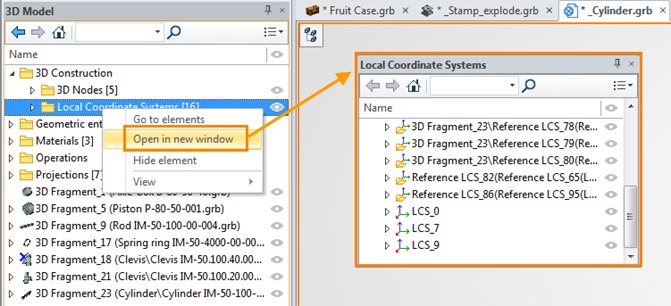
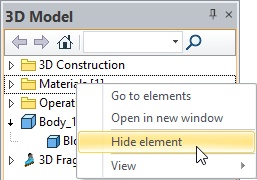
After using Hide element option, the selected elements will not be displayed in the model tree. For example, you can hide unused items, so they do not interfere with the work on the necessary elements.
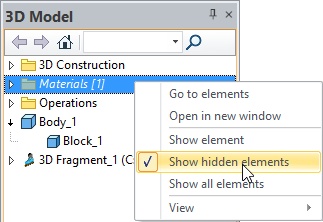
If flag Show hidden elements is active, all hidden elements are displayed but greyed. The element names are shown with italic font to differ them from the suppressed elements.
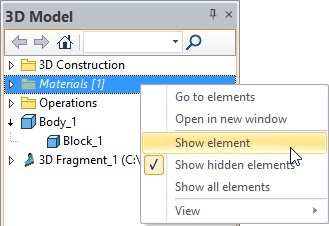
Apply the Show element option to show the element again.
To show all hidden elements use Show all elements option.
The commands for the model tree appearance such as Parameters and Appearance were moved to a separate command View in the context menu.

Library Explorer Window
Library Explorer window was redesigned. Now it is automatically updated if document files included into library were deleted, added or renamed. Thus, files added to the folder in Windows Explorer are displayed in the Library Explorer window. You can delete folders associated with libraries directly from the Library Explorer using Delete from hard disc option.
The ability to share files between Library Explorer window and Windows folders using cut, copy, paste and Drag’n’drop commands was added.
Now it is possible to transferring files from the Windows folder to Library Explorer using Drag’n’drop.
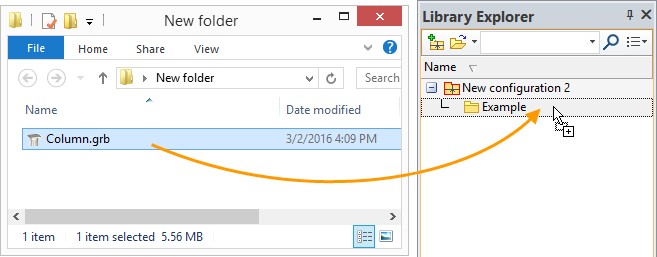
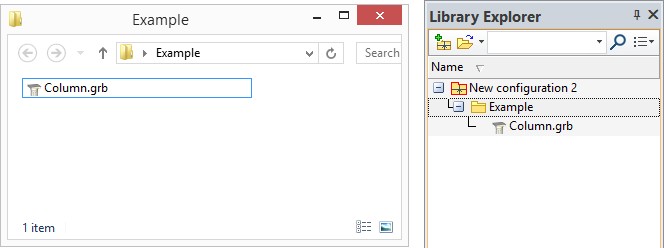
Drop-down list of all installed library configurations appears after pressing down arrow next to Open Configuration command icon ![]() . It is helpful for opening and closing existing library configurations.
. It is helpful for opening and closing existing library configurations.

When you start search, all documents, which names satisfy the search request are shown in the Library Explorer.
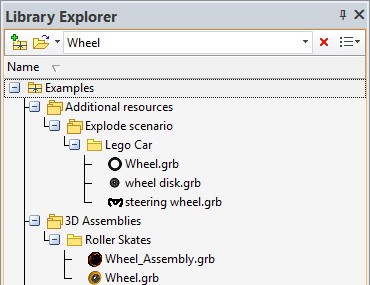
Columns with information about files are added. The information can be edited. Records can be sorted by columns.

Visibility column allows to hide configurations, libraries and files in the window. You need to click icon ![]() next to the element for this purpose. You may control visibility of hidden elements by clicking icon in the column header.
next to the element for this purpose. You may control visibility of hidden elements by clicking icon in the column header.

Preview of libraries and groups of libraries was added.
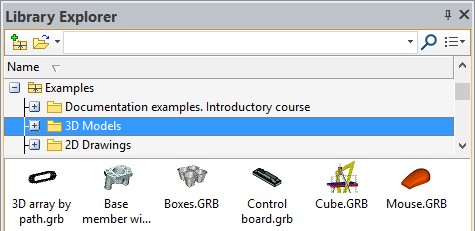
The Open Folder command was added to the context menu. Windows folder with the selected configuration, library or document will be opened after its activation.

New configuration of libraries is not saved upon creation. It is saved only on request with the corresponding command or at application exit.
Model Elements Window
New window Model Elements was added to display all elements of the document.
Both 2D and 3D elements are displayed in this window. Context menu with the corresponding set of commands is available for each element.
When you select elements from the list, they are highlighted on the drawing and in the 3D scene.
This window is particularly useful when working with drawings. It provides information on each element of the drawing on the current page or all pages of the document.
The drop-down list is used to configure the display of elements in the window.
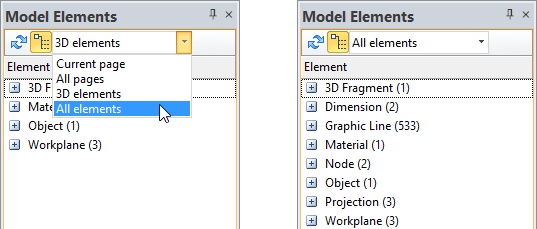
Option ![]() helps to enable or disable grouping of elements by type. To update the content of the window option
helps to enable or disable grouping of elements by type. To update the content of the window option ![]() is used.
is used.
In the right corner of the window you can select the column, which will display information about the elements.
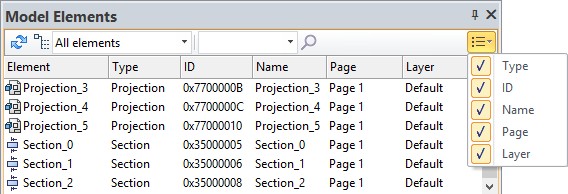
In the window, you can select elements to be used in the current operation, for example, select graphic lines for the Copy operation.
Links Window
The window displays all links to external files, which are used in the current document, and allows you to manage them. In particular, it shows fragment files that are inserted into an assembly, database files and material textures.
This window replaces the functionality of Links dialog existed in previous versions and also it includes some new features. New window provides a complete set of commands and additional tools for comfortable management of links.
The context menu allows you to perform some operations on links: open external files, change the link type from internal to external, change links to the file location, etc.
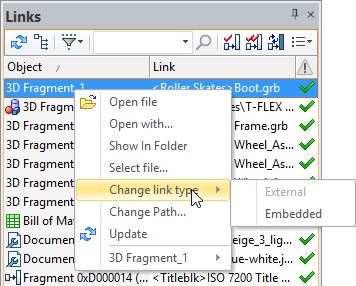
For example, if the file name was changed and the file disappeared from the assembly, you can select the renamed file using Select file command and it will appear in the assembly again.
You can rename files or move them to another Windows folder using Links window. Links with the current assembly will be retained.
Links and elements search can be performed with the help of the search bar.
![]()
You can customize display of object types, external and internal links in the window using ![]() filter.
filter.
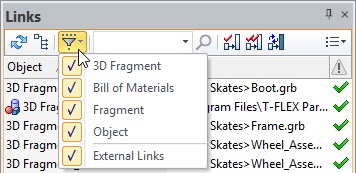
Columns are used to receive information about files included into the document. The columns may be selected from the drop-down list.
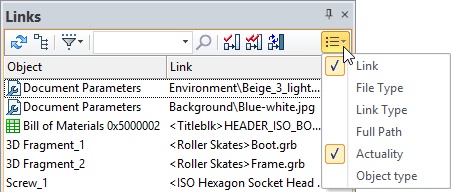
Column "Actuality" is worth mentioning separately:
![]() icon indicates that the link is actual.
icon indicates that the link is actual.
![]() icon indicates that a file on a given link is not found.
icon indicates that a file on a given link is not found.
![]() icon indicates that the changes from the link have not been put in the document and it needs to be updated.
icon indicates that the changes from the link have not been put in the document and it needs to be updated.
Additional columns appear in the window if integration with T-FLEX DOCs is enabled. These columns are used for team development.
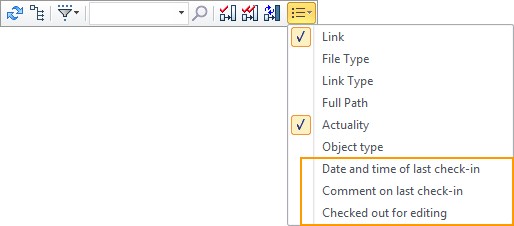
When Group by link option is enabled ![]() , objects related with one link are united.
, objects related with one link are united.

System Options and Document Parameters Dialogs
Dialog boxes of Options and Document Parameters (former Status) were redesigned. Now all former tabs of these dialogues are located in the left part in the window as a list. When you select parameter or option, the description field appears in the lower part of the window.
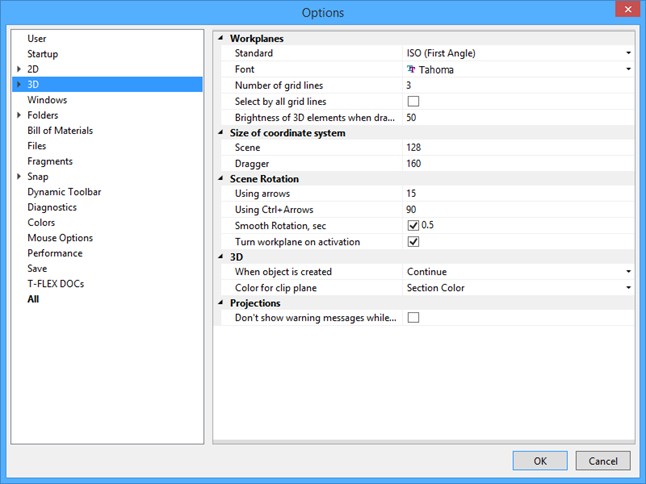
Configuration of some tabs was changed comparing to the previous version for simplify search of the necessary parameter or option.
"All" tab was added. It includes all available settings. Important feature of this tab are sorting buttons and search bar. Now you can to enter parameter name or its part to find it in the list.

In the Document Parameters window it is possible to manage parameters related to the whole document or to its particualar pages. For these purposes tabs Page and Document are used.
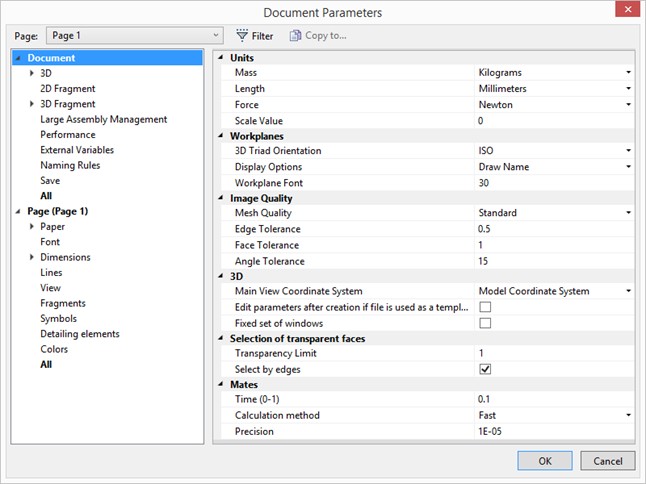
Page can be chosen from the drop-down list located on top of the window. It is possible to display certain type of pages in this drop-down list using Filter:

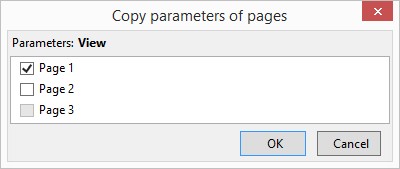
In addition, by means of [Copy to…] button it is possible to transfer parameters of one page to another. It is possible to copy all page parameters at once or parameters from the chosen tabs.
It is possible to select several pages for copying. This feature allows to quickly apply changes in parameters to several pages at the same time simplifying multipage document management.
Working with Multiple Monitors
Now you can open more than one main window for one document. The main purpose of this feature is to display the same document on multiple monitors.
For example, if your computer is connected to two monitors, you can display application window with 3D model on one of them and another application window with the drawing stored in the same document on another. Changes in the document are displayed simultaneously in all main application windows associated with the document.
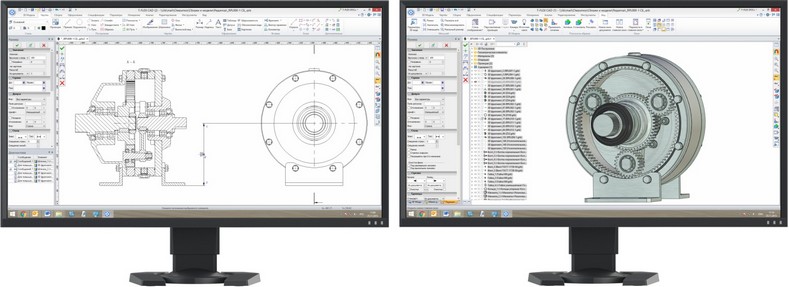
Despite the fact that work is proceeding on the same document, main application windows are independent of each other. Each of the windows has menus and ribbons with commands, dialogs for inputting parameters, and other user interface elements. Sets of documents opened in various main application windows may differ. It is possible to transfer documents from one main window to another. When you close a document in one of the main application windows system will ask you about saving the modified document only when you close the last main application window with this document.
Non-modal Parameters window always appears in active main window. Other non-modal windows, such as 3D Model, Library Explorer, etc. exist in single instance only in one of the main windows.
3D model in 3D scene is available for each main window.
Upon calling modal dialog box, such as Variables Editor, in one of the main windows, all other main windows become unavailable until its closing.
When creating a new main window, you can specify the Views placement for it.
Main application windows are numbered. Number of the window is displayed in its title in parentheses. It helps to choose the window if you want to transfer document from one main window to another.
![]()
To activate the multiple main windows mode, use Open new main window command, located on the View tab.

There you may also find command for transferring document window from one main application window to another as well as command for opening new document window with the possibility to assign main application window.
Document Tabs
Several changes were made in document tabs.
New document name now depends on the prototype name. For example, when you create a drawing based on the prototype "ISO Drawing", the document will automatically be given the name "ISO Drawing 1" in accordance with the name of the prototype. This allows you to specify the naming of new documents.
![]()
Unsaved documents are now marked with "*". Use it to monitor document modifications and avoid data loss. After you save the document the symbol disappears.
Some additional options are added to the context menu of tabs: Fixed width, New main window and Move to main window.
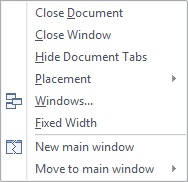
If option Fixed width is turned on, the width of the tabs becomes equal, simplifying the visual perception.
![]()
New main window option allows you to create a new window and copy the selected tab. To move a tab to a different window use option Move to main window. The window can be selected in the drop-down list.
There is a new possibility to close the document. Now it can be done by clicking on its tab with the mouse wheel.
3D Rulers
Linear parameters in different 3D commands are now displayed and can be set in the 3D scene by means of 3D rulers; angle parameters - by means of protractors. 3D Rulers and protractors allow to set value precisely without use of the keyboard and excess cursor movements.
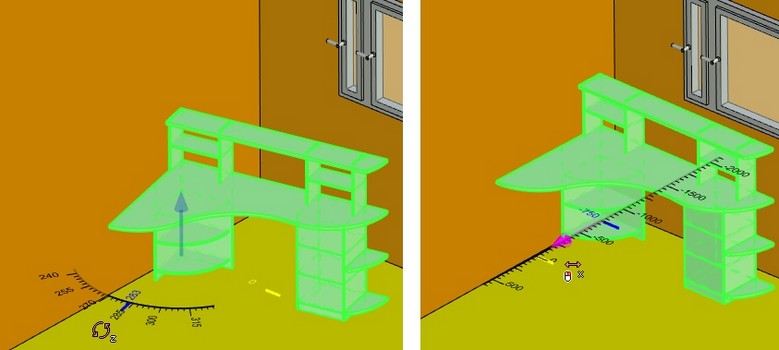
Rulers and protractors are displayed both in case of creation of operations and when editing during relocation of objects.
Color of 3D rulers and protractors can be set in the Options dialog.

Information Messages
System messages now are displayed at the top of the application window and do not block system operation.
![]()
Improved Performance
Inner processes of the system have been optimized to improve its performance. It applies to the processes of 3D models recalculation, working with large assemblies and drawings.
System uses the latest version of Parasolid geometric kernel, which also affects the acceleration of work and improves accuracy of modeling.
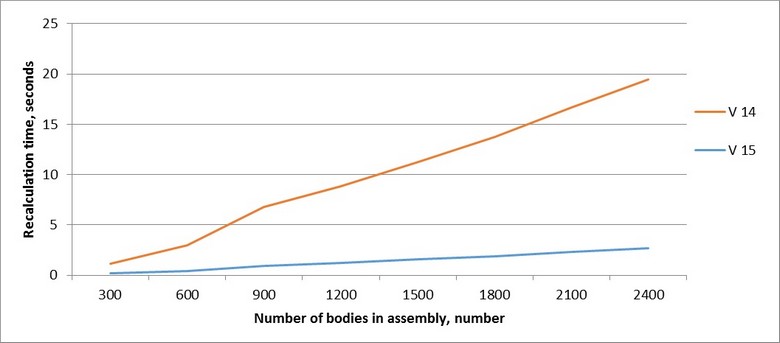
Speed of recalculation time for some 3D operations was increased by more than 30%. Large assemblies now are opening much faster.
Program launch takes less time.
Activation of drawing on workplane mode is about twice faster than in release 14.
Support for multi-core processors was improved, more operations now are multithreaded and various types of models got significant improvement in regeneration speed.
Compared with the previous version, projections, including broken views, sections, local section views were also considerably accelerated. Significant performance boost can be seen in recalculation of non-unique bodies’ projections.
Comparison of projections recalculation speed in T-FLEX CAD 15 and T-FLEX CAD 14 is shown below.
The graph shows dependence of projections recalculation time to the number of bodies in the assembly:
New and Improved Modeling Functionality
Significant improvements of intuitiveness, clarity and expansion of features have been made in several 3D modeling commands.
Primitives
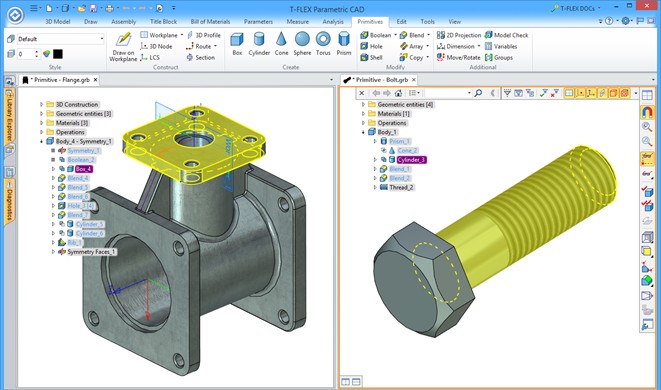
New commands, united in the Primitive group, can greatly simplify creation of basic geometric bodies.
The drop-down menu Primitive contains the following commands: Box, Cylinder, Cone, Sphere, Torus, Prism, Pyramid.

A dragger and a set of manipulators are available for each body. They can determine the position of the body in the scene and change the basic sizes.
The primitives made creation of certain types of models easier and more convenient. Now you may use just one command instead of a profile creation and its extrusion.
Symmetry ![]() option exists for all commands from Primitive group, except Pyramid command. A single body that consists of two symmetric parts is created after its activation. Additional operations are not performed in this case. Source coordinate system of the primitive is moved to the center of the body. The option is active for Sphere and Torus by default.
option exists for all commands from Primitive group, except Pyramid command. A single body that consists of two symmetric parts is created after its activation. Additional operations are not performed in this case. Source coordinate system of the primitive is moved to the center of the body. The option is active for Sphere and Torus by default.

A ![]() Sheet body option is available for all commands from Primitive group. Bases of the bodies are removed and side faces are left.
Sheet body option is available for all commands from Primitive group. Bases of the bodies are removed and side faces are left.

Possibility to create thin wall element is available for Box, Sphere, Cylinder and Torus.

Thin wall element parameters can be set in Parameters window.
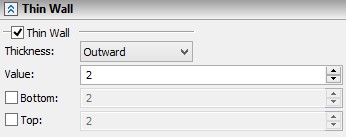
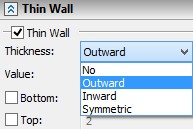
Bottom and top of thin wall element can be set for Box and Cylinder primitives.
There is possibility to link primitives’ dimensions to the existing geometry.
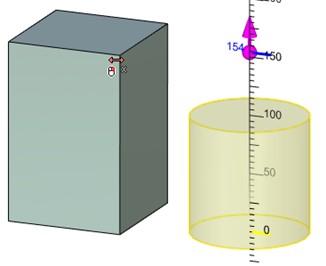
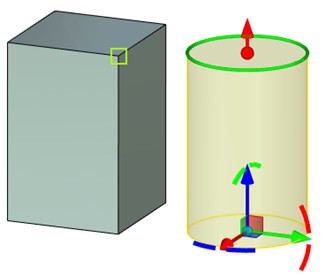
A primitive will transform according to the changes in the linked body.
You can break a link using special option. The option appears near the linked parameter.

You cannot create a link if a source coordinate system of the primitive has been changed. Warning appears in this case.
Sheet Metal
Bend
Hem
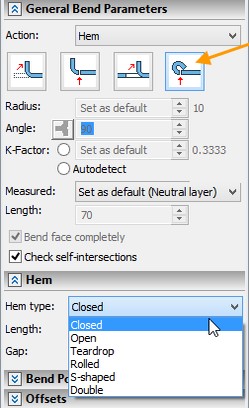
New possibility to create hems was added in Bend operation. For this purpose select the appropriate operation in bend parameters dialog. There are six hem types: closed, open, teardrop, rolled,
S-shaped, double.
|
Rolled |
Open |
Teardrop |
S- shaped |
Double |
Add Edges
Add Edges ![]() option was added to Attach Flange and Hem operations. The option allows to select several consequent edges for the operation. The next selected edge should belong to the same face and to adjoin previously selected edge.
option was added to Attach Flange and Hem operations. The option allows to select several consequent edges for the operation. The next selected edge should belong to the same face and to adjoin previously selected edge.
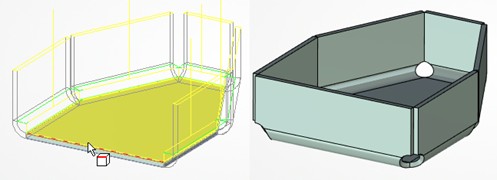
Gaps section appears in the Parameters window if you select more than one edge. There you can set Gap Type and Rip Gap.

Contour Flange Creation
New feature to create contour flanges with the help of Attach flange operation was added. In this case, the contour flange is the sheet metal operation, which shape is specified by a guide curve. The result of this operation is attached to the edges of the base sheet body, forming a single model.
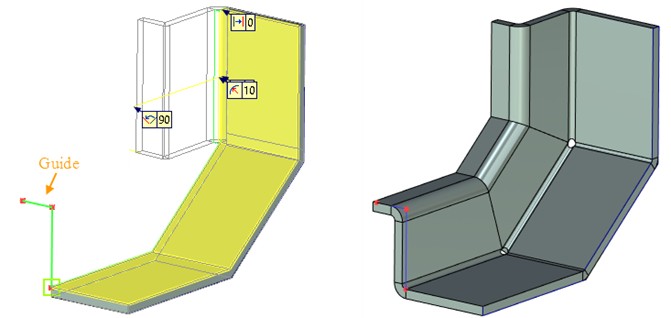
You need to select a profile or a path as a flange guide to determine the flange geometry. Flange guide cannot be closed. All points should locate in one plane. The flange guide can be set by straight lines or circular arcs.
It is necessary to select a rib to which the contour flange will be attached and a flange guide. After that you need to select adjacent point and profile direction. If the guide is already adjacent to the rib, the contour flange is created immediately after guide curve selection.
Flanges can form a closed contour. You can specify bend relief and gaps for the flange junctions.
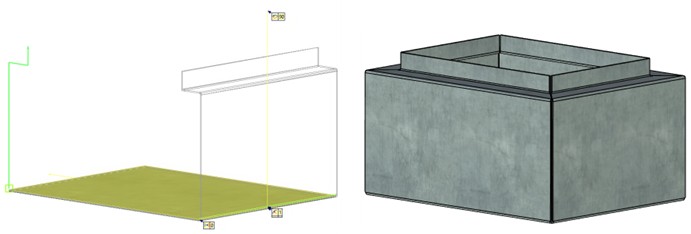
Lofted Bend
New operation Lofted Bend was added. It allows to model complex sheet metal bodies based on two profiles.
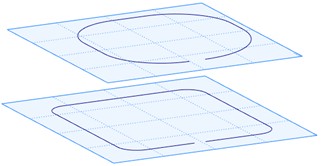
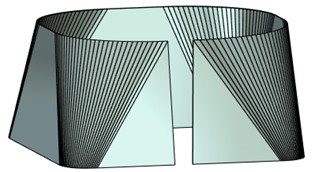
To create a new sheet body using this operation you need to select two non-closed profiles, arranged on two parallel planes. Profiles can consist of sequence of arcs and straight lines.
You can configure the number of folds, which are created in the segments formed by two arcs or straight lines.
The body produced as a result of this operation unbent with SMU: Unbend command.
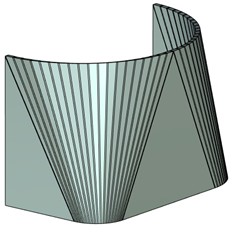
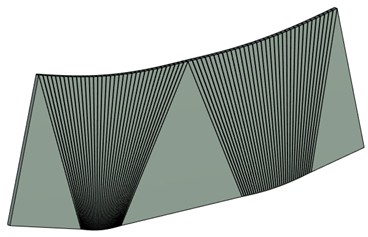
You can create sheet metal bodies from two closed contours.
For each of them you need to select starting point and direction for bends creation using corresponding options.

When you use Faceted approximation option, a surface body is created. The body can be converted into a sheet metal body.
Unbend
Possibility to unbend/re-bend non-closed conical faces of sheet bodies was added.
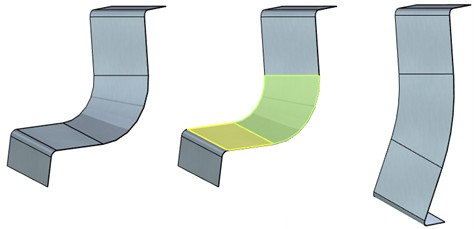
Select node to define split surface ![]() option was added. It allows to unbend closed faces of cylindrical sheet bodies, truncated conical sheet bodies and arbitrary unfolding surfaces. For this purpose you need to select point and unbending direction of the selected face. Flattened faces can be re-bent using the Re-bend operation.
option was added. It allows to unbend closed faces of cylindrical sheet bodies, truncated conical sheet bodies and arbitrary unfolding surfaces. For this purpose you need to select point and unbending direction of the selected face. Flattened faces can be re-bent using the Re-bend operation.


Convert Solid to Sheet Body
Relief parameters
Bend isolated relief parameters are added to Convert Solid to Sheet Metal command. Now it is possible to set their depth and width. Furthermore, bend isolated relief is created outside of the bent sheet body now. This change allows to receive more realistic model based on sheet bodies. |
|
|
Bend isolated reliefs can be configured on the special Bend Relief tab of properties dialog of Convert Solid to Sheet Metal operation. Their default settings can be specified in the SMP: Defaults command. |
|
New bend relief type Welding was added. When it is used, the same distance is specified on straight and curved sections at the junctions. |
Thickness Direction
Now you can specify thickness direction for the sheet body. Inside, outside and symmetric modes are available.


Inside |
Symmetric |
Outside |
Bend Table
New Bend Table command was added to the sheet metal operations group.
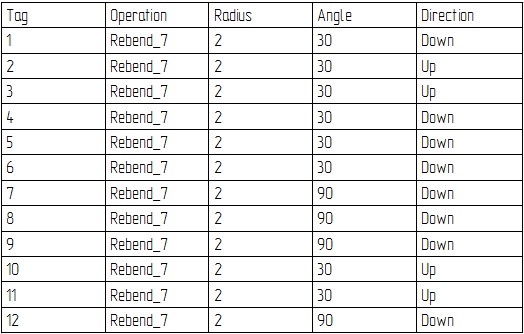
Bend table displays a list of all bends for each of the existing in the scene bodies. General bend parameters are displayed in the corresponding columns. When you select a bend in the list, the bend is highlighted in the scene.
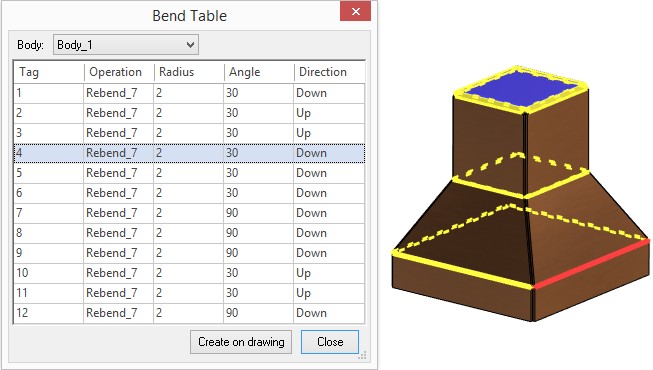
You can create a bend table on the drawing using Create on drawing option.
Sweep
New possibility to use solid body as the source object which is moving along selected trajectory was added in the Sweep operation.
During movement the body rotates around the predetermined axis. The resulting “trace” model left by the swept body can be used in further, for example, in Boolean operation.
Thus, it is possible to simulate trace that leaves a milling cutter when machining.
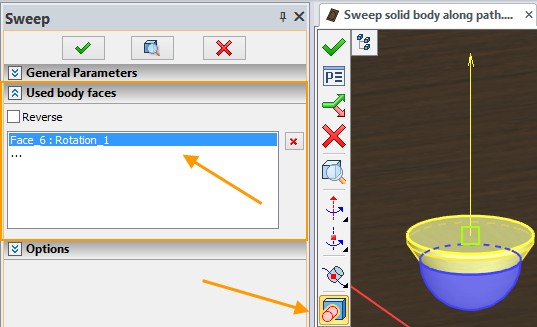
You can select body faces of the forming body using option ![]() Select body faces to reduce computing. Only selected faces will be used for the operation. If Reverse flag is set, the selected faces will not be used for the operation.
Select body faces to reduce computing. Only selected faces will be used for the operation. If Reverse flag is set, the selected faces will not be used for the operation.
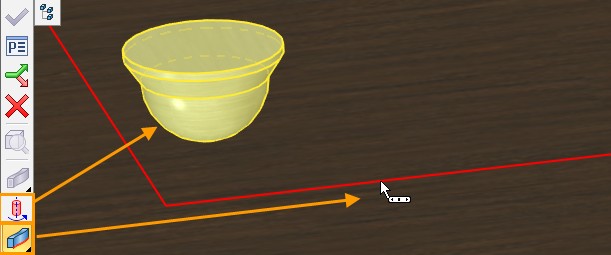
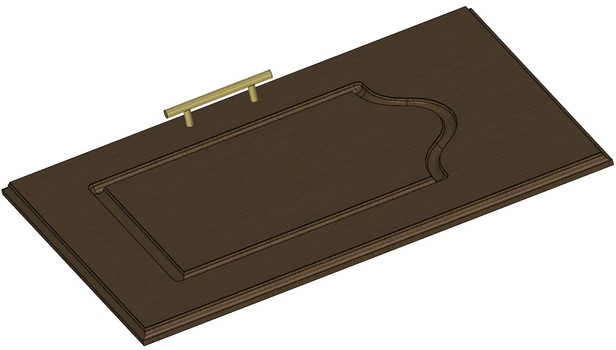
For example, you can model a groove on the door with this operation. For this purpose a trajectory on the treated body and forming body of the desired shape were created:
Trajectory on the treated body: |
|
Forming body: |
|
After command activation, you need to select these elements:
For the forming body you need to define axis of rotation ![]() and fixing point of rotation axis
and fixing point of rotation axis ![]() .
.
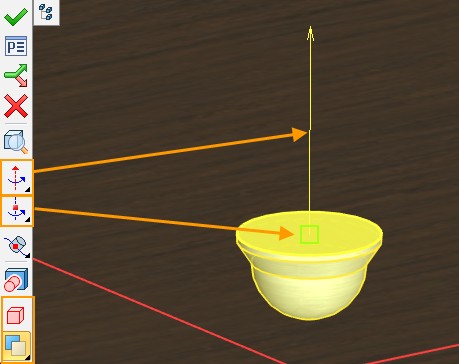
When the forming body is moved along the predetermined trajectory it simultaneously rotates around the defined axis, thereby forming the groove. The Boolean operation of subtraction is applied after that. The result is the following:
Deformations
Common Changes in Deformations Commands
New decorations are used for deformation commands. Special manipulators used for translations and rotations.
Nodes in Skew Deformation and Sculpt Deformation commands are replaced by convenient spheres. Usage of deformation commands became more comfortable and intuitive.
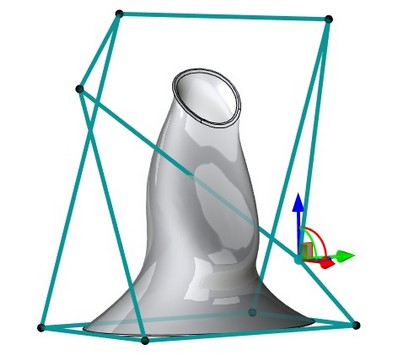
History of transformations is now saved when working with operation. So the right mouse button click does not cancel all model transformations, only the last one. This helps to avoid situations when user might accidentally undo all changes of the body.
New option to set the local coordinate system (LCS) - LCS-based on operation - was added for the deformation operations. In this mode, deformation of the object retains transformations of the parent operation.
If necessary, you can use the old mode - LCS- by global coordinate system.
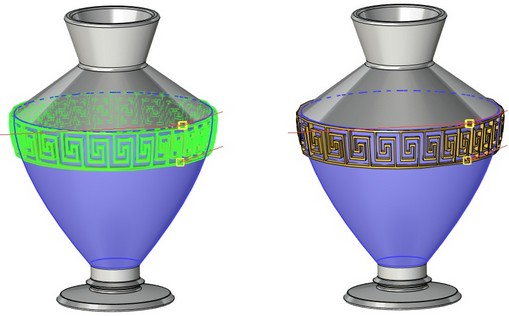
New options Mark body and Live update were added to the Options tab for all deformation commands.
If you disable option Mark body, the body is no longer highlighted in the scene, which simplifies visual perception of the deformed object.
On |
Off |
The Live update option allows to watch deformations of the body in real time. Deactivating the option accelerates recalculation because solid body updating is not required.
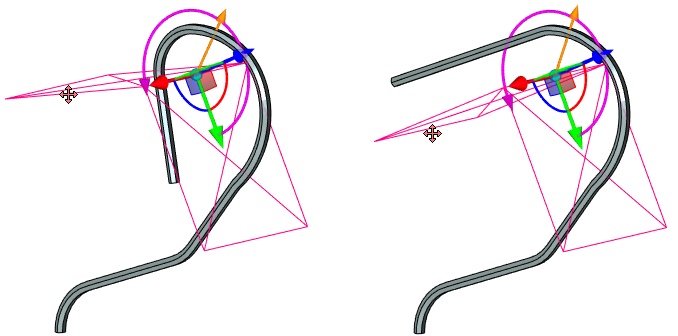
On (the result is displayed) |
Of (the result is not displayed, only decorations update) |
Sculpt Deformation
Several changes have been introduced to improve the usability of Sculpt deformation command:
Mesh nodes are replaced by spheres. When selecting such sphere a special manipulator appears. It moves relative to the global coordinate system.
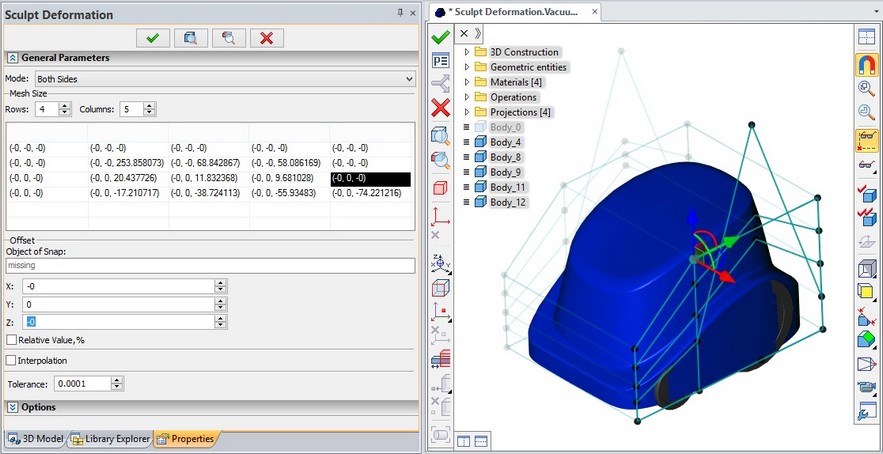
The size of the coordinates table of mesh spheres position now varies with the size of the Properties window. When you point cursor at one of the cells in the table, its number will be shown in the following format: (row number, column number).
In the Interpolation mode, you can add new grid line: hold <Alt> and select one of the existing horizontal or vertical lines in the scene. The deforming principle will not be changed.
Now, when you activate option ![]() semitransparent box appears. Its faces can be moved, thereby changing the area of deformation.
semitransparent box appears. Its faces can be moved, thereby changing the area of deformation.
Upon clicking on line it will be selected.
Selection of multiple spheres or lines can be done with pressed <Ctrl>. You can also select the entire row by using <Shift>.
Scale/Twist Deformation
Changes were also made in Scale/Twist command to simplify its interface.
When you select body for the operation, the system is creating LCS for the deformations automatically. User can change LCS manually, if necessary.
Now it is possible to add new position by clicking the left mouse button on the line that connects centers of two existing positions. Previously it was necessary to create a new position in the properties window and then manually move it to the desired position.
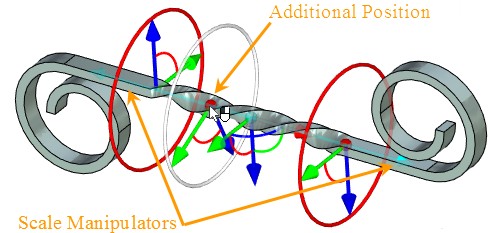
Moving/Scaling along the X-axis is now performed with respect to the origin of the applied coordinate system. Move/scale manipulator is available for both primary ellipses. This is done to ensure the symmetry of the created body.
Local coordinate system manipulator can now be hidden using the appropriate flag in the Options tab.
Imprinting
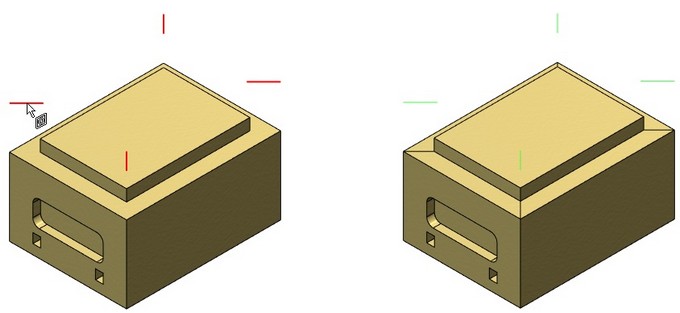
Now it is possible to use multi-solid operations and multi-contour profiles as the imprinting and imprinted elements. This capability eliminates extra steps if you want to imprint faces with several contours or split multi-solid body.
In the example below, face was divided by imprinting multi-contour profile:
Holes
Moving Nodes with Faces
When 3D node is moved to another face of the body by using Recreate command or by other reason, “hole”, which was created on the 3D node, will be moved too. 3D node can be moved within a single body or multibody operation. The functionality supports single 3D nodes and 3D node arrays.
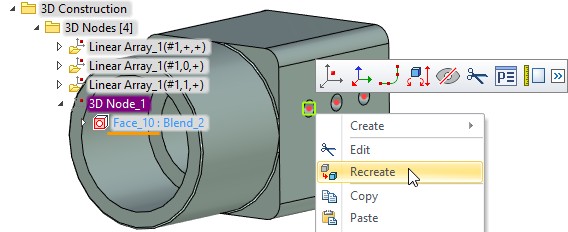
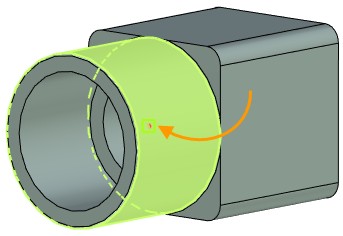
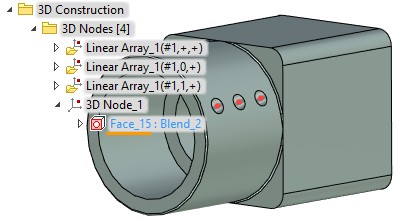
If direction was set for the hole, it will be reset and the hole will be built along the normal to the new face.
If there is a specified face for the hole, the hole will be not recreated and will be located in the same plane, regardless of the 3D node position.
Create Coaxial Holes without Uniting Bodies
You can create coaxial holes in several bodies or fragments and such holes will not be united in one resulting body. Use the Create coaxial holes ![]() option for this purpose.
option for this purpose.

A separate hole will be created for each of the bodies.
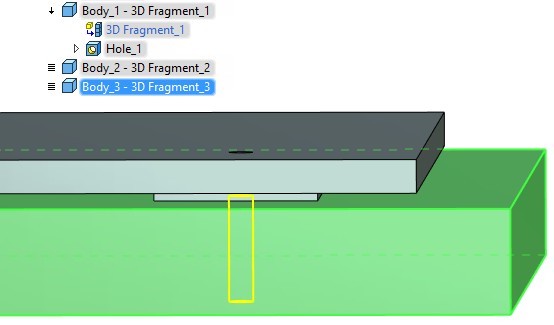
Parameterization is via the common variables. Thus if you specify hole parameters using variables, they will be retained for each of the holes.
3D Profile
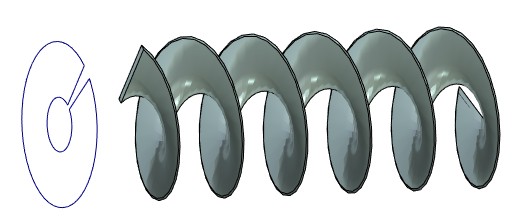
A possibility to create unfolding of helix was added. Use Unfold ruled surface option for this purpose. You need to select unfolded face and node as tangency point of the profile and the source face. Unfolding is created for not more than one helix turn. Helix should be created using Spiral command.
Move/Rotate
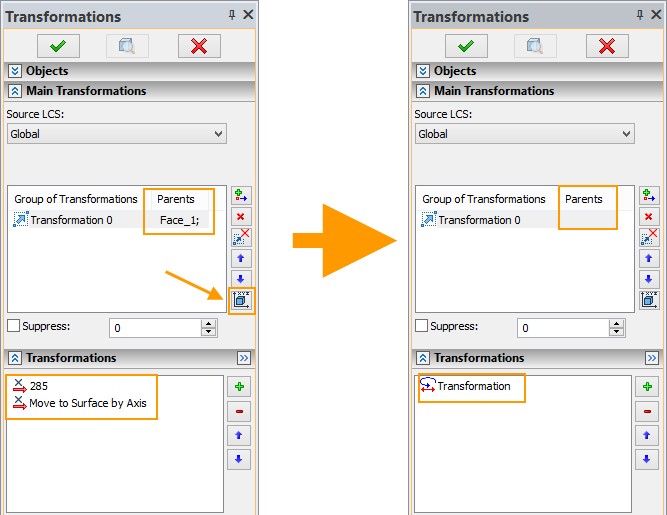
Now it is possible to break associativity between objects in the model. Option Replace with a single non-associative transformation is used for this purpose.
The option is useful if you need to position one object relative to another, and then break associativity between them. After using this option the object will be positioned in absolute coordinates.
Selection of All Faces Created by Operation
Copy, Symmetry and all commands associated with Arrays can now have option for selecting all faces created by another operation.
Now you do not need to select each face created by some operation individually. You may use just one click to select all faces, which saves time.
For example, when creating symmetry of rib operation you can enable option ![]() and select corresponding “Rib” operation in the model tree. Instead of faces, the selection list will contain selected operation thus selecting all its faces.
and select corresponding “Rib” operation in the model tree. Instead of faces, the selection list will contain selected operation thus selecting all its faces.
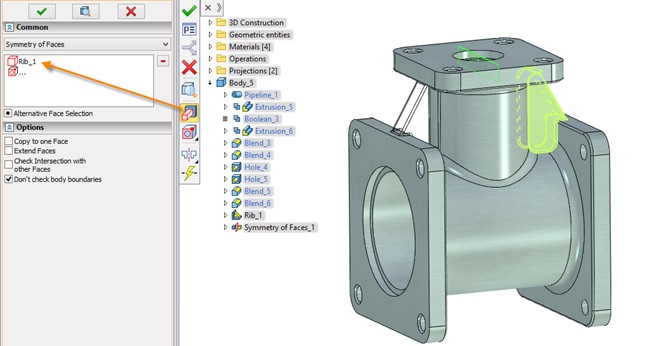
System automatically determines the set of faces that were created in this operation, and use them in the creation of symmetry.
It is also convenient to use this feature to select all faces of holes.
3D Nodes on 3D Picture Meshes
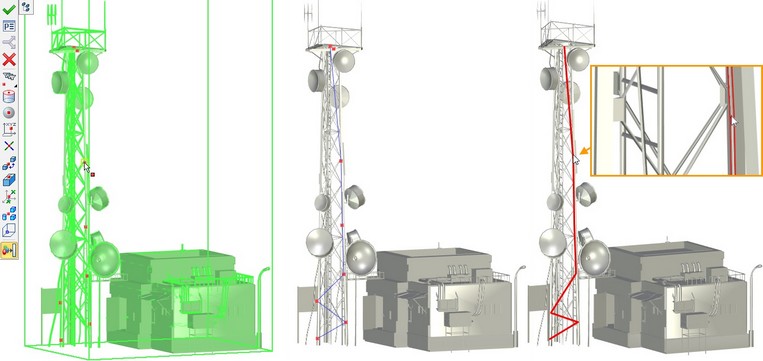
The 3D node command now has option to create a new 3D node on the mesh of a 3D Picture ![]() . 3D node created on the mesh of imported 3D picture can then be used to create or fix other elements of the model. For example, using such 3D node, you can create a local coordinate system that in its turn can be used to fix other bodies and 3D pictures.
. 3D node created on the mesh of imported 3D picture can then be used to create or fix other elements of the model. For example, using such 3D node, you can create a local coordinate system that in its turn can be used to fix other bodies and 3D pictures.
In the following example of 3D nodes on the 3D pictures, 3D nodes created on mesh were used to construct the route; and then the wire cable was created using this route.
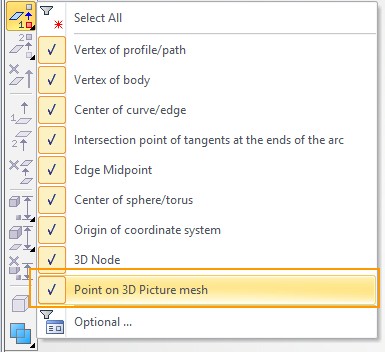
In addition to the direct creation of 3D nodes it is also possible to select points on the mesh of 3D pictures in various modeling commands. For this purpose, use special filter: "Point on 3D Picture Mesh".
For example, in Extrusion command it is possible to use point on mesh when defining direction of extrusion.
Ribs
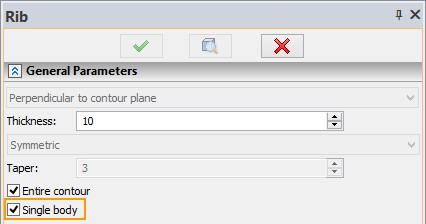
Possibility to create a rib as a separate body was added. You need to set Separate body flag in the Parameters window for this purpose.
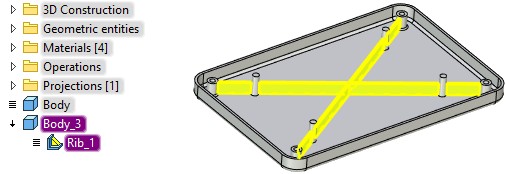
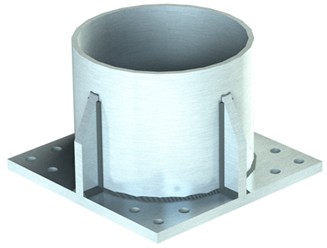
The innovation, in particular, allows you to create welded structures using ribs.
This method may be used for example when modeling welded structure of flange and pipe.
Edge Blend
Edge blend functionality was extended. Special flag can set Continuity in curvature for creating A-class surfaces (G2 surface), which ensure a smooth transition. The curvature of both surfaces selected for the operation is the same at each point of their common border.
Such surfaces are particularly useful in modeling products for which it is important to reduce the resistance to fluids, such as in automotive, aircraft and shipbuilding industries.
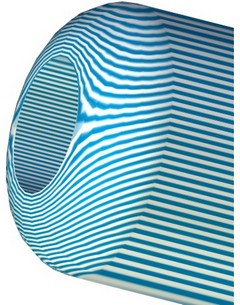
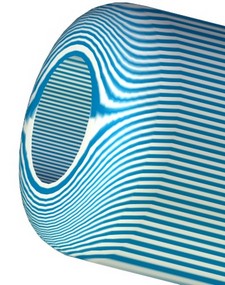
Continuity in curvature off Continuity in curvature on
Workplanes and Worksurfaces
Workplane and Worksurface Parameters
Several new options were added to the workplane parameters.
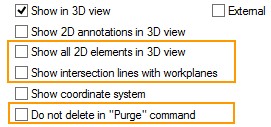
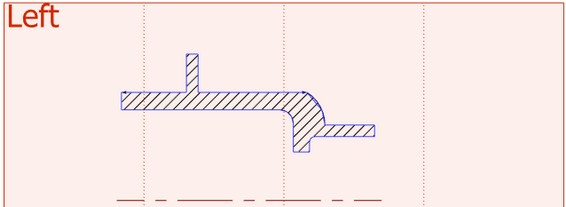
When the flag Show all 2D elements in 3D view is set, all hatches, graphic lines and other elements of 2D drawings will be displayed in 3D scene.
When the flag Show intersection lines with workplanes is set you will be able to see not only workplane boundaries but also line of workplane intersection with the other model workplanes.
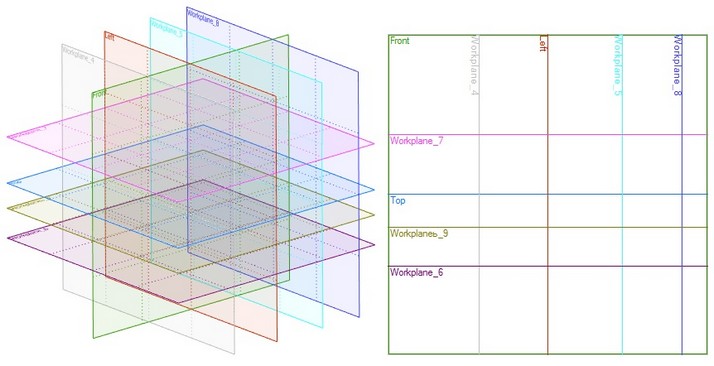
Intersection lines can be further selected to create new construction lines.
Line that shows intersection of the workplanes is drawn with the color of the plane. Under the line you may see the name of the workplane to which it belongs. Intersection line gives access to the parameters of its original workplane via context menu command.
When the flag Do not delete in Purge command is set, the workplane or worksurface will not be deleted, even if it is not used for the operations creation. Option is useful when workplane or worksurface contains sketch, which removal from the document is undesirable.
Automatic Workplane Orientation
When you activate Draw on face command the orientation of the workplane is selected so that it corresponds to optimal direction of view (camera position).

Angle of workplane rotation does not change when you again activate it for drawing on workplane.
New mechanism eliminates the possibility of incorrect rotation, for example, when the face is located in an inverted state or is rotated at the wrong angle.
Cameras and Light Sources
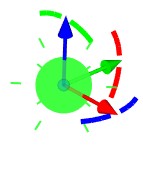
Cameras and light sources now have their own manipulators and no longer require mandatory preliminary creation of local coordinate systems.
With the help of manipulators, cameras and light sources can be positioned anywhere in the 3D scene and quickly moved to the new position if necessary.
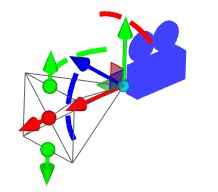
In addition camera preview mode was added for showing the view from camera in real time in the upper right corner of the window.
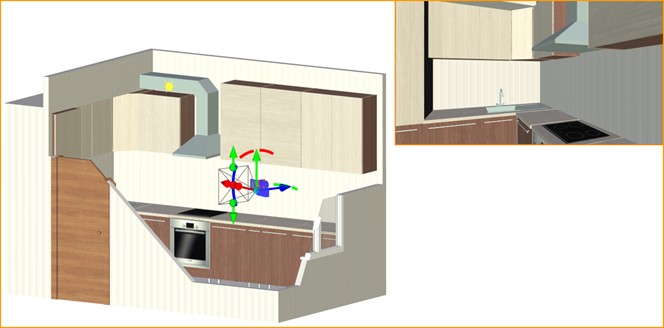
You can set Height-to-width ratio and size of preview window in Parameters window.
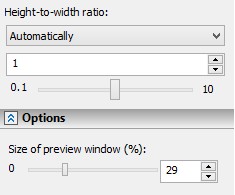
You can create or activate cameras on the View toolbar. Additional options for camera are available on the View toolbar after selecting camera as active.

A separate mechanism for cameras movement was implemented. Active camera mode allows to move inside designed areas, rotate camera and perform operations as usually in T-FLEX CAD.
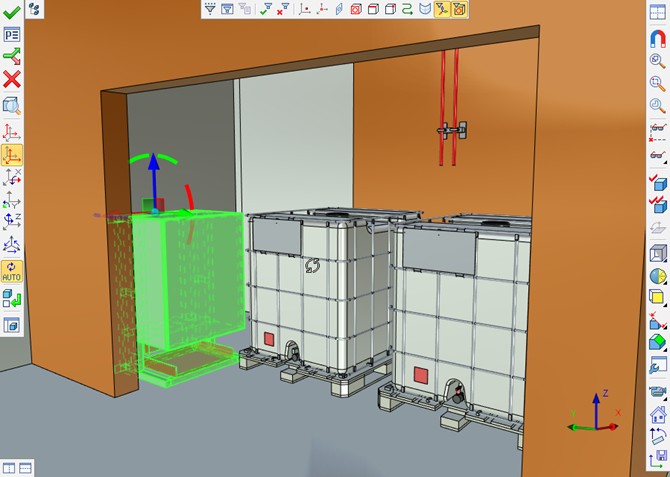
Options available when camera is active:
Option ![]() allows to save current position and perspective of the camera. If you didn’t activate the option after movement/rotation of the camera, the camera will return to the original position after exiting selected camera mode.
allows to save current position and perspective of the camera. If you didn’t activate the option after movement/rotation of the camera, the camera will return to the original position after exiting selected camera mode.
Option ![]() allows to reset vertical orientation of the camera.
allows to reset vertical orientation of the camera.
Option ![]() allows to restore original/last saved position of the camera.
allows to restore original/last saved position of the camera.
Controls in active camera mode:
LMB - camera rotation.
To eliminate rotation around view axis you need to activate Panorama ![]() mode.
mode.
Arrow keys allow to move camera forward/backward.
Page up/Page down keys allow to move camera up/down.
It is recommended to disable object snap ![]() on View toolbar upon movement in selected camera mode.
on View toolbar upon movement in selected camera mode.
LMB + CTRL – movement in the screen plane.
LMB + SHIFT – zoom.
LMB + ALT – rotation around vertical axis.
Pressed mouse wheel + CTRL – mode of smooth move forward/backward. Movement speed changes according to the cursor position.
Mouse wheel rotation – zoom: move the camera forward/backward.
Mouse wheel rotation + CTRL – zoom: perspective angle changed without camera movement.
Long press left mouse button (until the cross symbol appears) – orbital rotation around the selected center.
Special tab in the Document Parameters dialog is used for camera management.

Photorealistic View
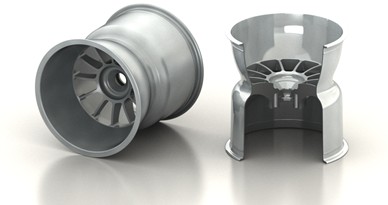
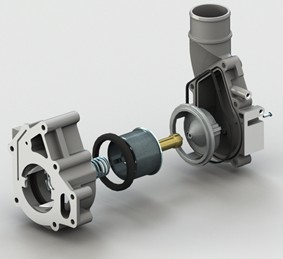
New mechanism based on Embree, ray tracing kernel developed by Intel, was added to already existing mechanisms for photorealistic rendering.
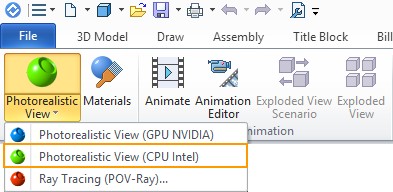
Embree uses CPU for its calculations and provides high performance and image quality.
User interface for the mechanism is similar to NVIDIA OptiX rendering.
New Tools for Modeling Assemblies
When working with assemblies in the top/down mode it is now possible to unload supplemented modified bodies or fragments from it. After being unloaded from an assembly they maintain the current geometry, model tree and variables. This is helpful when designing parts directly in the assembly document and unloading parts together with the history of their creation only at the final stage.
If unloaded fragment, which was added to the assembly and subsequently modified, had model projection drawings, variables and dimensions in the original fragment file, they will be automatically updated to reflect these modifications. Thus, you can receive all files with details ready or almost ready as a set of drawings and documentation.
After unloading, unloaded fragment or original body in the assembly can be replaced with the unloaded part. It is important that after this replacement it is possible to transfer all of its next revisions from the assembly with the help of Update command.
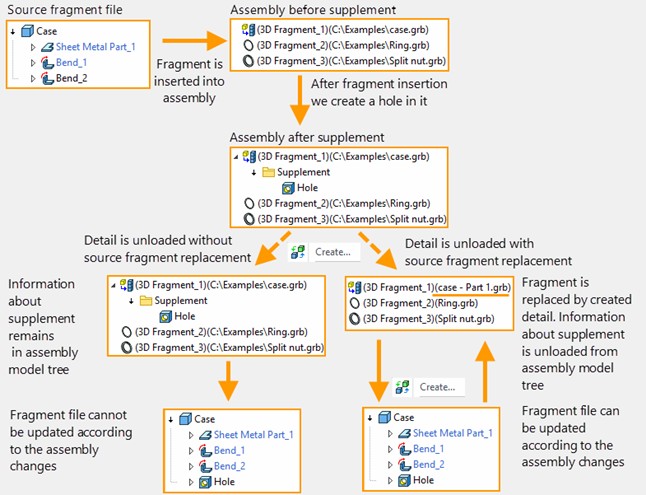
New mechanism Save body as a new detail file that will automatically update when assembly changes is available in Unload command.


This new mechanism was created to replace old mechanisms. It unloads the model with its current geometry to a separate file.
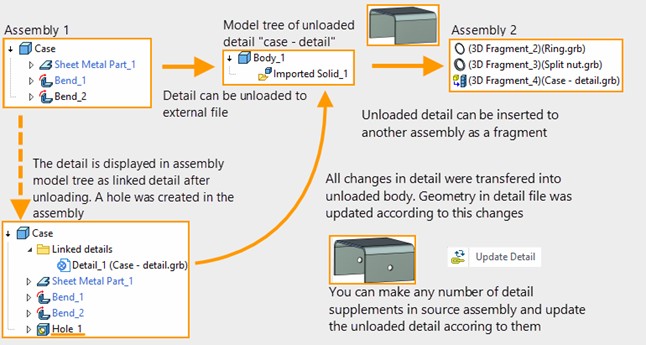
An important feature of this method is ability to transfer all model changes from assembly to detail. Detail can be inserted as a fragment into other assemblies.
The difference between the new mechanism and Create command is that history of detail creation is not unloaded from the Model Tree.
Structural Elements. Targeted Applications
New tool for developers that simplifies solving applied tasks in various designing fields was introduced.
For example, you can solve the following problems using the tool:
●Pipeline design
●Furniture design
●Metal construction
●Addition of user data into geometric model to transfer into external systems.
Structural element is a typed object, which can contain arbitrary user data, references to elements of drawings, 3D models and other structural elements. Structural element describes elements of application area and relations between them.
Information model based on structural elements may describe closed systems and, if necessary, influence results of geometric model recalculation, according to the logic of targeted add-on application.
Special editor is created for managing structural elements.
Hierarchy and description of product structures types is formed based on description of application area in structural elements editor. Description of types includes definition of attributes, relations with other structural elements or model elements geometry and methods that realize operations upon structural elements. Methods should be described in add-on application – DLL file, which logic is established by applied task developer.
Changes in Drafting Functionality
Projections
Moving Projections
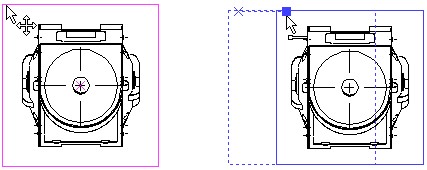
Program now has the possibility to move drawing projections with a single touch. To do this, place the cursor on the projection and move it by holding the left mouse button.
This feature speeds up the work with projections, excluding extra steps for positioning projections on the drawing. Dynamic view of projection being moved, allows you to see the full image after moving the projection. When you move the projection of large drawings system offers option to disable dynamic view not to slow down operations.
Parameters of Assembly Projections Lines
Important change was made in creation of projections. Now you can change image line parameters for particular 3D construction elements, bodies and fragments. To do this, select element in the scene or in the model tree, and then configure its lines.
|
In this regard, the appearance of the Lines tab of the projection parameters dialog box was changed. The upper pane now displays the list of selected items.
In the center there is a list of categories of projection lines. Parameters of lines available for changing are displayed in the lower part and depend on the selected category.
You can select several categories at the same time and set common properties for them. If Line style by default item is selected, the parameters are set for all elements of projection simultaneously. Parameters that were manually set for individual elements will not be changed.
Parameters of the main lines of the projection now can be set along with the rest. |
Parameters can be changed directly in Parameters window, as the corresponding tab was added there.
New Categories of Projection Lines
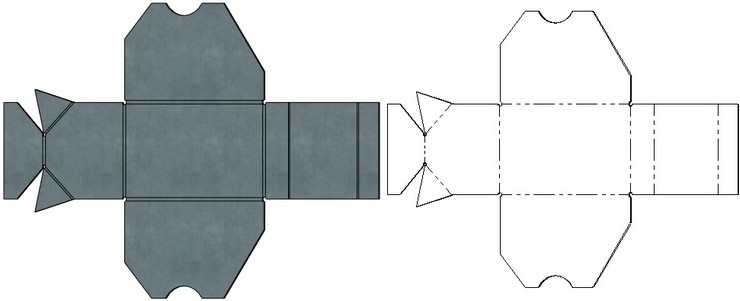
Two new categories of projection lines to control their visibility and parameters were added - "Bend edges" and "Hidden smooth edges".
"Bend edges" are designed to display lines on the projections of unbent sheet metal parts.
"Hidden smooth edges" previously were displayed on projections only on the condition of simultaneous usage of hidden lines and smooth edges options. Now they are handled separately.
Optimization of Large Assembly Projections
An essential reorganization of internal calculations of three-dimensional models projections was carried out. It considerably increased productivity projections creation, including projections of large assemblies. Besides, the mechanism provides additional acceleration in certain situations.
Parameter Minimum size of elements was added to projection properties. It allows to reduce time of construction and recalculation of projections by omitting small details. In addition such detail exclusion may increase drawing readability in some cases.
The minimum size is set in the current units of model measurement. All bodies with a smaller size won't be shown on the projections.
![]()
![]()
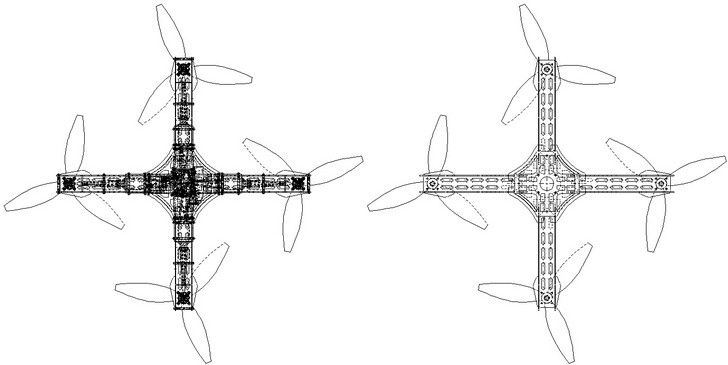
Recalculation time: 0,577 seconds. Recalculation time: 0,088 seconds.
2D Fragments
The Do not remove hidden lines parameter was added in Create fragment command in the Options section.
After its activation, lines under the inserted fragment do not disappear, and they can be used for a fragment fixing during the process of insertion. For example, if Invisible lines parameter is set for a hatch profile, this hatch won't hide drawing elements when the fragment is inserted.
|
|
Do not remove hidden lines |
Remove hidden lines |
Upon finish of a fragment insertion, if the mechanism of hidden lines removal is used, hidden lines will be removed.
For a 2D fragment it is possible to set color in the corresponding field of Parameters window.

Construction Lines
A possibility to fix construction lines and circles was added. To do this use command Fix Element from the context menu. Fixed lines cant be moved when the option is active, which is convenient when working with parametric drawings.
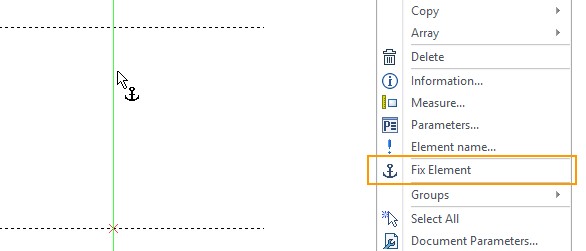
Cursor icon changes when pointing fixed line.
Dimensions
Dimensions Interface
Interface of the dimension creation and editing was changed. When you create or edit dimension you may now use special floating options panel - control icons and markers for changing dimension position, arrows style and dimension text. They appear when you place cursor on the dimension.
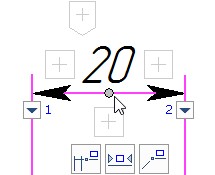
You can enter text Before, After and Under on the toolbars that appear after clicking on one of the ![]() icons. Drop-down lists
icons. Drop-down lists ![]() includes standard texts Before, After and Under. Context menu appears, when you press right mouse button in the text field.
includes standard texts Before, After and Under. Context menu appears, when you press right mouse button in the text field.
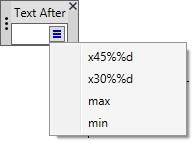
You can apply Before and After text insertion by pressing <Enter>. You can cancel text insertion using <Esc>.
You can select sign for the dimension from the drop-down list after clicking ![]() icon.
icon.

You can set arrows parameters on the special toolbar that appears after clicking ![]() icon under the arrow.
icon under the arrow.
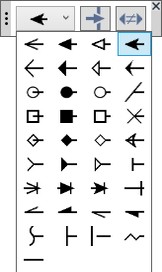
Option ![]() allows to clear background. Option
allows to clear background. Option ![]() enables/disables the same arrows for the dimension.
enables/disables the same arrows for the dimension.
You can move toolbars. Place cursor on ![]() icon and press left mouse button. Click
icon and press left mouse button. Click ![]() icon to close the toolbar.
icon to close the toolbar.
Dynamic toolbar with Place leader ![]() , Center dimension text
, Center dimension text ![]() , Dimension with jog
, Dimension with jog ![]() options appears under the dimension, when you place cursor on it.
options appears under the dimension, when you place cursor on it.
To specify dimension location and to align it according to another dimension you can use the special control marker.

If dimension is on a leader, you can specify the jog length using special control marker.
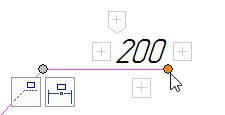
Options Hide jog ![]() and Remove jog
and Remove jog ![]() are available for the dimension with jog.
are available for the dimension with jog.
Option Remove leader ![]() is available for dimension on leader.
is available for dimension on leader.
The interface is implemented for linear, angular and radial dimensions. For various types of dimensions available options may differ.
You can hide dimensions control icons and markers if necessary. For this purpose, use Show floating options panel option in dimensions parameters window.

Dimensioning of the Ellipse
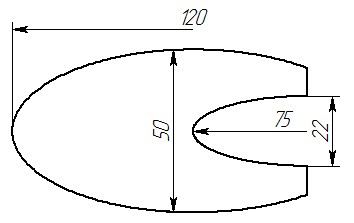
Linear dimensions can be created for ellipses. For this purpose you need to select an ellipse or an elliptical arc.
A dimension is created on the ellipse axis. To change axis use ![]() option.
option.
Pages
In Page dialog there is now possibility to select several pages in the list.
[Copy] option was added. It is possible to create a copy of the selected page with all its parameters: size, type, document parameters, etc.
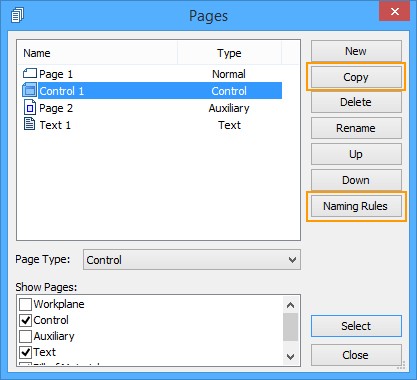
New Naming Rules option allows to set naming and numbering rules for different types of pages.
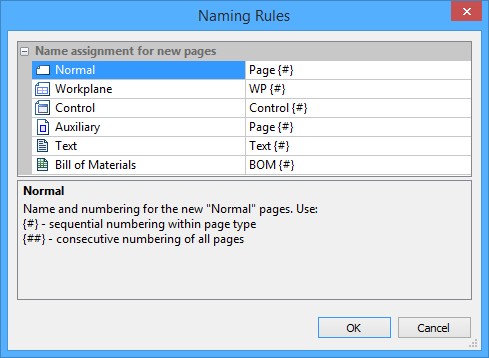
Naming rules can be also set in Document parameters command on the corresponding tab.
Bill of materials naming at first is taken from product structure parameters. Thus, if naming rule is already specified in the product structure parameters, it will be applied regardless of the rules specified in the Naming rules window.
Bitmap Images
By means of new Scale by fixing vector feature in parameters of the Drawing view command it is possible to specify scale of raster images placed on the drawing as a backgrounds using fixing vector. This option allows you to simplify placing raster images on the drawing at the desired location and with the correct scale.
At first raster image must be inserted as a picture on a separate page using the appropriate command. This page will be used later when adding drawing view to the drawing. On this special page with raster image you must create fixing vector by specifying two points in the desired location.

Then, for the precise placement of the image on the drawing you should add a new drawing view with indication in parameters the above page and fixing vector.
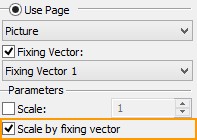
Two points that will be defined to position the drawing view on the drawing will determine the position and the length of the fixing vector, and with it, therefore, the position and scale of the raster image on which the fixing vector has been constructed.
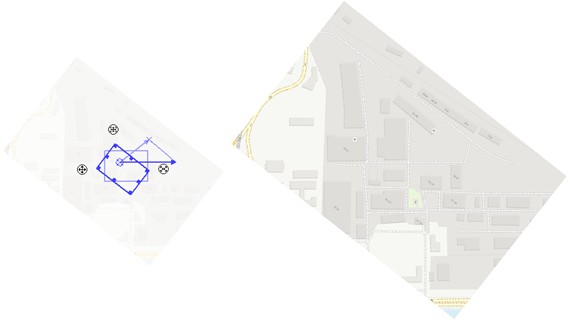
Other Innovations
Printing
Appearance of the printing dialog was changed. New parameters and options were added.
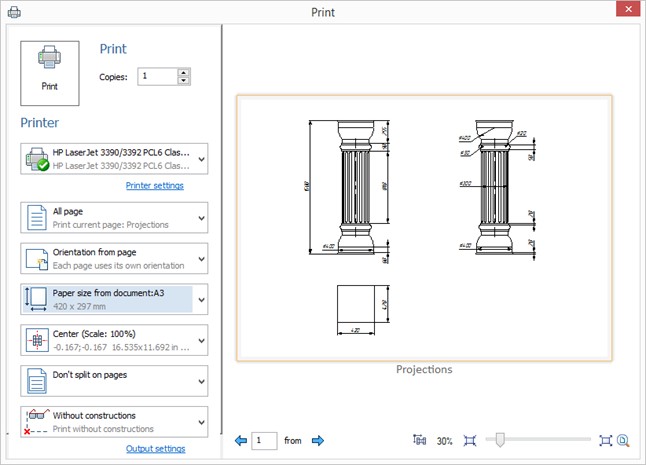
Printing is configured using drop-down lists that contain all parameters from the previous printing dialog box.
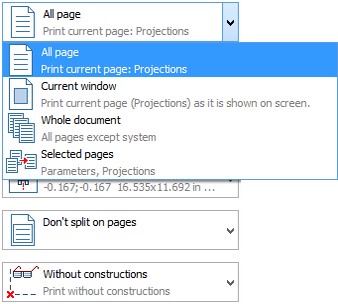
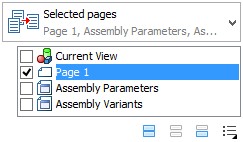
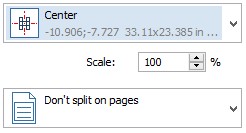
Advanced settings appear for Selected pages, Split into pages, Custom and Center options.
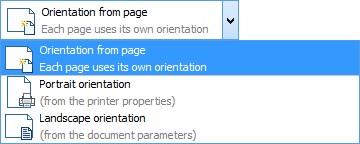
Orientation from page parameter was added. It allows to specify each page orientation individually.
Coordinates of printed page left top corner are now taken into account in Split into pages mode.
You can select skipped pages using option ![]() . Split lines will be printed, when corresponding option is selected.
. Split lines will be printed, when corresponding option is selected.
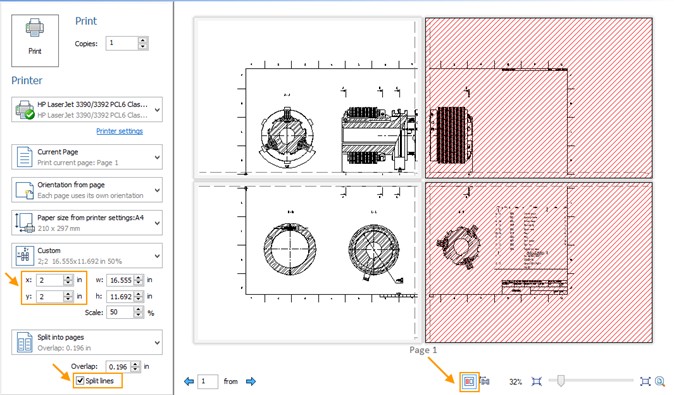
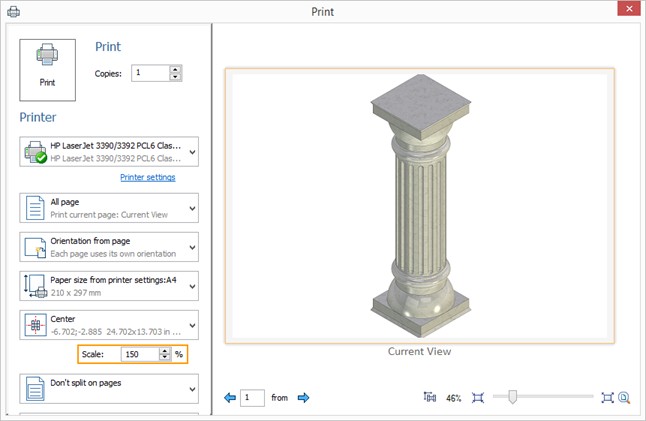
3D view printing was improved. Dynamic selection of the printed bitmap resolution depending on the printer DPI and scale was added.
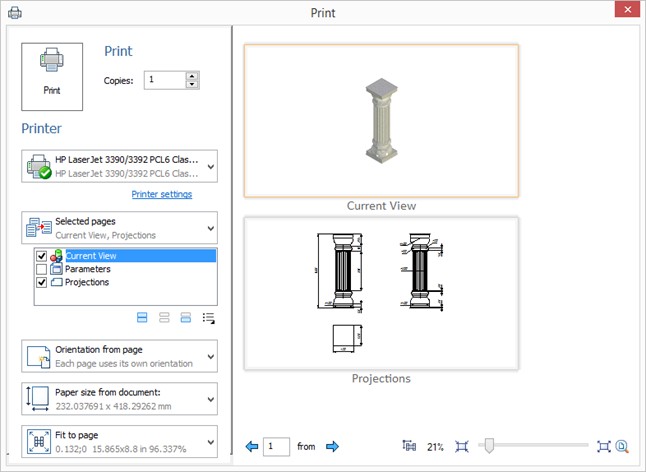
You can select additional pages when printing 3D view.
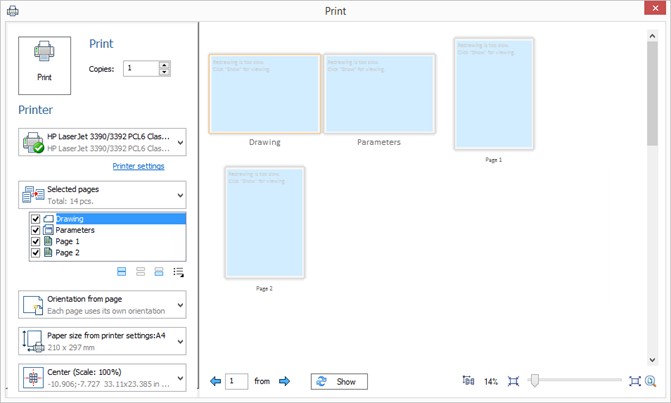
Preview window is located in the right pane of the dialog. Its scale can be specified in the right bottom corner.
![]()
To zoom in and zoom out use options ![]() and
and ![]() . Option
. Option ![]() allows to fit page.
allows to fit page.
Several pages can be shown in preview window when you zoom out. If their display takes a long time, their content is not displayed and ![]() button appears in the bottom of the dialog.
button appears in the bottom of the dialog.
Selected page is highlighted with orange frame.
Option ![]() allows to select position and scale of the printed area manually. You can move printed area with pressed left mouse button. Mouse wheel rotation allows to change scale of the printed area when the option is active. The drop-down list switches to the corresponding location parameter according to the changes.
allows to select position and scale of the printed area manually. You can move printed area with pressed left mouse button. Mouse wheel rotation allows to change scale of the printed area when the option is active. The drop-down list switches to the corresponding location parameter according to the changes.
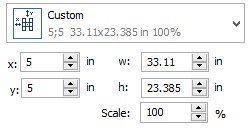
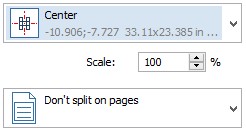
Printer's fields are showed with grey in preview window. There are no fields for virtual printer.
If you want to use legacy version of printing dialog box, you need to set option Legacy printing on Additional Options tab in Options command.
![]()
Measurement
Body Measurement Mode
A new body measurement mode ![]() was added to the command.
was added to the command.
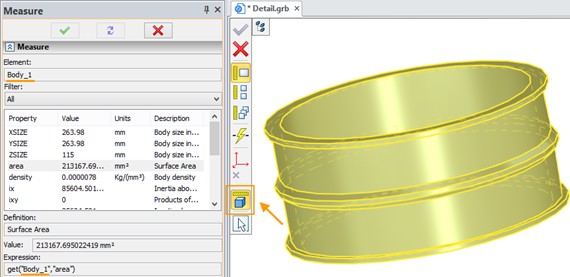
The mode allows to consider possible changes in the once measured body.
For example, you measure the area of a body and assign variable for it. Then you apply Boolean operation to the body and the area changes. In this case the corresponding variable will change as well.
Material Properties
The Measure command became available for materials of 3D models. For measurement of material properties, it is necessary to activate the command and to choose material in the 3D model tree.
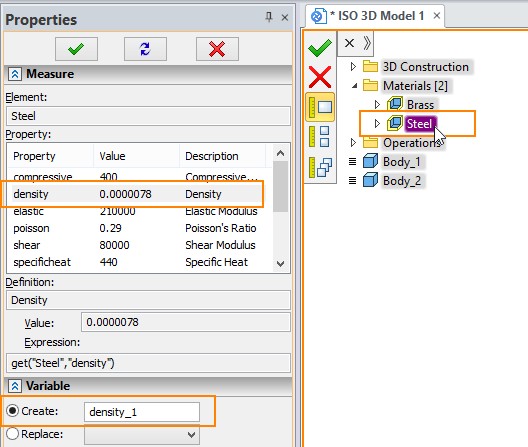
The measured values of materials physical properties can be saved as variables. You can use them in calculations so that there is no need to enter them manually.
Distance between Elements Relative to LCS
Possibility to measure distance between elements relative to the selected local coordinate system was added. The selected elements are projected on the X-axis of the specified local coordinate system, and then the distance between them is measured.
For example, when measuring the distance between two vertices (Vertex_5 and Vertex _6), these vertices are projected on the X-axis of the specified coordinate system (LCS_2).
You can specify variable for the measured value.
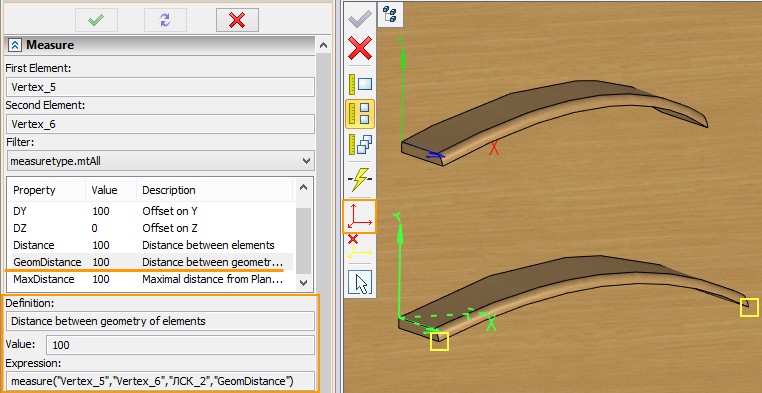
This possibility is helpful, For example, when you want to measure objects of irregular shape.
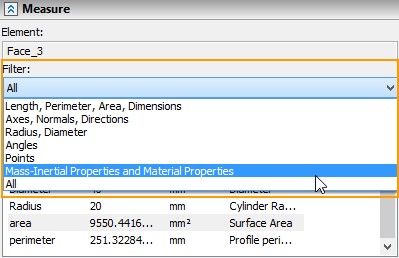
Filter for the measured values
Filter of the measured values was added to the parameters window. Only values that satisfy selected filter will be displayed in the window.
Units
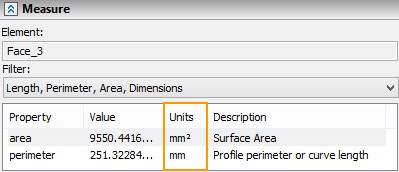
The “Units” column was added for the measured values.
Saving Document Copy
Now it is possible to keep copies of the document while designing without excess mouse clicks.
The Save Copy command was added to the Save group of commands. It allows to create a copy of the current document without existing currently edited document.

The created document has suffix "- Copy" in its name. For each following copy of the same document number is incremented.
![]()
Export to 3D Polygonal Formats
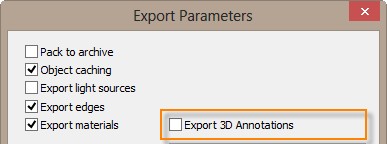
Export of 3D Drawing Elements (PMI)
Now you can export the 3D drawing elements, such as dimensions and GD&T symbols, in polygonal formats U3D, 3D PDF, VRML, X3D, TF3D. This option is present in the dialog of relevant export formats.
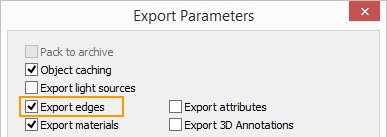
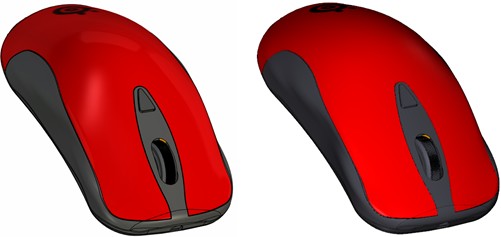
Export of Edges to 3D PDF and U3D
Now model edges can be exported in formats 3D PDF and U3D.

T-FLEX CAD |
3D PDF |
Export of Edges to 3D PDF and U3D
Now model edges can be exported in 3D PDF and U3D formats.
T-FLEX CAD |
3D PDF |
STEP Export and Import
Export
|
Protocol provides compatibility of STEP files with older versions of CAD systems. New protocol is enabled by default. Older protocol version AP203 doesn’t support colors, so the Color option is unavailable for it. Compatibility with CAD systems option provides possibility to read STEP file in other CAD systems. Representation specifies type of bodies export: boundary representation based on geometry (Solids and surfaces) or faceted polygonal representation (Faceted). Export 3D Images option is available for faceted representation. If it is disabled, objects of 3D image type will not be exported into STEP file. Color option specifies source of bodies color: basic material color or shading color. Accuracy of current geometry conversion into representation spline can be set using Quality of curves and surfaces option. The geometry is converted only if it is necessary. Simplify geometry option removes excess topology from the model and reduces file size. It is disabled by default, as export time and memory consumption grow when it is used. |
Options for welds and profiles export were added.
Import
STEP files import performance was improved. Memory consumption was reduced. Bodies and fragments from one level of assembly are imported concurrently, which significantly increases speed of STEP files reading. Primarily this improvement is important for large assemblies, with many bodies and fragments on one level. Number of simultaneously imported bodies and fragments depends on the number of computer cores. Material “Steel” is automatically applied to the bodies upon importing. It is important, if imported body is used for analysis. When you select Automatically option system defines type of model (assembly or set of bodies) from the STEP file and import file according to it. Previously, parts from assembly were imported without the assembly file itself. Now assembly file is formed and imported into assembly as a fragment with embedded fragments, which allows to save hierarchy specified in the assembly. The assembly file is recorded on the hard drive along with its fragments. Thus, you can import multiple assemblies into one document. |
|
When importing with Set of bodies option, all bodies from assemblies and subassemblies from STEP file will be imported on the same level.
Duration of import using Assembly option exceeds duration of import using Set of bodies option, but consumes less memory.
In the Representation group you can specify import of solids and surfaces, facet models and set option for curves.
Create set of surfaces option allows to create set of surfaces from the bodies’ faces that for some reason can’t be stitched together.
Create solids or surfaces option allows to convert polygonal faceted models into solid bodies and sheet bodies. Sheet bodies will result when imported facets cannot be stitched to solids.
New Import Product Structure option was added. It manages the creation of product structure based on data from STEP file: Description (Product name) and Part No. (Product ID). It should be used only if records for product structure exist in the imported file.
In Path for saving result field you can specify folder for the created parts and assembly documents.
Variables
There is an automatic prompt-substitution of variable name in the data boxes for entering values. When you start entering variable name, a drop-down list containing all variables with suitable names appears.

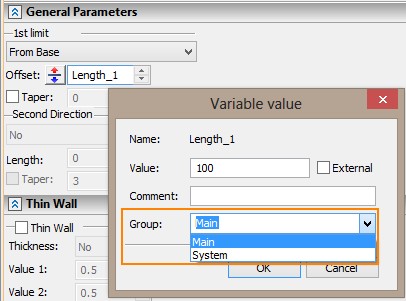
You can set the Group for the variable in the corresponding field of the Variable value window.
Toolbar and text menu were added to the variables editor in the left pane.

You may now open variables editor in a separate window with a command on the toolbar.
Tgetv() and tget() functions
For getv() function parameters "DATE" and "TIME" can change the format. For this purpose the format of date or time is specified after ‘Space’.
The existing formats of time and date can be found on the following web sites:
Date format:
https://msdn.microsoft.com/en-us/library/windows/desktop/dd317787(v=vs.85).aspx
Time format:
https://msdn.microsoft.com/en-us/library/windows/desktop/dd318131(v=vs.85).aspx
Example:
tgetv("DATE dd MMMM yyyy")
tgetv("TIME HH:mm")
Now tget() function allows to get the number of the page on which the object is placed.
Example:
tget("name","pagename"), where name is an object name.
Entering Values
Now there is a Enter Value command in the context menu of value fields. It solves the problem with incomplete display of long expressions in the field – now all entered expression will be displayed - not just its part.
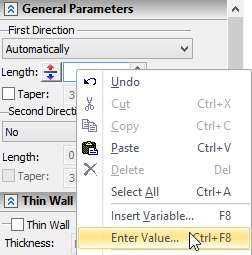
When you call the command, an Enter Value window appears. It contains the field Value in which the expression can be entered. Size of window can be changed..

3D Fragment Name
You can set displayed name of 3D fragment. The name can contain variables. It allows, for example, to display principal dimensions or order numbers in fragment names.
For example we can enter “Dn” variable into Fragment name (displayed) field. It’s value is set to 17.


If you click in Fragment name (displayed) field, its current value will be shown.

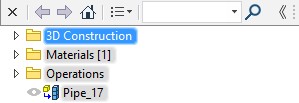
When you insert the fragment into an assembly, the name and variable value will be displayed in model tree.
Automatic Letters Designation
Automatic designation of letters option was added to the Document parameters dialog. It allows to manage unique ordering of detail, section and auxiliary views.

Do not designate. System does not track uniqueness of designations and allows to define designations with similar letters manually.
For page only. System automatically renames designations with similar letters and does not allow duplications on the page.
For the entire document. System automatically renames designations with similar letters and does not allow duplications in entire document.
You can disable automatic renaming for any 2D section even if For page only or For the entire document parameters are active. For that purpose, you need to disable Automatic flag in section parameters window.

Automatic Display of Scale and Rotation Symbol
Now you can enable or disable the automatic display of the scale and rotation symbol on the drawing views.

You can set such automatic designation in Document Parameters.
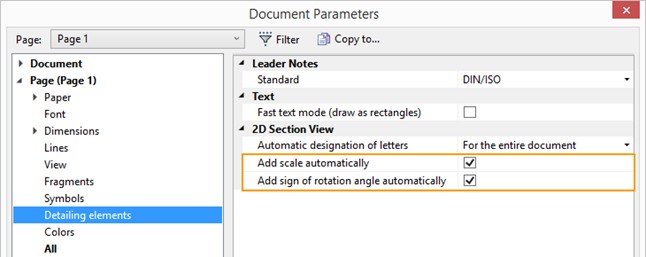
When these flags are checked view scale and rotation symbol will be displayed if necessary.
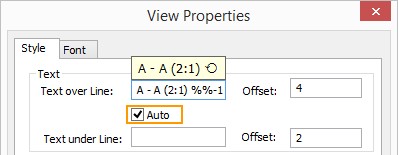
Such behavior of automatic designation may be also enabled or disabled for particular drawing view element.
Stereoscopic Image
Now program supports output of 3D models as three-dimensional images. For their viewing, it is necessary to use 3D glasses. Parameters of the three-dimensional image can be customized in the Options window.

Help and Tutorial Now Online
It is not necessary to wait for a new system update to obtain information about new commands and features. Help is now available in the Internet and is continuously updated as needed.
Annotations
Functions of T-FLEX Annotator are now available in T-FLEX CAD and T-FLEX Viewer. Use Annotations command to activate them.
Annotating allows the head of department, verifier or any other employee to add comments to the document without editing the original document. This functionality may be helpful for team developmen t, especially when working with document management system.
Protection Keys
Mechanism of licensing in T-FLEX CAD 15 has changed. Now it is possible to use software keys along is with the hardware keys. The software key does not require existence of the hardware dongle and is associated with the particular computer.
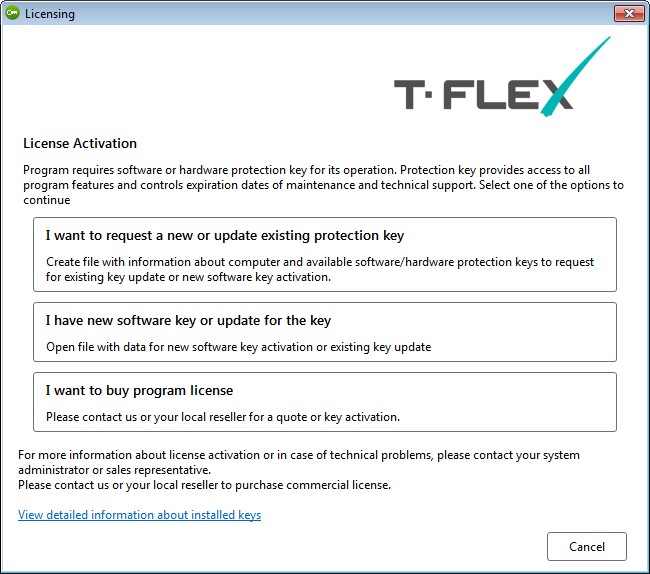
User can manage protection keys and receive information on them via web browser.
The software key can be re-hosted to another computer if necessary.
