Trimming of Edge Blend |
  
|
Trimming of Edge Blend |
|
It is possible to trim the blend surface by an arbitrary faces, plane or surface. It might be useful in some complex cases.
|
|
|
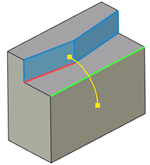
Blended edge is highlighted in green, trimming face - blue |
Blend result without trimming |
Blend result with trimming |
Trimming has priority over saving boundaries.
|
|
|
Blended edge is highlighted in green, saved boundary edge - red, trimming faces - blue |
Blend result without trimming |
Blend result with trimming |
To select trimming geometry go to the Trimming tab of the General Parameters section of the Parameters window, or use the following automenu option:
|
<T> |
Select Trimming Surfaces |

This automenu option and the Trimming tab are linked together: activation of the tab activates the automenu option and vice versa. This mode enables filters for selecting objects allowed as trimming geometry on the Filter Toolbar. Then you can select an object in the 3D scene by moving mouse cursor over it and clicking ![]() . When selecting elements, pay attention to active filters.
. When selecting elements, pay attention to active filters.
![]()
Selected object will be displayed in the list. Objects added to the list are highlighted in blue or green (depending on the object type) in the 3D scene, current selection is highlighted in red.
Buttons allowing to ![]() Collapse the list,
Collapse the list, ![]() Delete Element from the List or
Delete Element from the List or ![]() Clear the list are located to the right side of the list. Click
Clear the list are located to the right side of the list. Click ![]() on element in the list to select it. Selected element will be highlighted in the list.
on element in the list to select it. Selected element will be highlighted in the list.
Each row of the list contain an element type icon, a name of an element and a name of a parent body.
The Reverse Direction checkbox is located below the list. It works individually for each selected object. Enabling this checkbox changes the location of resulting blend surface in relation to the trimming object