Stars Creation |
  
|
The following command can be used for creating stars in drawing or on active workplane:
Icon |
Ribbon |
|---|---|
|
Applications > Stars > Stars creation |
Keyboard |
Textual Menu |
|
Tools > Open API Examples > Stars > Create |
The command is available, when the StarsPlugin application is running.
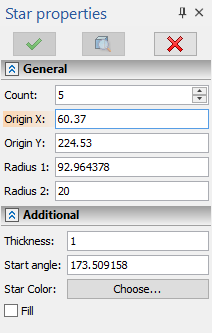
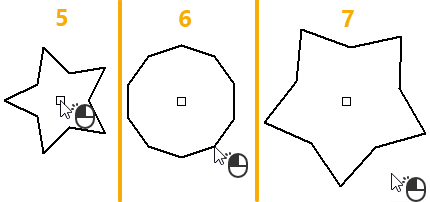
Upon calling the command perform following actions:
1.Specify the number of rays (optional action).
The number of rays can be typed into the Count input box of the parameters window or specified using following automenu options:
|
<3> |
3 rays |
|
<4> |
4 rays |
|
<5> |
5 rays |
|
<6> |
6 rays |
|
<7> |
7 rays |
|
<8> |
8 rays |
|
<9> |
9 rays |
|
<0> |
10 rays |
For the options to work, the input focus should be manually switched to the Count input box.
Allowed values are whole numbers from 1 to 10. If the number is set to 1, the resulting object looks like a straight line segment, if the number is set to 2, the resulting object has diamond shape. 5-ray stars are created by default.
2.Customize the line thickness (optional action).
The thickness of the star contour lines can be typed into the Thickness input box of the parameters window. The thickness is measured in length units selected in document parameters for the current page.
3.Customize the color (optional action).
Stars are black by default. In order to change the color, press the Choose button of the Star Color parameter in the parameters window. The standard color selection dialog will appear. The selected color is used both for contour lines and filling (see below).
4.Enable the filling (optional action).
In order to Fill the star with color, enable the eponymous checkbox in the parameters window, or activate the following automenu option:
|
<F> |
Fill |
Filling uses the same color as the contour lines (see above).
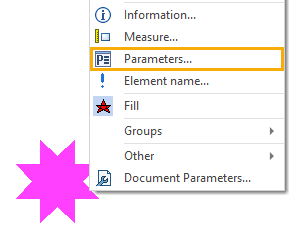
Upon creating a star, you can quickly enable or disable its filling anytime, using the contextual menu:
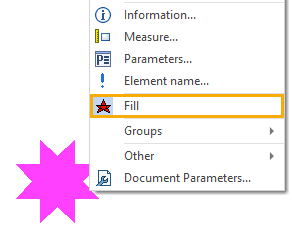
5.Specify the origin.
Upon calling the command, the preview of the star follows the cursor in drawing window. You should specify the position of the star center by pressing ![]() in a desired location. Coordinates of the specified point are indicated in the Origin X and Origin Y boxes of the parameters window. Upon specifying the center point initially, you can edit them by clicking a corresponding box with
in a desired location. Coordinates of the specified point are indicated in the Origin X and Origin Y boxes of the parameters window. Upon specifying the center point initially, you can edit them by clicking a corresponding box with ![]() and editing the value via keyboard.
and editing the value via keyboard.
6.Specify the base radius.
Upon specifying the origin, the preview no longer follows the cursor, but the base radius and angle become dynamically changing depending on the cursor position. Specify the desired radius by moving the cursor and press ![]() . Value of base radius is indicated in the Radius 1 box of the parameters window. Upon specifying the radius initially, you can edit it by clicking the corresponding box with
. Value of base radius is indicated in the Radius 1 box of the parameters window. Upon specifying the radius initially, you can edit it by clicking the corresponding box with ![]() and editing the value via keyboard.
and editing the value via keyboard.
7.Specify the rays radius and angle.
Upon specifying the base radius it gets fixed, but the rays radius become dynamically changing depending on the cursor position. Specify the desired radius of rays and angle of star rotation by moving the cursor and press ![]() . Value of rays radius is indicated in the Radius 2 box of the parameters window, value of the angle - in the Start angle box. The angle is measured counterclockwise in relation to the horizontal axis pointing to the right from star center. Upon specifying the radius and angle initially, you can edit them by clicking a corresponding box with
. Value of rays radius is indicated in the Radius 2 box of the parameters window, value of the angle - in the Start angle box. The angle is measured counterclockwise in relation to the horizontal axis pointing to the right from star center. Upon specifying the radius and angle initially, you can edit them by clicking a corresponding box with ![]() and editing the value via keyboard.
and editing the value via keyboard.
8.Confirm the input using the ![]() button in the header of the parameters window or the following automenu option:
button in the header of the parameters window or the following automenu option:
|
<Ctrl>+<Enter> |
Finish input |
Following options are also available, when working with the command:
|
<P> |
Set command options |
Invokes the parameters dialog of the resulting star. The content of the dialog is similar to the content of the command's parameters window.
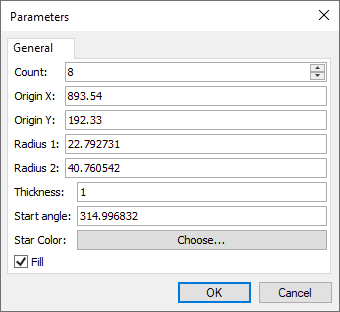
The dialog may also be invoked for an already created star, using its contextual menu.
|
<Esc> |
Cancel selection |
Sequentially cancels the specified rays radius and angle, base radius and origin. If the origin is not specified, this option is replaced by the next one.
|
<Esc> |
Exit command |
Allows to quit the command, until the star origin is specified. Upon specifying an origin, this option gets replaced by the previous one. However you still can quickly exit the command anytime using <Shift>+<Esc>.
See Also: