“Main toolbar” tab |
  
|
“Main toolbar” tab |
|

This tab displays the list of all main toolbar sets that are defined in the system. The sets marked in the list by the tick are displayed on the toolbar, unmarked sets are hidden. It is possible to control visibility of the sets independently, by removing/putting the tick (with the help of ![]() ) located next to the name of the corresponding set.
) located next to the name of the corresponding set.
Double pressing ![]()
![]() on the name of any set activates the set on the main toolbar.
on the name of any set activates the set on the main toolbar.
The button [Rename] enables to assign another name to any set of the main toolbar. After pressing this button, the window for assigning the new name of the set appears.
Buttons [Up] and [Down] allow changing the order in which the sets follow in the list.
To add the new (user's) set to the main toolbar the button [New] is used. After pressing this button the system prompts to assign the name of the set being created. Also, the prompt to add the standard buttons (i.e. related to command used for working with new documents, files etc.) to the new set will appear on the screen. In case of negative answer, an empty set is created, in case of positive one, the set containing only the standard buttons is created. Other buttons can be added to the created set via the tab “Commands” (by using “drag&drop” method).
It is possible to remove the previously created user's set by selecting it in the list and pressing the button [Remove] (for standard sets this button is not available).
The button [Create toolbar] enables to create a single toolbar on the basis of the set selected in the list. Upon creating the toolbar, it is possible to automatically remove the standard buttons from it (by default, these buttons are present practically in all standard sets of the main toolbar).
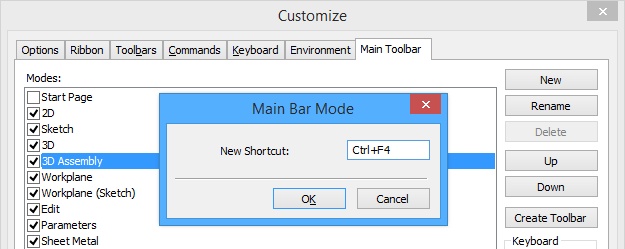
To make the work more convenient, several sets of main toolbar commands were assigned the key combinations for quick call with the help of the keyboard (by default, these sets are “2D”, “Sketch”, “3D”). If necessary, the key combinations can be also assigned for other sets (including user's defined ones). To do it, the buttons [Assign] and [Reset] in the group “Keyboard” are used.
After pressing the button [Assign] the window opens up in which the required key combination for the selected set has to be specified. For specifying the combination, it is just enough to press the corresponding buttons simultaneously. If the combination is specified incorrectly, it is sufficient to press the correct combination again. After closing the window with the help of [OK] the specified key combination will be displayed in the list to the right of the name of the corresponding set.
To modify already defined key combination for some set, it is enough to press the button [Assign] and specify new combination.
For removing the assigned key combination without specifying a new one, it is necessary to press the button [Reset] after selecting a set in the list.
The “Show labels” flag controls how the labels to the buttons of the main toolbar are displayed. By default, the flag is disabled, i.e., the labels are not shown.
The “Show Labels” flag has a similar action in the context menu that is invoked with the help of ![]() in the domain of the automenu or any toolbar. These two flags (“Show Labels” in the “SB: Show Toolbars” command and “Show Labels” in the context menu of toolbars) work in a synchronized manner.
in the domain of the automenu or any toolbar. These two flags (“Show Labels” in the “SB: Show Toolbars” command and “Show Labels” in the context menu of toolbars) work in a synchronized manner.
Additional flag called “Use standard font” affects how the labels to the buttons of the main toolbar are displayed when working in Windows Vista. If in the settings of Windows Vista the large font size is selected and the “Use standard font” flag is disabled, the labels to the buttons of the main toolbar will be displayed larger than the labels in the text menu. If the flag is enabled, the font size on the main toolbar is the same as that in the text menu.