Axes Creation |
  
|
Axes Creation |
|
This command is provided for automatic creation of axes (centerlines) for graphic entities. The axes created in this way maintain associative relationship with their reference elements and adjust to modifications of those elements.
Axes creation
Axes creation is done by the command "АХ: Create Axis". The command call is done in one of the following ways:
Icon |
Ribbon |
|---|---|
|
Draw → Draw → Axis |
Keyboard |
Textual Menu |
<АХ> |
Draw > Axis |
Upon calling the command, the dash-dotted line type is set automatically, as it is used for axes. You can modify the line type either in the system toolbar ![]() or among the graphic line parameters. The line parameters dialog box is called by the option
or among the graphic line parameters. The line parameters dialog box is called by the option ![]() . The dialog settings affect the type of the line used by this command in the current drawing.
. The dialog settings affect the type of the line used by this command in the current drawing.
To create an axis, you need to select a graphic line using one of the following options:
![]() <1> Create Axis of two Graphics lines
<1> Create Axis of two Graphics lines
This option allows creating an axis line between two graphic lines. You can select two straight segments or two arcs of equal radii as the source graphic lines. The selection is done by ![]() . Selected elements are highlighted.
. Selected elements are highlighted.


If the object snapping is engaged in the current session, then the axis being created appears as soon as you select the second segment or arc. It the object snapping is turned off, then the axis is displayed only upon confirming the selection. Confirm the selection of elements for creating the axis by the option ![]() .
.
The axis is bounded by the projections of the end points of the selected graphic lines on the axis line.
It is possible to extend the axis on one or both sides. To do this, you need to select additionally one or two graphic lines. The axis will then be extended up to the projection point on the axis of the selected graphic line end point. If two graphic lines are
selected as the additional lines, then the axis creation is completed automatically, without the confirmation by the option ![]() .
.


![]() <2> Create two Axes of Circle or Ellipse
<2> Create two Axes of Circle or Ellipse
This option allows simultaneously creating two axes for a circle, ellipse or an arc. To do this, just select the graphic entity - the circle, ellipse or arc.
The selected elements are highlighted, and the pair of axes is instantly displayed (if the object snapping is turned on). The limits of the axes are defined by the radii of the selected elements. The axes are created automatically upon the selection, without the confirmation.


![]() <3> Create Horizontal Axis
<3> Create Horizontal Axis
![]() <4> Create Vertical Axis
<4> Create Vertical Axis
These options allow creating, respectively, the horizontal and vertical axes for circles and circular arcs. In the case of ellipses or elliptical arcs, the major axis is created instead of the horizontal one, and the minor – instead of the vertical.

 or
or 

When using the following options, it is first required to specify a 2D node and then the graphic line of the circle, ellipse or arc:
|
<5> |
Axes make an angle with the node |
|
<6> |
Radial axis through the node |
|
<7> |
Tangent axis along the node |
|
<8> |
Axis along a circle and radial axis |
The The |
|
||
The The |
|
To create axes with the use of the ![]() ,
, ![]() ,
, ![]() and
and ![]() options, it is first required to specify the center node and then the graphic line of the circle, ellipse or arc. After the selection, the axial lines are created automatically without the need to confirm.
options, it is first required to specify the center node and then the graphic line of the circle, ellipse or arc. After the selection, the axial lines are created automatically without the need to confirm.


It is important to note that after creation of the axes, the command will remain in the mode of axes creation with the same center node. To create one more axis (or a couple of axes), it is sufficient to select the next graphic line of the circle, ellipse or arc. To return to the stage of selection of the center node, it is sufficient to press ![]() or use the
or use the ![]() option in the automenu of the command.
option in the automenu of the command.
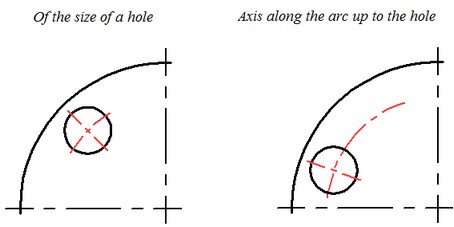
One more option of the automenu of the command allows us to create inclined axes through the center for two circles (ellipses) with an arc of the size of these circles (ellipses):
|
<9> |
Axis along arc and radial axis |
To create the axes with the help of this option, it is first required to select the center node. Then it is required to specify two graphic lines – of the circle or ellipse. When the cursor of the mouse is over the second graphic line, the view of the future axis along the arc will appear on the screen in a dynamic mode. At this moment the direction of the arc can be modified with the help of the option:
|
<Tab> |
Change direction of arc |
To finish creation of axes, press ![]() in the window of properties or in the automenu of the command.
in the window of properties or in the automenu of the command.


The second graphic line does not have to be specified; instead a 2D node can be selected. In this case is created an inclined axis with an arc of the size of one of the circles or an inclined axis with an arc up to the node.
Parameters of axes
Axes parameters are the standard graphic line parameters that can be defined at any time by calling the parameters dialog box with the option:
![]() <P> Set Graphic line parameters
<P> Set Graphic line parameters
The detailed description of graphic line parameters is provided in the chapter "Graphic Lines".
Editing axes
Since the created axes maintain associative relationship with their reference elements, their modifications occur together with the reference elements. Axes can be deleted, or their parameters changed, or their name defined, by using the context menu coming up upon right clicking ![]() over an axis, or by the command "EG: Edit Graphic Line" (see the chapter "Graphic Lines").
over an axis, or by the command "EG: Edit Graphic Line" (see the chapter "Graphic Lines").


