The operation Spiral creates a 3D body as a conic or cylindrical helix-shape spring with arbitrary profile. This functionality is mostly similar to the Spring operation functionality. Spiral is created by sweeping an arbitrary closed 3D profile along a helical curve. The profile can be oriented perpendicular to the spiral trajectory or perpendicular to the helical curve.

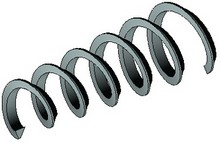
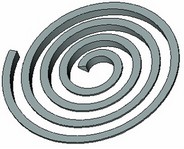
For speeding up modeling, a capability is provided for creating a Boolean operation together with spiral creation (this capability was described in details in the chapter "Extrusion").
Main concepts and operation capabilities
Spiral axis
The helical curve used for sweeping the profile is centered about the spiral axis. The axis is defined by two 3D points: the start point and the end point. 3D points can be defined by 3D nodes, as well as by any 3D objects suitable for defining a point in the space. The vector defining the spiral axis will be directed from the first point to the second one (this also defines the start and the end of the spiral, respectively). The shape of the curve is defined by the spiral parameters. The swept profile will be normal to the original curve.

Spiral profile and its orientation in the space
You can select any closed single-contour 3D profile as the spiral profile.
The profile position in the space is defined by a fixing vector. The spiral fixing vector is defined by two 3D points fixing the profile. The profile fixing vector will be directed from the first 3D point to the second one. If the profile is defined by 2D constructions, the profile fixing vector can be defined by two 2D points in the profile plane.
Once the spiral is created, the first point of the profile fixing vector is snapped to the end point of the radius vector at the spiral start. The direction of the vector is collinear with the radius vector.
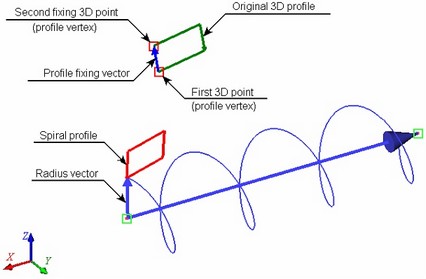
After that, the profile is rotated about the fixing vector to achieve one of the following orientations: perpendicular to the helical curve, perpendicular to the axis or parallel to the axis.
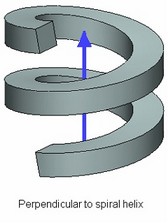
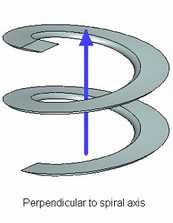
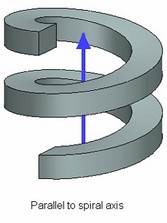
If necessary, the profile of the spiral can be rotated about the radius vector by 180 degree.
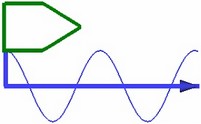

Spiral main parameters
The main spiral parameters are:
● Mean spiral radii at the ends – the radii of the helical curve at the start and end of the spiral;
● The step (pitch), the number of coils and the free length of the spiral;
● Spiral winding direction (hand of coiling): Clockwise (right) or counterclockwise (left).
The free length of the spiral can be defined as the distance between the 3D points defining its axis. In this way, it is sufficient to define just the pitch or just the number of coils, while the other parameter will be calculated by the system automatically. In the cases when both the pitch and the number of the spiral coils are defined, the spiral length will be defined solely by those parameters.
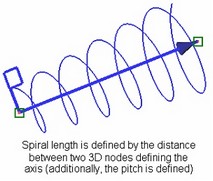
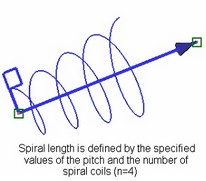
The radius of the spiral can also be calculated automatically by the system. It will be equal to the distance from the spiral axis to the first profile attachment point.
Initial position of spiral profile
The initial position of the spiral profile is defined by the system as follows: The spiral start radius vector lies in the plane passing through the spiral axis and the closing point of the original 3D profile. If necessary, a different starting position can be specified. The desired starting position can be defined with the help of an additional 3D point – the start point of the profile – or by specifying the numerical value of the profile rotation angle (with respect to the original position).
Once the start point of the profile is specified, it will snap to the plane passing through the selected point and the spiral axis, along the specified start radius vector. (This capability was described in the chapter "Spring".)
When both the angle of the start point and the numerical value of the rotation angle are specified, the latter is evaluated with respect to the profile position defined by the start point.
Tapering
If necessary, the ends of the spiral can be tapered at a specified rate. This capability is provided for defining thread tapering when using Spiral operation for creating thread bodies.
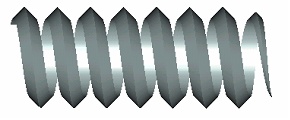
When tapering, the spiral profile reduction is done against the direction of the profile fixing vector.
Steps of Spiral operation creation
To create a Spiral operation, use the command "3SR: Create Spiral".
Icon |
Ribbon |
|---|---|
|
3D Model → Modify → Spiral |
Keyboard |
Textual Menu |
<3SR> |
Operation > Spiral |
To create a spiral, do the following steps:
1. Define the spiral axis by two 3D nodes.
2. Select a 3D profile.
3. Define the profile orientation in the space.
4. Define the starting position of the profile (select the start point for the profile position – optional).
5. Define spiral parameters (the spiral radius, etc.).
6. Confirm the operation creation (![]() in the property window or in the automenu).
in the property window or in the automenu).
The spiral parameters are defined in the command property window or in the operation parameters dialog box, accessible by the option ![]() .
.
Spiral axis definition
The start 3D point of the spiral axis is defined by the following automenu option:
![]() <F> Select starting Point of Axis
<F> Select starting Point of Axis
The end point of the axis is selected option:
![]() <S> Select ending Point of Axis
<S> Select ending Point of Axis
The options activate one after another. Selected 3D objects are highlighted. Once the second point is selected, a vector will be displayed in the 3D scene, defining the axis of the spiral, the helical curve and the radius vector indicating the radius at the start of the spiral.
Spiral profile selection
Upon defining the spiral axis, the following options become available in the automenu:
![]() <C> Select 3D Profile
<C> Select 3D Profile
To select the spiral profile, in the 3D view window move the pointer to a 3D profile and click ![]() . To select a 3D profile based on a 2D hatch, you can pick the original 2D hatch in the 2D view window (or on the activated workplane).
. To select a 3D profile based on a 2D hatch, you can pick the original 2D hatch in the 2D view window (or on the activated workplane).
Defining 3D profile orientation in the space.
The 3D points of the profile fixing vector are defined by the following automenu options:
![]() <R> Select First Attachment 2D Node
<R> Select First Attachment 2D Node
![]() <T> Select Second Attachment 2D Node
<T> Select Second Attachment 2D Node
To define the fixing vector by 2D nodes (in the case of the 3D profile based on 2D elements), use another pair of options in the command automenu:
![]() <N> Select first attachment 2D Node
<N> Select first attachment 2D Node
![]() <A> Select second attachment 2D Node
<A> Select second attachment 2D Node
Selected 3D points (or 2D nodes) are highlighted; however, the profile fixing vector is not displayed in the scene.
The way of orienting the profile is defined in the operation parameters, in the group "Profile Orientation". The combo box contains the following options: Parallel to Axis – the spiral profile plane stays parallel to the spiral axis as it is swept along the helical trajectory; Orthogonal to Axis – the spiral profile plane stays perpendicular to the spiral axis; Orthogonal to Path – the spiral profile plane stays perpendicular to the helical trajectory. |
|
To rotate the spiral profile about the radius vector by 180 degree, set the flag "Reverse Profile".
At this stage, you can already complete the spiral creation by pressing ![]() in the property window or in the automenu.
in the property window or in the automenu.
Spiral parameters definition
The main spiral parameters are defined in the first section of the property window – "Parameters". Those include the number of coils and the pitch, the start and end mean spiral radii, the spiral direction, etc. To have the spiral length calculated by the distance between the axis-defining 3D points, set one of the flags: "Coils from Spiral Length" or "Pitch from Spiral Length". In this case, the system will automatically calculate the value of the parameter with the respective flag set (either the number of coils or the pitch). At the same time, you will have to specify a numeric value for the other parameter (either of "Coils" or "Pitch"). If none of the flags is set, you will have to specify both the number of coils in the spiral and the pitch. The winding direction of the spiral is controlled by the radio group "Direction of Coiling". The spiral radius will be calculated automatically (by the distance between the axis and the first attachment point of the spiral profile), if the flag is set, "Coil Radius from fixing Node". To define an arbitrary radius at the spiral start and end, cleared the flag and enter the desired values in the boxes "Start" and "End". |
|
Selection of the start point for spiral profile position
The start 3D point of the spiral profile is defined by the following automenu option:
![]() <B> Select 3D Node as profile starting location
<B> Select 3D Node as profile starting location
To undo a 3D point selection, simply select another one with the same option, or cancel the selection by the option:
![]() <К> Delete starting 3D Node
<К> Delete starting 3D Node
The profile will then revert to its original position. You can enter a numerical value of the profile rotation angle with respect to the original position in the operation property window, by the parameter "Offset Angle" ("Parameters" section).

Using the created spiral in a Boolean
To create a Boolean operation, do the following:
1. Turn on the Boolean creation mode by the automenu option
![]() <Ctrl+B> Select original body for Boolean operation
<Ctrl+B> Select original body for Boolean operation
A Boolean is created when the icon is pushed.
2. Select the type of the operation from the pull-down list under the above option:
![]() <Ctrl+'+'> Addition
<Ctrl+'+'> Addition
![]() <Ctrl+'-'> Subtraction
<Ctrl+'-'> Subtraction
![]() <Ctrl+'*'> Intersection
<Ctrl+'*'> Intersection
![]() <Ctrl+l> Smart mode
<Ctrl+l> Smart mode
Operating principles of the Smart mode:
●If the body being created and the existed selected body have intersection of volumes - the type of Boolean operations: subtraction.
●If the body being created lies entirely within the selected body - the type of Boolean operations: subtraction.
●If the body being created touches and selected body touch each other - the type of Boolean operations: addition.
●If conditions set out above are not met, or a selected body lies inside the created, or error occurred determining the type of penetration, then, Boolean type is not defined - the Boolean operation will not be created.
3. Select the target body for the Boolean (optional in some cases), using the automenu option
![]() <Ctrl+T> Select Target Body for Boolean
<Ctrl+T> Select Target Body for Boolean
If only one body exists in the scene, it is selected automatically. The new body created by the extrusion operation becomes the tool body of the Boolean.
Upon confirming operation creation, first the body is created by the spiral operation, and then the specified type Boolean is performed.