Creating and Editing BOM Prototype |
  
|
Creating and Editing BOM Prototype |
|
A BOM prototype is a T-FLEX CAD document, containing only an empty BOM with specific defined properties. Since a prototype is not an assembly, its BOM does not have any records. The text formatting parameters and the tables defined in the prototype will drive the graphic shape of the BOM based on this prototype.
Should a BOM prototype need modifications, it can be opened as a common T-FLEX CAD document and be edited. One can also create one's own custom BOM prototypes and use them in future.
The files used as prototypes are stored in the folder whose name and path are defined by the command "SO: Customize|Options", the tab "Bill of Material", the parameter "Template Folder". The default folder setting is "…\Program\Template\BOM". The standard BOM table prototypes are stored there upon the system installation.
To create a custom BOM prototype, use the command "BC: Create Bill of Materials". In the coming up dialog box, select one of the prototypes in the BOM list. If the new BOM has just insignificant difference from a standard BOM, then the most closely matching prototype should be selected. To create a BOM, whose table differs in a relevant manner from the tables of the standard BOMs, use the "Empty Template". Upon selecting a BOM prototype, press the graphic button [Create New Template].
Creating BOM prototype based on existing prototype
The first step will be defining the name of the new prototype (a new prototype is always created in a new document). By default, the document is created in the folder defined in the command "SO: Set System Options", the tab "Bill of Material" (by default, "…\Program\Template\BOM"). This insures the presence of the created document in the list of prototypes when creating a new BOM. After that, a window opens with the new document created based on the selected one.
To make modifications to the table header, open the title block or the BOM title fragment and modify the names of columns, then number and with as desired. Save the title block under a new name. Returned to the document of the prototype being created. If the prototype being created is intended for creating a BOM, that will occupy a separate page or separate document, specify the name of the edited title block in the properties of the title block fragment. In the case of a BOM prototype for positioning on the drawing page, modify the fragment name in the BOM properties. If the prototype provides for automatic continuation of the BOM to the new page, make the respective changes to the subsequent pages of the title block fragment, as specified in the parameter "Insert Fragment on new Page creation" in the command "ST: Set Document Parameters", the "Fragments" tab.
Upon modifying the title block or the BOM header fragment, modify the properties of the BOM template as well. In the BOM context menu select the command "BOM Properties…" and enter the necessary changes (see the section "BOM Properties"). The BOM template will be automatically edited according to the introduced changes. The same can be done by calling the command "Tools|Bill of Materials|Bills of Materials…" and pressing the button "Properties".
The size of the table cells and their contents formatting parameters is done by using the option "Edit Template", called in the BOM editing mode.
Creating BOM prototype based on "Empty Template"
When selecting the "Empty Template" as the prototype, BOM creation stars "from scratch", based on an empty drawing. In this case, the BOM table has to be created manually.
First, in a separate document create either the complete BOM title block with a header and the ruled BOM table, or just the table header, depending on the purpose of the prototype being created. Upon saving the created title block, one can proceed with creation of the BOM prototype itself.
Call the command "BC: Create Bill of Materials". Select the "Empty Template" as the base prototype. Upon pressing the graphic button [Create New Template] a window appears for selecting a new document prototype (the default is the prototype of a new 2D document "NONAME<No.> .grb").
Next, define the name of the prototype being created. The system will then open a new window with the created document, and the automenu will display the options for creating the BOM template text:
![]() <M> Create Multiline Text
<M> Create Multiline Text
![]() <R> Create paragraph text
<R> Create paragraph text
![]() <P> Set Text parameters
<P> Set Text parameters
![]() <N> Set relation with Node
<N> Set relation with Node
![]() <Esc> Exit command
<Esc> Exit command
Creating BOM title block
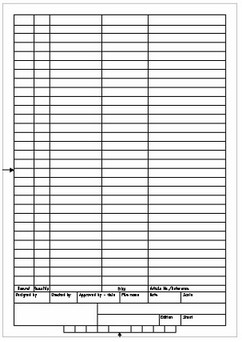
A prototype for a BOM on a separate page requires creation of a complete BOM title block including the title block text, header and grid lines of the BOM table being created. The table itself will be created with indivisible borders in this case.
Fixing of the title block as a fragment in the BOM prototype document will be done in absolute coordinates. Therefore, it is not necessary to create fixing points or a fixing vector. All you need is just to position the title block drawing correctly with respect to the page borders.
The title block text entries are created based on "Text" elements, driven by the external variables in the document. To simplify entering the title block text, one can create custom dialog boxes.
To create a BOM prototype to be placed on an existing drawing page, all you need is to create just the table header. The grid lines will be defined by the borders of the table text, that should be made visible in this case.
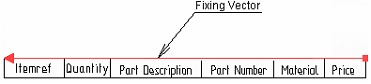
A fixing vector needs to be created in the table header file, using two points. The fixing vector should pass along one of the horizontal borders of the created table. The fixing vector direction determines the position of the header as the BOM grows.
The fixing vector should be the directed from left to right in the case the left justification is set for the BOM table template, and the right to left if the right justification is set to for the template. When creating the BOM, the system will fix the header at upper or lower nodes of the text, reserving the necessary space for the header.

If the prototype is intended for creating multipage BOMs (usually, those are BOMs located on a separate page), one needs to create an additional title block for the second and the subsequent pages (also in separate document).
As an example, one can review the standard BOM title blocks located in the library "Standard", the folder "Titleblk".
Creating prototype for BOM located on separate page
As an example, let's create a BOM prototype, whose table will have the following columns: "Item No", "Quantity", "Description", "Part Number", "Material", "Price".
Let's begin the prototype creation with creating BOM title blocks for the first and subsequent pages in separate T-FLEX CAD documents.
The title block for the subsequent pages may differ from the title block specified for the first page.
 After that, one can proceed with creating the BOM prototype itself. Call the command "BC: Create Bill of Materials". In the coming up dialog box select "<Empty Template>" and press the graphic button [Create New Template]. After selecting the new document prototype and entering the name for the prototype being created, the system activates the text creation command. The BOM table is created based on the paragraph text or multiline text. If you want the system to support automatic continuation of the BOM table onto the new pages as records are added (with automatic new page creation) or into a different area on the current page, then select the paragraph text. If you select the multiline text, then your BOM table will grow high without the capability of transferring it onto another page.
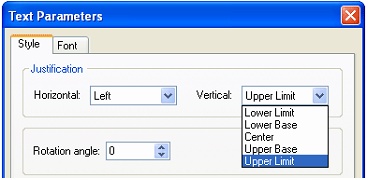
Select, for example, the option ![]() ("Create paragraph text"). You should set vertical justification among the text parameters of the table being created. This should better be done before entering the text.
("Create paragraph text"). You should set vertical justification among the text parameters of the table being created. This should better be done before entering the text.
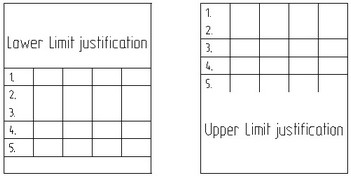
Call the text parameters dialog box using the <Р> option. If you want your BOM to grow from bottom up as records are added, then set Lower Limit justification, to grow from top down use Upper Limit justification (Upper Limit justification is set by default). When creating a BOM prototype on separate page, the vertical justification is usually required to be the Upper Limit one. |
|
If you use the paragraph text, the rest of parameters can be left unchanged. When using the multiline text, additionally set the right horizontal justification. When using the paragraph text, the vertical justification can later be changed by calling the properties dialog box for the rectangular text area (see the chapter "Text"). After that, we need to define the boundaries of the box where the created BOM table will be placed. To do this, specify two arbitrary points in the case of the paragraph text, or just one in the case of the multiline text. |
|
To continue with the BOM creation, click ![]() inside the paragraph text or press
inside the paragraph text or press ![]() . The BOM property window will appear on the screen (see the section "BOM Properties"). In the case of using the multiline text, the BOM property window will appear right after selecting the fixing node.
. The BOM property window will appear on the screen (see the section "BOM Properties"). In the case of using the multiline text, the BOM property window will appear right after selecting the fixing node.
Default BOM properties (names and types of the columns, the sorting rules and the groups) are copied from the file …\Program\BomStructure.mdb.
The number of columns, their position and structure can be defined on the tab "Columns". The columns that are checkmarked in the table on this tab are the ones that will be included in the created BOM table. In the example shown on the diagram, the BOM table will have the six check marked columns, their positioning left to right being determined by the relative positions of the checkmarked entries on this tab in the top down direction.
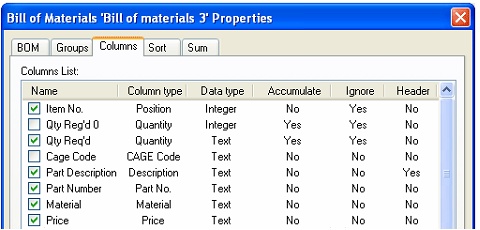
Note that the number, names and order of the columns should correspond with the BOM title block.
The "Sort" and "Sum" tabs allow defining (or modifying default) sorting rules of the BOM records and summing up rules for its cells.
Upon confirming the specified properties, the system will activate the BOM table editing mode. The dialog box “Add Record into Group or Create Group” will appear on the screen. The BOM prototype should not contain any records; therefore, close the dialog window by pressing the graphic button [Cancel].
To format the columns of the created table, enter the template editing mode. This can be done using the option:
![]() Edit Template
Edit Template
This option is located on the main toolbar (in the button set “BOM”).
Upon calling the option, the system activates the table editing mode. On the main toolbar (if it is not locked), the button set “Text” will be shown.
The options of this set allow changing the height, width and formatting of the columns. Besides, the following options become available in the automenu:
![]() <F9> Format Font
<F9> Format Font
![]() <F10> Format Paragraph
<F10> Format Paragraph
![]() <Ctrl><F5> Parameters of changing Paragraph size
<Ctrl><F5> Parameters of changing Paragraph size
![]() <F11> Edit in separate window
<F11> Edit in separate window
Let's format the created table. The columns width was set automatically when inputting the text based on the size of the input paragraph text. (When using the multiline text, the width is set by default). The width of each column must be changed according to the width of the columns in the BOM title block. The height of the template rows must be equal or (for multiline records) a multiple of the distance between the horizontal grid lines in the title block.
Select the whole table by clicking ![]() or with the following option on the main toolbar (button set “Text”):
or with the following option on the main toolbar (button set “Text”):
![]() Select Table
Select Table
Then, using the option ![]() , call the paragraph parameters dialog box. The parameter "Between (interval)" should be assigned the value "Exactly" and the numerical value equal to the height of the rows in the title block table (in this example - 8). Press the [Ok] button to close the dialog box. The height of the table rows should be changed accordingly, and the border display should be turned off. To do this, keep the table highlighted and call the option on the main toolbar (button set “Text”):
, call the paragraph parameters dialog box. The parameter "Between (interval)" should be assigned the value "Exactly" and the numerical value equal to the height of the rows in the title block table (in this example - 8). Press the [Ok] button to close the dialog box. The height of the table rows should be changed accordingly, and the border display should be turned off. To do this, keep the table highlighted and call the option on the main toolbar (button set “Text”):
![]() Table Properties
Table Properties

On the "Row" tab, set the following row parameters: the row height, as well as the line spacing interval, is set equal to the distance between the horizontal grid lines in the title block. The parameter "Mode" should be assigned the value "Multiple". This allows increasing the height of the rows with long entries in the table so that they exactly match the rows of the title block. Additionally, one can set the parameter "Allow wrap". This will allow prolonging the BOM table on the next page.
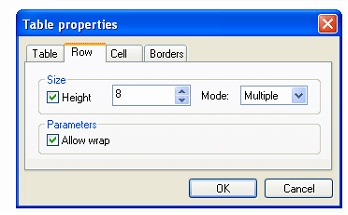
Since the BOM table grid is defined by the title bar, the display of the template table border lines should be turned off. To do this, on the tab "Borders" of the same dialog box clear the respective flags. Upon confirming the entered changes, the system returns to the BOM editing mode.
Keep calling the same dialog box for each separate cell in the template table, setting the desired width of each cell in the "Cell" tab, along with text offsets from the beginning and the end of the cell, if necessary. Besides, one can set horizontal justification mode for various table cells, and force no-line-break for the text, using the automenu option ![]() .
.
Table creation and editing capabilities are described in details in the chapter "Text".
To complete BOM template editing, one can use the option:
![]() <F5> Finish input
<F5> Finish input
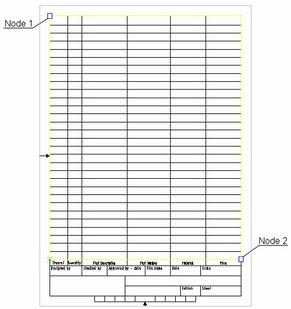
The system will then return to the BOM editing mode. To complete working with this functionality, one can also use the option ![]() . After that, the system returns to the text creation command. To continue working with the system, with this command. Next, let's insert the predefined title block fragment in the drawing. To do this, use the command "FR: Create Fragment". Then call the command "Edit" from the BOM context menu and snap the created text to the fragment nodes ("Node 1" and "Node 2" on the diagram) for the exact match between the BOM template and the title block lines.
. After that, the system returns to the text creation command. To continue working with the system, with this command. Next, let's insert the predefined title block fragment in the drawing. To do this, use the command "FR: Create Fragment". Then call the command "Edit" from the BOM context menu and snap the created text to the fragment nodes ("Node 1" and "Node 2" on the diagram) for the exact match between the BOM template and the title block lines.
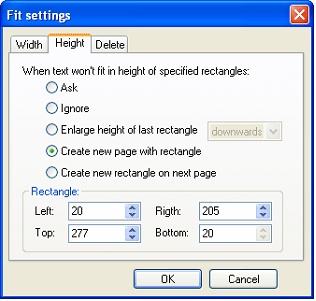
The final step will be insuring the correct BOM continuation onto the subsequent pages. For this purpose, call the command "ST: Set Document Parameters" and on the "Fragments" tab specify the title block fragment names for the second and other subsequent pages of the BOM. You will have to enter the template editing mode again and call the option ![]() . In the coming up dialog box on the tab "Height" set the action upon the text outgrowing the rectangle bounds as "Create new rectangle on next page". The new rectangle coordinates are set according to the coordinates of the outer nodes of the table (similar to the nodes on the previous diagram) on the title block drawing for the subsequent BOM pages.
. In the coming up dialog box on the tab "Height" set the action upon the text outgrowing the rectangle bounds as "Create new rectangle on next page". The new rectangle coordinates are set according to the coordinates of the outer nodes of the table (similar to the nodes on the previous diagram) on the title block drawing for the subsequent BOM pages.
Note that the described order of steps in defining the BOM template parameters is not mandatory. All these steps can be performed in an arbitrary order.
Creating prototype for BOM located on existing drawing page
The sequence of steps for creating such a prototype is mostly the same as in the previously described situation. As in the case of creating a prototype for a BOM on the separate page, the prototype creation should begin with creating the BOM header in a separate file.
In the following example, let's create the table header consisting of the same four columns as in the previous case. Let's position the fixing vector along the top border of the header directed from right to left. The vector direction choice is based on the requirement, that the BOM table template located on the existing page has right justification.
Save this file. Then call the command "BC: Create Bill of Materials". In the coming up dialog box select "<Empty Template>" and press the graphic button [Create New Template]. After selecting the new document prototype and defining the name of the prototype being created, the system activates the text creation command.
In the text parameters dialog box, called by the option ![]() , set the Lower Limit vertical justification (a BOM located on the drawing page should grow from bottom up). In the case of the multiline text, additionally define the right horizontal justification.
, set the Lower Limit vertical justification (a BOM located on the drawing page should grow from bottom up). In the case of the multiline text, additionally define the right horizontal justification.
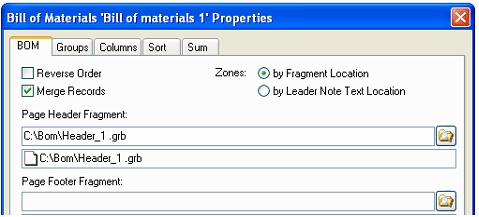
After that, define the boundaries of the rectangular area for fitting the BOM table being created. Upon defining the text boundaries, the BOM property window will appear. In it, select the required BOM columns, sorting and summing rules, etc.
Additionally, specify the table header (footer) fragment on the tab "BOM" of the same window. If the header is used in the table, specify the path to the header fragment. Otherwise, if the footer is used in the table, enter the path to the footer. The path can be defined using the button ![]() . Upon confirming the specified BOM properties, the system will switch to the BOM table editing mode. The dialog box “Add Record into Group or Create Group” will again appear on the screen. On the main toolbar (if it is not locked), the button set “BOM” will appear. The BOM prototype should not contain any records; therefore, close the dialog box by pressing the button [Cancel].
. Upon confirming the specified BOM properties, the system will switch to the BOM table editing mode. The dialog box “Add Record into Group or Create Group” will again appear on the screen. On the main toolbar (if it is not locked), the button set “BOM” will appear. The BOM prototype should not contain any records; therefore, close the dialog box by pressing the button [Cancel].
To format the columns of the created table, enter the template editing mode using the option ![]() . in the Paragraph parameters dialog box (the automenu option
. in the Paragraph parameters dialog box (the automenu option ![]() ) specify the line spacing for the table cells, as well as the text horizontal justification modes and the requirement of keeping the text as one line.
) specify the line spacing for the table cells, as well as the text horizontal justification modes and the requirement of keeping the text as one line.
In the "Table properties" dialog box, called by the option ![]() on the main toolbar (set “Text”), change the width of each column according to the width of the columns in the header fragment. The height of the table rows does not have to be set in this case. Also, turn on the table border display (is on by default). On the "Table" tab, the right horizontal justification should be set for the table. This will allow automatically keep the BOM being created toward the right hand side of the drawing above the title block text.
on the main toolbar (set “Text”), change the width of each column according to the width of the columns in the header fragment. The height of the table rows does not have to be set in this case. Also, turn on the table border display (is on by default). On the "Table" tab, the right horizontal justification should be set for the table. This will allow automatically keep the BOM being created toward the right hand side of the drawing above the title block text.
Note that the justification defined in the table parameters must correspond with the fixing vector direction of the BOM header.
The template editing, as well as the whole BOM editing, can be completed using the option ![]() . Exit the text creation command and save the resulting prototype.
. Exit the text creation command and save the resulting prototype.