Text |
  
|
Text |
|
By learning various text handling techniques presented in this chapter, you will gain the command of a wide range of tools for handling text in T-FLEX CAD environment. At the time of decorating a drawing, you can insert standalone notes consisting of one or more lines of text. These lines are positioned on the drawing according to the attachment point and are controlled by a number of parameters that define the font, size, rotation angle, etc. (the section "String Text"). It is also possible to insert large amounts of text, including several paragraphs with different formatting (the sections "Paragraph Text" and "Multiline Text"). Table creation is also supported (the section "Table"). Any text may include variables created in the drawing and text excerpts from the dictionary (the section "Working with dictionary"). If necessary, a text can be imported or exported.
Creating text
To create a text, the command is used "TE: Create Text":
Icon |
Ribbon |
|---|---|
|
Draw → Title Block → Text |
Keyboard |
Textual Menu |
<TE> |
Construct > Text |
Upon calling the command, the following options are available in the automenu:
|
<M> |
Create Multiline Text |
|
<R> |
Create paragraph text |
|
<B> |
Create Table |
|
<D> |
Create string text |
|
<P> |
Set Text Parameters |
|
<Alt+P> |
Copy Properties from Existing Element |
|
<A> |
Set absolute coordinates |
|
<N> |
Set relation with Node |
|
<L> |
Set relation with Line (available for The string text only) |
|
<C> |
Place Text around Circle (available for The string text only) |
|
<F4> |
Execute Edit Text command |
|
<Esc> |
Exit command |
The first four options serve for selecting the type of the text to be created (multiline, paragraph, string text and table). The creation and handling techniques will be reviewed in details for each type in the respective sections of this chapter.
Note that on subsequent calls to the command the type option will be turned on that was used in the previous command session. The default type is ![]() .
.
The text being created can be positioned either in absolute coordinates (the option ![]() ), or attached to an existing node (the option
), or attached to an existing node (the option ![]() ) to have its position adjust together with the position of the specified nodes. A string text can also be positioned at the specified vertical and horizontal offsets with respect to the attachment node.
) to have its position adjust together with the position of the specified nodes. A string text can also be positioned at the specified vertical and horizontal offsets with respect to the attachment node.
Besides that, the following additional options will be available in the automenu for a string text in order to relate it to construction entities (lines ![]() and circles
and circles ![]() ). Those allow defining the rotation angle and the shape of the text according to the position and shape of the construction entities.
). Those allow defining the rotation angle and the shape of the text according to the position and shape of the construction entities.
Text of any type can also be bound to the joint points between graphic lines belonging to 2D fragments or 2D projections (a 2D node is automatically created when selecting such a point).
Before you begin creating a text, you can set default parameters for all newly created text by using the option ![]() . Upon calling this option, the text parameters dialog box appears.
. Upon calling this option, the text parameters dialog box appears.
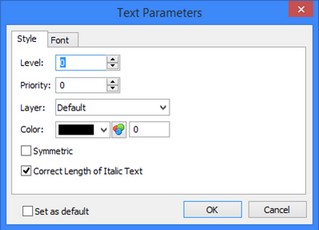
Default text parameters
"Style" tab
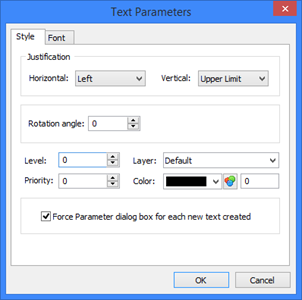
The first group of parameters – "Justification" - defines the element position with respect to its attachment point, as well is justification modes of the element contents with respect to its boundaries. The effect of these parameters is different for different types of text (see the respective sections for details).
Justification - Horizontal. This parameter can take five values: "Left", "Center", "Right", "Left&Center", "Right&Center". Generally, this parameter defines the way of positioning the text with respect to the attachment point, as well as the horizontal justification mode of the text contents. The combination values of the parameter, such as "Left&Center", simultaneously define the text contents justification (the first value, along the left margin), and the attachment mode (centered with respect to the attachment element).
The simple parameter value entries, such as "Left", simultaneously set the justification of the text contents and the same attachment mode.
When working with a paragraph text, the attachment mode is ignored, since this element is attached by two points. In the case of "Table"-type text, the text contents justification mode defined in this dialog box is ignored.
Justification - Vertical. In the case of the paragraph text, this parameter defines the vertical justification of the text contents. In all other cases, it defines the way of positioning the text with respect to the attachment point. However, this parameter affects various types of text in the ways specific to each type.
This parameter can have five values:
"Lower Limit" - The string text is positioned above the attachment point at the distance defined by the font size; multiline text and table are attached at their lower boundary; in the case of the paragraph text, this defines the vertical justification of the text contents along the bottom margin;
"Lower Base" - The string text will be positioned immediately above the attachment point; for the rest of text types this parameter is equivalent to the previous one;
"Center" - The string, multiline text and table are centered with respect to the attachment point; the contents of the paragraph text are vertically centered;
"Upper Base" - The string text is positioned immediately under the attachment point; multiline text and table are attached at the upper boundary; the contents of the paragraph text are top-aligned vertically;
"Upper Limit" - The string text is positioned under the attachment point at the distance defined by the font size; for the rest of text types this parameter is equivalent to the previous one.
Rotation angle. Defines the Rotation angle of the text with respect to the horizontal coordinate axis in degrees. Positive rotation is counterclockwise.
Symmetric. This parameter defines "mirror" text mode.
General system parameters Color, Level, Layer, Priority.
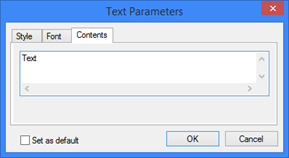
Force Parameter dialog box for each new text created. This parameter makes sense only for the string text. If it is set, then the contents of the string text being created can be defined on the additional tab "Contents" of the parameters dialog box. Otherwise, the special text editor is invoked.
"Font" tab
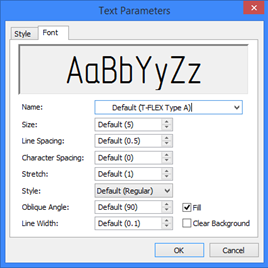
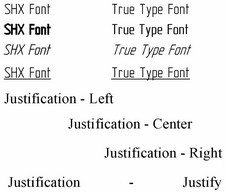
Name. This parameter defines the font name and type. T-FLEX CAD supports use of the two types of fonts: the TrueType (![]() ) fonts that are the Windows standard, and the vector font format .SHX (
) fonts that are the Windows standard, and the vector font format .SHX (![]() ). The fonts of the TrueType and SHX formats are distinguished in the font menu by the respective icons before the font name. Size. Defines the vertical size of capital letters (for example, the height of the character "A").
). The fonts of the TrueType and SHX formats are distinguished in the font menu by the respective icons before the font name. Size. Defines the vertical size of capital letters (for example, the height of the character "A").
Oblique angle. Defines the oblique angle of the font. The normal (vertical) font has the slant angle equal to 90°. The slant angle of 75° makes the font Italic. This parameter is of higher priority than the parameter "Style".
Line spacing. Defines the spacing between the neighboring lines of a multiline text. Line interval is defined in relative units. To calculate the absolute value of the line spacing, multiply this parameter by the font height.
Character spacing. Defines additional spacing between the two neighboring characters in a line. The value of this parameter is also relative. To calculate the absolute value of the character spacing, multiply this parameter by the font height.
Clear background. This parameter is used for padding the text outline box with the drawing background color. Clearing background may be convenient when displaying text over hatches, fills, etc.
Stretch. Defines the scale factor for the width of the font symbol. Any stretch value can be specified except 0.
Style. This is a standard parameter for fonts TrueType (it does not affect SHX-fonts). It is selected from the list (normal, bold, italic, bold italic).
The following two options affect only SHX-fonts:
Line width. Defines the width of the text contour lines for the fonts of the formats *.SHX.
Fill. Note that not all fonts can be filled. A font can be filled, if a file is present in the T-FLEX system folder with the extension CHD and the same name as the respective SHX font name. The file can be empty. In this case, every font character will be filled.
Once the font type and its parameters are defined, the result is displayed in the preview pane.
Any parameter value can be defined by a variable. A textual variable can be used for the font name in this case.
Creating string text
To create a string text, call the command "TE: Create Text", and then select the option ![]() in the automenu.
in the automenu.
The necessary text parameters can be defined before creating the text (the option ![]() ). These parameters will be applied to all types of the newly created text by default.
). These parameters will be applied to all types of the newly created text by default.
Upon calling the option ![]() , the graphic pointer will be displayed as a box and a crossing. The box height corresponds with the height of the text font.
, the graphic pointer will be displayed as a box and a crossing. The box height corresponds with the height of the text font.

The position of the crossing indicates the position of the text attachment point. The position of the box with respect to the crossing indicates the scheme of the text justification and positioning with respect to the attachment point, defined in the text parameters dialog box. The height of the box corresponds to the size of the text font.
You can define the text position by clicking ![]() , and then invoke the text editor for inputting its contents. Besides, the text can be attached to a node, line or circle in order to have its position adjust together with the drawing parameter modifications.
, and then invoke the text editor for inputting its contents. Besides, the text can be attached to a node, line or circle in order to have its position adjust together with the drawing parameter modifications.
If attached to a node, the offsets of the text attachment point with respect to the node are maintained constant. If you want to impose such a relation, use the key <N> to select the desired node before clicking ![]() for positioning the text.
for positioning the text.
![]()
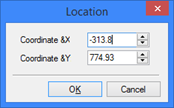
If you want to specify the exact horizontal or vertical offset of the text from a node, use the option <A> for entering the offset values. The same option used without selecting a node will allow you entering the exact text position with respect to the coordinates of the drawing.
An attachment line defines the Rotation angle of the text. The text can be positioned parallel to the line or at some angle (the angle being defined among the text parameters). Type <L> for tying the text to a line.
![]()
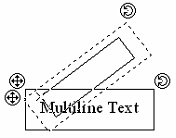
Attaching a text to a node and to a line can be combined by using the options <L> and <N> subsequently. This allows, for example, attaching the text in such a way that it will adequately adjust as the image rotates. The example of the right hand side shows the result of selecting a construction line and a node. The option <A> was used for selecting the node with the offset values "0,0".
![]()
If you want to wrap the text on a circle, select a circle using the option <C>. You can flip such text (rotate by 180°) by using the justification parameters for defining the position of the attachment point.

The diagram on the right hand side shows a text wrapped on a circle. The following justification parameters were used for creating this text: horizontal – left, vertical – upper limit. By selecting this text for editing one can see a small square displayed in the upper left corner of this text, indicating the position of the text attachment point.
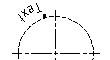
Modifying the justification parameters of this text as follows: horizontal – left, vertical – lower limit - flips the text by 180°.
With the snapping turned on, the construction elements suitable for the text attachment references are pre-highlighted as the pointer approaches. To attach the text to those, you can simply click ![]() . Construction line intersections can also be selected as the attachment node, the actual node being created automatically in this case.
. Construction line intersections can also be selected as the attachment node, the actual node being created automatically in this case.
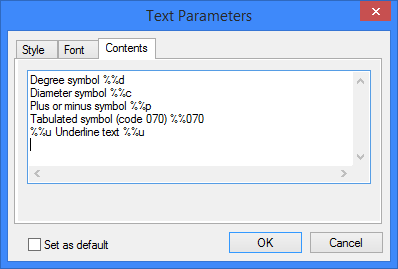
Upon defining the text position, a window will be displayed for inputting the text contents. The text may contain variables, subscripts and superscripts, as well as special symbols. If the flag "Force Parameter dialog box for each new text created" is set among the text parameters, then the parameters dialog box appears with an additional tab "Contents", where the desired text can be input. |
|
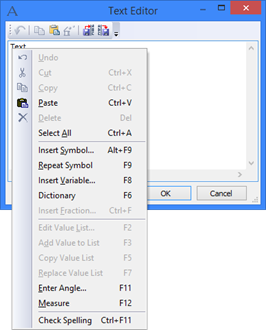
Otherwise, a special text editor will be displayed for inputting the text contents. Text Editor is provided for inputting and editing the contents of string text. The text editor supports all functions of a common Windows text editor, including importing/exporting text files. The following commands are provided in the context menu of both the text editor and the parameters dialog of the string text: Insert Symbol (by selecting it from the symbol table); Repeat Symbol inserted before; Insert Variable; Insert text from Dictionary (see below); call Measure command. |
|
Subscript and superscript text. Use of variables in text
The string text allows insertion of textual and numerical variables, subscripts and superscripts, as well as special symbols. These symbols are displayed using the same font as the main text.
You can use the context menu commands for inserting, while the pointer is within the text editor or the text contents input pane in the parameters dialog.
For example, to insert a variable in a text, you can use the context menu item "Insert Variable…" or use the function key <F8>. The standard dialog box "Insert Variable" will appear on the screen. Upon selecting a variable, the reference to the variable will be inserted in the text contents in the following format: {<variable name>}. In the drawing, the reference to the variable will be replaced by its value.
The string text also allows "manual" insertion of variables and various symbols in the text.
To insert variable values in a text, use the following syntax:
{<variable name>} or {<format>,<variable name>}
Example of using variables: Create the text with the following contents: Diameter of cylinder is {D} millimeters
![]()
Assigning the variable "D" the value "10" will make the text appear on the drawing as shown on the diagram.
The following is an example of using formatted representation of variables:
Today is {"%lg",DAY}, {"%s",$MONTH}, {YEAR}
The format structure used by T-FLEX variables corresponds to the syntax of the input/output formats of the "C" programming language. Use of formats helps you control the appearance of the variable as displayed on the screen (for example, the number of decimal digits, or justification of the output value).
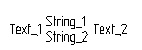
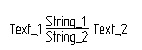
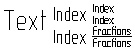
To insert a subscript or superscript at any position in a line of text, surround the intended block in double brackets: Text_1 [[String_1^String_2]] Text_2 |
|
Using the symbol "~" instead of "^", divides the String_1 and String_2 by a horizontal line: Text_1 [[String_1~String_2]] Text_2 |
|
Using angular brackets instead of square ones makes String_1 and String_2 displayed in a two times smaller font than the rest of the text: Text_1 <<String_1^String_2>> Text_2 |
|
String text can be framed by prefixing it with the symbol "~". This feature affects the whole text. |
|
Special symbols and underlining can be used in text.
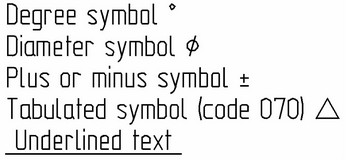
Text supports symbols in the Unicode format. Those are entered as "\U+FFFF", where "FFFF" – is a four-position hexadecimal describing the symbol code. For example, use of the symbol "\U+03A9" in combination with the "Arial" font is displayed as the Greek character "Ω".
To insert such symbols, one can use the standard Windows symbol table (Character Map). In it, you can find out the symbol code and insert it in the string text editor.
Editing string text
To edit a text, start the command "ET: Edit Text":
Keyboard |
Textual Menu |
Icon |
<ET> |
"Edit|Draw|Text" |
|
Upon calling the command, the following options become available in the automenu:
![]() <*> Select All Elements
<*> Select All Elements
![]() <R> Select element from list (for named elements only)
<R> Select element from list (for named elements only)
![]() <Esc> Exit command
<Esc> Exit command
Selection, editing the position and attachment, and modifying text parameters are similar to editing other system elements.
Selection of several text, as well as multiple selection of other system elements, can be done by box or by using the options ![]() (selection of all text) and
(selection of all text) and ![]() (selection from the list of the named elements). Besides that, the string text allow subsequent selection of elements by using
(selection from the list of the named elements). Besides that, the string text allow subsequent selection of elements by using ![]() with the <Shift> key depressed. Use of
with the <Shift> key depressed. Use of ![]() in combination with the depressed key <Ctrl> excludes the text from the list of selected for editing.
in combination with the depressed key <Ctrl> excludes the text from the list of selected for editing.
If the selected text is attached to some construction element, this element will be highlighted.
After selecting several text, the following options become available:
|
<P> |
Set selected Element(s) parameters |
|
<Alt+P> |
Copy Properties from Existing Element |
|
<N> |
Set relation with Node |
|
<K> |
Break (kill) relations |
|
<J> |
Merge Text |
|
<Del> |
Delete selected Element(s) |
|
<Esc> |
Cancel selection |
Upon selecting a specific element, the following options are available:
|
<E> |
Edit selected Text |
|
<P> |
Set selected Element(s) parameters |
|
<Alt+P> |
Copy Properties from Existing Element |
|
<Y> |
Create Name for selected Element |
|
<N> |
Set relation with Node |
|
<L> |
Set relation with Line |
|
<C> |
Place Text around Circle |
|
<K> |
Break (kill) relations |
|
<I> |
Select Other Element |
|
<X> |
Explode Text |
|
<D> |
Duplicate Text |
|
<Del> |
Delete selected Element(s) |
|
<Esc> |
Cancel selection |
The option ![]() is used for editing the selected text contents. When the option is called, the text editor window appears on the screen.
is used for editing the selected text contents. When the option is called, the text editor window appears on the screen.

To attach the selected text to a node, line or circle, the same options ![]() ,
, ![]() ,
, ![]() are used as when creating a text. To break and attachment, use the option
are used as when creating a text. To break and attachment, use the option ![]() .
.
The option ![]() allows breaking a text containing several lines into a number of separate elements. In this case, each line of the original text will be converted into a separate “String Text” element.
allows breaking a text containing several lines into a number of separate elements. In this case, each line of the original text will be converted into a separate “String Text” element.
The option ![]() allows creating a copy of the selected text.
allows creating a copy of the selected text.
Modification of text parameters is bound to the option ![]() .. The parameters dialog box appears in the screen. Besides accessing the text parameters and its contents, you can define the text position in the absolute coordinates or by an offset from the attachment node, if the text was attached to a node.
.. The parameters dialog box appears in the screen. Besides accessing the text parameters and its contents, you can define the text position in the absolute coordinates or by an offset from the attachment node, if the text was attached to a node.
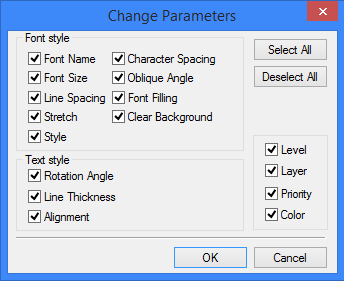
When calling the option while several elements are selected, you will have to first specify the parameters to be modified in the dialog box "Change Parameters". By default, all parameters of the selected elements are subject to editing. Upon specifying the parameters to edit, this standard text parameters dialog box appears.
Creating paragraph text
Paragraph Text is a text located in a specified rectangular area. The lines of such text are wrapped automatically upon reaching the area boundary. Various formatting functionalities can be used for paragraph text creation that are applicable to any text fragment.
To create a paragraph text, use the command "TE: Create Text".
When creating a text, the parameters are automatically used that were set as the default parameters (the option ![]() ). Originally, these parameters use the settings "from document". The text parameters will be applied to the whole content of the given text.
). Originally, these parameters use the settings "from document". The text parameters will be applied to the whole content of the given text.
When editing the contents of the text being created, you can assign specific parameters to its separate elements, for example, to an isolated word or sentence. This capability is described in the topic "Standard formatting options".
Defining text position and size
In the automenu, select the option:
![]() <R> Create paragraph text
<R> Create paragraph text
To create a paragraph text, first define the position and boundaries of the rectangular area that will hold the text (you can subsequently define several such areas with their boundaries). To do this, subsequently select the two bounding points for attachment. This can be freely done by clicking ![]() or specified by selecting existing nodes. Upon defining the first attachment point, a rectangle starts rubberbanding following the pointer, indicating the size and position of the text being created.
or specified by selecting existing nodes. Upon defining the first attachment point, a rectangle starts rubberbanding following the pointer, indicating the size and position of the text being created.
One can subsequently input the boundaries of several such rectangles. This, however, creates only one element of the type "paragraph text". This means, as the text being input fully occupies the first rectangle, the input automatically continues in the second rectangular area, etc. in the order of rectangles creation.
Next, click ![]() inside the defined area or the icon
inside the defined area or the icon ![]() (<End>) to proceed with entering the text contents. At this moment, the rectangle will appear as follows, depending on the way of attaching the text:
(<End>) to proceed with entering the text contents. At this moment, the rectangle will appear as follows, depending on the way of attaching the text:
If the paragraph text is attached to nodes
In this case, the rectangle can be modified or moved using the construction lines to which the paragraph text is attached.
If the paragraph text is not constrained
In this case, the rectangle can be moved, rotated or resized by using the provided handles while in the text editing mode. Move the rectangle using the handle located in the upper left corner of the rectangular area. Move the pointer to the handle (the pointer appearance will change), depress ![]() and drag the mouse to the desired position. The rectangular area of the text will follow the pointer.
and drag the mouse to the desired position. The rectangular area of the text will follow the pointer.
Meanwhile, the coordinates of the upper left corner of the rectangular area will be displayed in the auxiliary fields of the status bar: ![]() . To locate the text, move the pointer to the handle located in the up or right corner. The pointer appearance will change accordingly. Hold down the left mouse button and rotate the text rectangle in the desired direction. Rotation will be about the text centerpoint with snapping at each 15°. Rotation without snapping is done by depressing the <Ctrl> key. Rotation angle will also be displayed in the auxiliary field of the status bar.
. To locate the text, move the pointer to the handle located in the up or right corner. The pointer appearance will change accordingly. Hold down the left mouse button and rotate the text rectangle in the desired direction. Rotation will be about the text centerpoint with snapping at each 15°. Rotation without snapping is done by depressing the <Ctrl> key. Rotation angle will also be displayed in the auxiliary field of the status bar.
To resize the rectangle, move the pointer over one of the small squares located at midpoints of each side and at each corner of the rectangle. The pointer will assume the shape corresponding to the vertical, horizontal or diagonal resizing. Hold the ![]() down and move the pointer in the desired direction.
down and move the pointer in the desired direction.
Inputting text contents
When inputting the contents of a paragraph text, the user is provided with various tools for formatting the text being input. To call the necessary options, you can use the system toolbar, the context menu or the command automenu.
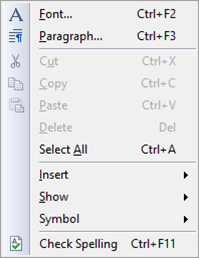
Selection of a text fragment (as for its formatting) is done by dragging the mouse with the ![]() depressed. To select the whole contents of the paragraph text, one can use the key combination <Ctrl><A> or the context menu command "Select All". The command "Copy" allows copying a highlighted text fragment or table into the clipboard for further pasting into another "Text" element or into another application. The command "Paste" is used for pasting a text or table from the clipboard. For example, you can copy a table from Microsoft Word and paste it in T-FLEX CAD. When working with variables, as well as with various objects inserted in the text, additional commands are provided in the context menu for defining and modifying the object parameters (see below).
depressed. To select the whole contents of the paragraph text, one can use the key combination <Ctrl><A> or the context menu command "Select All". The command "Copy" allows copying a highlighted text fragment or table into the clipboard for further pasting into another "Text" element or into another application. The command "Paste" is used for pasting a text or table from the clipboard. For example, you can copy a table from Microsoft Word and paste it in T-FLEX CAD. When working with variables, as well as with various objects inserted in the text, additional commands are provided in the context menu for defining and modifying the object parameters (see below).
System toolbar options for handling text
As you enter the mode of creating (editing) text contents, the system toolbar appearance changes. Various text-handling options become available. Those work on all elements of the paragraph text.
![]()
|
|
![]() Text numbering <Ctrl+M>. Turns on and off automatic numbering of parameters. Once turned on, the paragraph numbering begins from number 1. The subsequent paragraphs are numbered automatically until the command is turned off. To access additional settings of text numbering, lunch the command "Format Paragraph" (see the description below).
Text numbering <Ctrl+M>. Turns on and off automatic numbering of parameters. Once turned on, the paragraph numbering begins from number 1. The subsequent paragraphs are numbered automatically until the command is turned off. To access additional settings of text numbering, lunch the command "Format Paragraph" (see the description below).
![]() Box. With this option turned on, the selected text will be framed by a box.
Box. With this option turned on, the selected text will be framed by a box.
![]() Show Unprintable characters <Ctrl+F2>. Toggles the display of the formatting marks. When viewing or editing a document, various formatting marks can be displayed, such as tabulation characters, spaces and paragraph marks that do not appear in printouts. For example, tabs are marked by arrows, spaces - by dots. This allows identifying, for instance, extra spaces between the words, spaces used instead of tabulation, etc.
Show Unprintable characters <Ctrl+F2>. Toggles the display of the formatting marks. When viewing or editing a document, various formatting marks can be displayed, such as tabulation characters, spaces and paragraph marks that do not appear in printouts. For example, tabs are marked by arrows, spaces - by dots. This allows identifying, for instance, extra spaces between the words, spaces used instead of tabulation, etc.
![]() Show Variable names <Ctrl+F3>. Defines whether the values or names of the variables are displayed on the drawing.
Show Variable names <Ctrl+F3>. Defines whether the values or names of the variables are displayed on the drawing.
Besides the above, the system toolbar allows defining the color, type and size of the text being created or selected portion of an existing text. Initially, these parameters are set "By default", that is, their values are taken from the text properties defined before the text creation.
To set a color different from the default color, turn off the button ![]() and select the color from the list (the button
and select the color from the list (the button ![]() turns off automatically as you select a color from the list). To use the color set “By default”, push the button
turns off automatically as you select a color from the list). To use the color set “By default”, push the button ![]() .
.
Automenu options for handling text
When inputting a text, the following automenu options are available to the user:
Standard Windows options:
![]() Cut selected text. <Ctrl><X>
Cut selected text. <Ctrl><X>
![]() Copy selected text to Clipboard. <Ctrl><C>
Copy selected text to Clipboard. <Ctrl><C>
![]() Paste selected text from Clipboard. <Ctrl><V>
Paste selected text from Clipboard. <Ctrl><V>
When pasting a text from the Clipboard, the system checks the type of the clipboard contents against the current variable, preventing, for instance, insertion of a character string into a numerical variable.
Insertion options:
A black triangle in the lower right corner of an icon indicates the presence of several enclosed options behind this icon. Holding the button ![]() depressed a bit longer over such an icon opens up a menu with additional options.
depressed a bit longer over such an icon opens up a menu with additional options.

Any of the enclosed options can be displayed by the automenu. Usually, it is the icon of the option used last in this command.
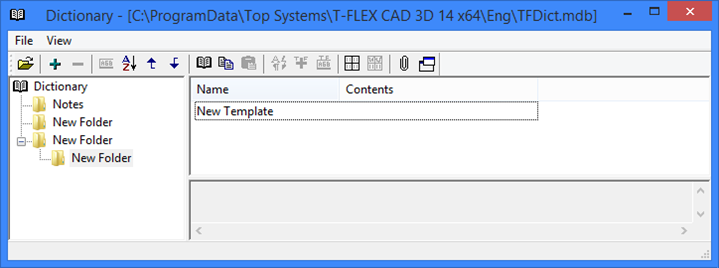
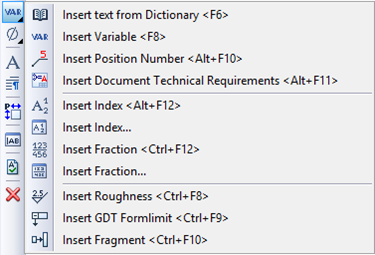
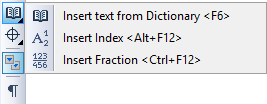
![]() Insert text from Dictionary. <F6>. Opens the dictionary (see the section "Working with dictionary" below).
Insert text from Dictionary. <F6>. Opens the dictionary (see the section "Working with dictionary" below).
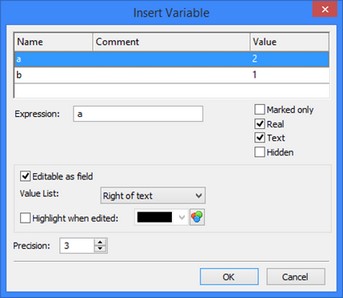
![]() Insert Variable. <F8>. If variables exist in the drawing at the time of the text creation, those can be inserted in the text using this option. Upon calling the command, the "Insert Variable" dialog box appears on the screen. This dialog displays the list of variables created in the current drawing. This list can be sorted by the attributes of the variables when displayed:
Insert Variable. <F8>. If variables exist in the drawing at the time of the text creation, those can be inserted in the text using this option. Upon calling the command, the "Insert Variable" dialog box appears on the screen. This dialog displays the list of variables created in the current drawing. This list can be sorted by the attributes of the variables when displayed:
"Marked only" – the variables that were checkmarked in the variable editor (external);
"Real" – the variables with numerical value;
"Text" – the textual string variables. Next, select a variable from the list to be inserted. The variable name will then be automatically entered in the "Expression" input box. You can create a new variable by entering its name manually.
Besides a variable name, you can insert an expression – in this case, the result of its evaluation will be displayed on the drawing. To make a variable available for editing directly in the text, set the flag "Editable as field".
To edit an expression inserted in a text, call the "Insert variable" dialog box again. To do this, while editing the text, point the mouse to the expression/variable and right click ![]() , and then select the "Parameters…" item in the context menu.
, and then select the "Parameters…" item in the context menu.
You can control the displayed number of decimal digits of real variables inserted in the text by the parameter "Precision".
If the variable has a list of predefined values, then you can specify the position of the list access button that will be displayed in the variable editing mode:
Right of text – the button will be located on the right hand side and immediately after the variable. |
|
Left of text border – the button will be located at the end of the line within the rectangular text area. |
|
Right of text border – next to the end of the line outside the rectangular text area. |
|
None – the list access button is not displayed.
If a variable with a predefined list is followed in the text by another element (text or variable), then the option Right of text will be used for the list access button of this variable.
The editable variables can be highlighted among the given paragraph text for easy selection while in the editing mode (see the section "Editing paragraph text"). You can define their highlighting color. To do this, check the flag "Highlight when edited" and select the highlighting color from the list.
![]() Insert position numbers <Alt+F10>. This command allows us to insert the BOM position number into the text. When invoking this command the “BOM record selection” window appears, in which it is required to specify the desired BOM object. When the position number of the selected object in the BOM is changed, it will also be updated in the text.
Insert position numbers <Alt+F10>. This command allows us to insert the BOM position number into the text. When invoking this command the “BOM record selection” window appears, in which it is required to specify the desired BOM object. When the position number of the selected object in the BOM is changed, it will also be updated in the text.
![]() Insert document’s technical requirements <Alt+F11>. This option allows us to insert into the text the technical requirements of the document that are specified in the “Format|Technical Requirements|Document’s Tech Requirements…” command.
Insert document’s technical requirements <Alt+F11>. This option allows us to insert into the text the technical requirements of the document that are specified in the “Format|Technical Requirements|Document’s Tech Requirements…” command.
To modify an expression inserted in a text, call the Insert variable dialog box again. To do this, while in the text editing mode, point the mouse to the area occupied by the expression and right click ![]() , and then select the item "Parameters…" in the context menu.
, and then select the item "Parameters…" in the context menu.
![]() Insert Index <Alt+F12> and
Insert Index <Alt+F12> and ![]() Insert Index…. . These options allow inserting subscripts and superscripts in a text.
Insert Index…. . These options allow inserting subscripts and superscripts in a text.
Upon selecting the option ![]() , two input boxes appear by the cursor position – the subscript and the superscript one. Use the arrow keys or the mouse for navigation.
, two input boxes appear by the cursor position – the subscript and the superscript one. Use the arrow keys or the mouse for navigation.
When selecting the option ![]() the dialog box appears on the screen in which the user can specify the font scale for the inserted indexes. After closing the dialog box, the fields for entering indexes appear at the cursor’s position.
the dialog box appears on the screen in which the user can specify the font scale for the inserted indexes. After closing the dialog box, the fields for entering indexes appear at the cursor’s position.
![]() Insert Fraction <Ctrl+F12> and
Insert Fraction <Ctrl+F12> and ![]() Insert Fraction….. . Are similar to the options "Insert Index" (
Insert Fraction….. . Are similar to the options "Insert Index" (![]() and
and ![]() ). The subscript and superscript fields are divided by a horizontal line in this case.
). The subscript and superscript fields are divided by a horizontal line in this case.
The options "Insert Index" and "Insert Fraction" allow unlimited nesting, which means that any subscript/superscript or fraction can contain an unlimited number of its own subscripts/superscripts or fractions.
![]() Insert Roughness <Ctrl+F8>. Allows inserting the roughness symbol in the text. Upon calling the command, the standard "Roughness Symbol Parameters" dialog box appears. The same options are available in this case as when inserting the roughness symbol directly in the drawing.
Insert Roughness <Ctrl+F8>. Allows inserting the roughness symbol in the text. Upon calling the command, the standard "Roughness Symbol Parameters" dialog box appears. The same options are available in this case as when inserting the roughness symbol directly in the drawing.
![]() Insert GD&T Formlimit <Ctrl+F9>. This command is similar to the previous one. Upon calling the command, the standard "GD&T Symbol Parameters" dialog box appears.
Insert GD&T Formlimit <Ctrl+F9>. This command is similar to the previous one. Upon calling the command, the standard "GD&T Symbol Parameters" dialog box appears.
![]() Insert Fragment <Ctrl+F10>. Sometimes, you may need to insert, let's say, a symbol, that is not present in any table. In this case, first you can create its 2D drawing, and then insert it in the text as a 2D fragment. When inserting a fragment in a text, the standard "Insert Fragment" dialog box appears.
Insert Fragment <Ctrl+F10>. Sometimes, you may need to insert, let's say, a symbol, that is not present in any table. In this case, first you can create its 2D drawing, and then insert it in the text as a 2D fragment. When inserting a fragment in a text, the standard "Insert Fragment" dialog box appears.
The images of the roughness or tolerance symbol or a fragment can be scaled in two ways. The scaling can be with respect to the font height or with respect to the object itself.

To alter the way of scaling of the inserted object (the roughness, tolerance or a fragment), while in the text editing (creation) mode, right click over the element ![]() , and then select the "Size and Position…" item in the context menu. In the coming up "Object Parameters" dialog box, specify the scale value and the way of scale (with respect to "Object size" or "Font size"). The element properties can be modified by selecting the "Parameters…" item.
, and then select the "Size and Position…" item in the context menu. In the coming up "Object Parameters" dialog box, specify the scale value and the way of scale (with respect to "Object size" or "Font size"). The element properties can be modified by selecting the "Parameters…" item.
![]() Insert Diameter <Alt+F2>,
Insert Diameter <Alt+F2>, ![]() Insert Degree <Alt+F3>,
Insert Degree <Alt+F3>, ![]() Insert “Plus Minus” <Alt+F4> - the shortcuts are provided for inserting these frequently used symbols.
Insert “Plus Minus” <Alt+F4> - the shortcuts are provided for inserting these frequently used symbols.
![]() Insert Special <Alt+F9>. Inserts a symbol from the table of special symbols.
Insert Special <Alt+F9>. Inserts a symbol from the table of special symbols.
![]() Non-Breaking Space <Shift+Ctrl+Spacebar> and
Non-Breaking Space <Shift+Ctrl+Spacebar> and ![]() Non-Breaking Hyphen <Shift+Ctrl+"-">. Allows creating a phrase without wrapping to the new line.
Non-Breaking Hyphen <Shift+Ctrl+"-">. Allows creating a phrase without wrapping to the new line.
![]() Line Break <Shift+Enter>. Continues the text on the new line without creating a new paragraph.
Line Break <Shift+Enter>. Continues the text on the new line without creating a new paragraph.
![]() Open Character Map <Alt+F5>. This command brings up the standard Windows character map table, allowing to pick a symbol or a set of symbols into the clipboard
Open Character Map <Alt+F5>. This command brings up the standard Windows character map table, allowing to pick a symbol or a set of symbols into the clipboard
Standard formatting options
![]() Format Font <F9> This option allows setting the special parameters for a text contents fragment, such as a separate word or sentence. Calling the option brings up the "Font" dialog box. The following parameters can be defined in this dialog:
Format Font <F9> This option allows setting the special parameters for a text contents fragment, such as a separate word or sentence. Calling the option brings up the "Font" dialog box. The following parameters can be defined in this dialog:
Name and Size. Modify the font appearance and size of the selected text element. If set to "Default", the font name and size assume the overall text parameters.
Font Style, Italic by Default, Boldface by default. When the flag "Italic by Default" is set, the overall text italic style setting is used. When the flag is cleared, the edited text fragment is assigned the style, specified by the parameter "Style": "Regular", "Bold", "Italic" and "Bold Italic" and “From the Status” (the style is taken from the parameters of the entire paragraph-text). The “Boldface by default” flag works in the same way.
Underline. This parameter allows defining the way of underlining a text: "None" – without underlining, "Single" – with underlining (This is the underlined text).

Character spacing. Defines spacing between neighboring characters in a line.
Color. This parameter sets the font color. If the "Default" flag is turned on, the text color is used from the general settings of the overall text.
Vertical offset. Defines the vertical text offset with respect to the bottom edge of the line. For positive offsets, the shift is upwards, for negative – downwards.
Box. With this flag turned on, the text will appear in a box. ![]()
Strikeout. Setting this flag will apply the Strikeout style on the text ![]()
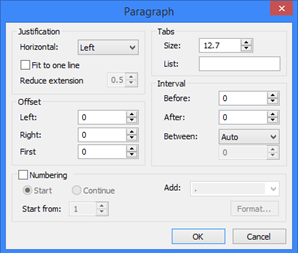
![]() Format Paragraph <F10>. By calling this command, you can set the parameters of the current or the selected paragraphs in the dialog box:
Format Paragraph <F10>. By calling this command, you can set the parameters of the current or the selected paragraphs in the dialog box:
Justification - Horizontal. This option controls the text horizontal justification. Four modes are supported: Left, Right, Center, Justify.
Fit to one line. Select this option when you need to fit the whole paragraph in one line. In this case, the font characters are first scaled by the width to the minimum extension (width) factor. If that's not enough, then the font height is reduced.
Reduce extension (width) to. Defines the minimum width factor.
Tab size. Defines the distance at which the cursor moves after pressing the <Tab> key.
Tab list. You can enter several numbers in the list, separated by commas, that will define the tab sizes. The numbers are automatically sorted in the ascending order. These numbers are the distances from the text left margin to the text position. For example, if you enter the set of numbers 20,40,50, then after pressing the <Tab> key first time the cursor will move by 20 measurement units from the left margin; on pressing the second time – by 40, on the third time – by 50. Thereafter, the tabulation is done according to the specified size (the default is 12.7).
Offset. Defines the distance from the boundary of the rectangular area to the text – left, right, new line indent.
Interval. Defines the spacing between the lines.
Before – sets the height of the first line in the paragraph,
After – sets the spacing between the last line of the current paragraph in the first line of the next one.
Between – sets the spacing between the lines in a paragraph. With the "Auto" setting, the spacing is set automatically, depending on the maximum font height (by the printed characters). "Minimum" - sets the numerical value of the minimum line spacing. If a printed character doesn't fit in the line by height, the spacing is increased automatically. "Exactly" - defines a strictly fixed numerical value of the line spacing. "Factor" – defines the line spacing as the product of the font height (by the printed characters) and the input factor.
Numbering. This option allows turning on the automatic numbering of the paragraphs. You can specify a number to start a new numbering or to continue an existing numbering with. Additionally, you can define the format of the font for the digits of the current numbering.
A new paragraph is automatically created by pressing the <Enter> key. However, you can wrap a textual string to the new line without creating a new paragraph. To do this, press <Shift><Enter> (the icon ![]() ).
).
Options to control text input and text editing
![]() Parameters of changing Paragraph size <Ctrl+F5>. This option is provided for the paragraph text only. It calls the dialog box for defining the coordinates of the window and the system actions in various situations.
Parameters of changing Paragraph size <Ctrl+F5>. This option is provided for the paragraph text only. It calls the dialog box for defining the coordinates of the window and the system actions in various situations.
The “Width” tab defines the system action in the case when the text doesn't fit into the box by width:
Ignore. The text part that doesn't fit in the box will be saved but not displayed on the screen.
Enlarge width of rectangle – in the specified direction by the specified amount (the respective numerical value is displayed in the dialog which automatically appears in the process of text input).
Ask. This sets automatic display of the query dialog in the case when the text does not fit in the box. If this parameter is not set, then the previously specified action will be executed without displaying the dialog. This parameter is On by default.
The “Height” tab defines the system actions in the case when the text doesn't fit in the box by height. It contains the same options as the “Width” tab, and, additionally:
Create new rectangle on current/new/next page. This option allows to create a new box with the specified coordinates on the respective page of the drawing. If necessary, the new page will be created automatically.

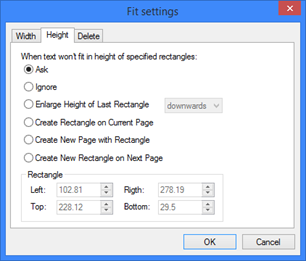
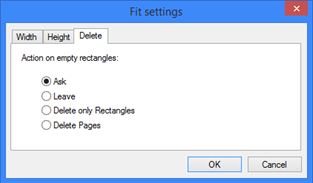
The “Deletion” tab serves to define the system actions in the case when the text shrinks so much that the last created box becomes empty. One can select one of the following options:
Ask. This parameter is similar to the same-name parameters on other types of this dialog. It sets the automatic display of the query dialog when the text shrinks. If this parameter is not set, then the previously specified action will be executed without displaying the dialog.
Leave. The paragraph text is left as is, with boxes remaining empty.
Delete only Rectangles. This means an emptied rectangle area (box) will be automatically deleted. Meanwhile, the document page, on which it was located, will still exist.
Delete Pages. An emptied rectangular area (box) of the paragraph text is automatically deleted. In addition, the document page, on which it was located, will also be deleted (provided that this text area was the only object on the page).
If the “Ask” option is set on any of the tabs of this dialog's window, and one of the above-described situations takes place, then an abridged dialog window will be automatically displayed. The contents of such dialog will be similar to the contents of the respective tab of the “Fit Settings” dialog. In addition, the dialog will have another parameter:
Don't ask this question again: ("For this text", "For this session"). If set, then the action defined in this dialog box will be performed in the future without displaying the dialog box. It is defined separately for the width and the height of the rectangle.
![]() Edit in separate window <F11> . Allows editing the text in the text editor (see the section "Edit paragraph text").
Edit in separate window <F11> . Allows editing the text in the text editor (see the section "Edit paragraph text").
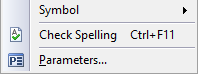
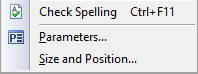
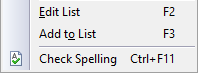
![]() Check Spelling <F7>. This option invokes the command for checking the spelling of the contents of the current text.
Check Spelling <F7>. This option invokes the command for checking the spelling of the contents of the current text.
Editing paragraph text
To edit a paragraph text, use the command "ET: Edit Text":
Keyboard |
Textual Menu |
Icon |
<ET> |
"Edit|Draw|Text" |
|
Selection of several paragraph text, just like multiple selection of other system elements, can be done by box or using the options ![]() (selects all text) and
(selects all text) and ![]() (selection from the list of the named elements). When selected, all rectangular areas of the specified paragraph text are highlighted.
(selection from the list of the named elements). When selected, all rectangular areas of the specified paragraph text are highlighted.
Upon multiple text selection, the following options become available:
|
<P> |
Set selected Element(s) parameters |
|
<Del> |
Delete selected Element(s) |
|
<Esc> |
Cancel selection |
Upon selecting a single element, the following options are available:
|
<E> |
Edit selected Text |
|
<P> |
Set selected Element(s) parameters |
|
<D> |
Add Rectangle |
|
<Y> |
Create Name for selected Element |
|
<N> |
Set relation with Node |
|
<I> |
Select Other Element |
|
<Del> |
Delete selected Element(s) |
|
<Esc> |
Cancel selection |
Text contents editing mode
To begin editing, click ![]() inside the rectangular area or select the option
inside the rectangular area or select the option ![]() .
.
There is yet another way to select a text for editing. When the system is in the command waiting mode, point the mouse to the text to be edited and right click ![]() . In the coming up context menu, select the item "Edit text".
. In the coming up context menu, select the item "Edit text".
Besides that, if the parameter "'Transparent' Text editing" is set among the drawing settings (the command ST: Set Document Parameters, the tab "Preferences"), then you can start the text editing mode by clicking the text ![]() (the pointer in this case turns into a textual cursor).
(the pointer in this case turns into a textual cursor).
Modifying parameters of selected elements
To modify parameters of selected text, use the option ![]() . If the whole paragraph text was selected, then after calling the option a dialog box appears with general parameters of the paragraph text:
. If the whole paragraph text was selected, then after calling the option a dialog box appears with general parameters of the paragraph text:
Level, layer, priority, color – the standard parameters for all T-FLEX CAD elements.
Symmetric. This parameter defines "mirror" text mode.
Account for italic font while formatting. Enabling this parameter allows us to take into consideration the text in italic when placing the elements of fractions, indices and also when formatting the paragraph in the “fit into one line” mode.
By default this parameter is disabled for texts created in T‑FLEX CAD of versions 11 and lower, and enabled for the newly created texts.
The "Font" tab contains several standard parameters. If a rectangular area is selected (see the topic "Editing rectangle" for selection tips), then the option call brings up the dialog box Rectangle parameters:
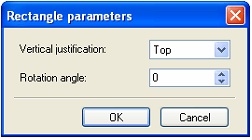
Vertical Justification - sets the vertical text justification inside the selected rectangle. Three justification options are available –Top, Center, and Bottom.
Rotation angle – allows rotating the rectangular area by an arbitrary angle, in degrees. In the case of selecting several elements, upon calling the option <P>, the dialog box appears for selecting theparameters to be edited. The checkmarked parameters will be available for editing in the general text parameters dialog box that follows.
Adding rectangle
The following option adds a rectangle at the end of the list of the existing rectangles:
![]() <D> Add Rectangle
<D> Add Rectangle
If an existing area of the paragraph text being edited was selected before calling the option, then the new rectangle will be inserted in the list before the selected area.
The new rectangle (box) may be automatically created when the content of a paragraph text is edited.
Editing rectangle
To resize an arbitrary rectangular area of a paragraph text, first you need to select it. To do this, click ![]() on the outer side of the rectangle. Now, you can resize it by the mouse.
on the outer side of the rectangle. Now, you can resize it by the mouse.
Automatic deletion of rectangle
It is possible that, as you edit a paragraph text that spans several boxes, the text shrinks so much that the last created box becomes empty. In this case, the system could maintain the empty box, or delete it from the page, or even delete it together with the page on which it is located, provided that this text box is the only object on that page. The specific system actions depend on the settings made in the dialog of the “Parameters of changing Paragraph size” option (the icon ![]() ) in the text content editing mode (see the topic “Entering text content”).
) in the text content editing mode (see the topic “Entering text content”).
Editing text in separate window
Besides the way of editing a paragraph text directly on the drawing, there is a provision for working in the text editor. To start the editor in the text contents editing mode, call the option ![]() . The text editor window will be displayed.
. The text editor window will be displayed.
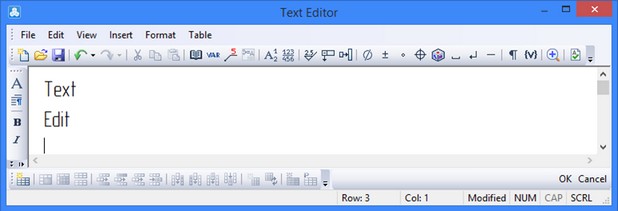
The text editor provides all the text handling options described above (formatting and insertion), plus the option:
![]() Zoom. The displayed text can be zoomed for convenience.
Zoom. The displayed text can be zoomed for convenience.
The text editor also allows working with various text document files. The following formats are supported: T-FLEX Paragraph Text (*.tft), Rich Text Format (*.rtf), Text files (*.txt), DOS Text files (*.txt).
The following options are used for handling files:
![]() New Text <Ctrl+N>. Creates a new document.
New Text <Ctrl+N>. Creates a new document.
![]() Open <Ctrl+O>. Opens a text document.
Open <Ctrl+O>. Opens a text document.
![]() Save as <Ctrl+S>. Saves changes in a file.
Save as <Ctrl+S>. Saves changes in a file.
These options support exchange of text with other text editors. Suppose, for example, that you need to import a Microsoft Word document into a T-FLEX CAD drawing. To do this, use the "Save as" command in Microsoft Word and save a copy of the document in the RTF format. Then, in the T-FLEX CAD text editor open the RTF document using the command "Open file". Thus, you open a copy of the original Word document with all the formatting preserved. You can export text in a similar way. Besides, you can carry over a text from one editor to another by using the clipboard via the commands "Put selection on Clipboard", "Paste Clipboard contents".
The commands for editing paragraph text can be also called from the context menu by right clicking ●"Edit" - calls the command "ET: Edit Text"; ●"Delete" - deletes the selected text; ●"Parameters" - lunches the parameters editing of the selected text; ●"Edit text" (for multiline and paragraph text) - executes the command of editing the paragraph text in the text contents editing mode; ●"Edit in Dialog" - calls the text editor for editing the contents of the selected text; ●"Edit Variables" (if variables exist in the selected text) - starts variable editing mode. |
|
Variable editing mode
To modify the values of the variables inserted in a paragraph text, you do not have to start variable editor. Modifications can be done directly in the text, which is convenient.
This way of editing variables is applicable only to the variables inserted in the text with the flag "Editable as field" checked.
To start variable editing mode, simply point the mouse to the inserted variable and click ![]() . Besides, this mode can be invoked from the context menu by right clicking
. Besides, this mode can be invoked from the context menu by right clicking ![]() over a paragraph text.
over a paragraph text.
The paragraph text containing the chosen variable will be selected as if in the text contents editing mode. However, available for editing will be only the variables inserted in the text and flagged as "Editable as field".
At this moment, the following icons will appear in the automenu:
|
<Ctrl+Enter> |
Finish Variable change |
|
<Ctrl><X> |
Cut |
|
<Ctrl><C> |
Copy |
|
<Ctrl><V> |
Paste |
|
<F6> |
Text… |
|
<Alt+F2> |
Special… |
|
<Ctrl><F3> |
Show “Select from List” buttons |
|
<Ctrl><F2> |
Show non-printing symbols |
|
<Esc> |
Cancel Variable change |
The options ![]() and
and ![]() allow the user to insert the text from the dictionary, indexes, fractions and special symbols into the expression of the edited variable. Both options contain the lists of embedded icons. Any of them can be shown in the automenu. Usually it is the icon of the option which was invoked the most recently.
allow the user to insert the text from the dictionary, indexes, fractions and special symbols into the expression of the edited variable. Both options contain the lists of embedded icons. Any of them can be shown in the automenu. Usually it is the icon of the option which was invoked the most recently.

When using the options of insertion into the expression of the edited variable, the special symbols of formatting by rules adopted for the string text are automatically added (see section “Subscript and Superscript Text. Use of Variables in Text”).
The options ![]() ,
, ![]() ,
, ![]() are provided for handling the selected portion of the current variable value. As the contents of the clipboard are being pasted, the system checks the correspondence between the types of the clipboard contents and the current variable. Therefore, it is impossible to insert a character string into a numerical variable.
are provided for handling the selected portion of the current variable value. As the contents of the clipboard are being pasted, the system checks the correspondence between the types of the clipboard contents and the current variable. Therefore, it is impossible to insert a character string into a numerical variable.
Besides, the system checks for presence of the tab character dividers in the text being inserted. If the text being inserted into the field of a textual variable contains the tabulation characters, it will be processed as follows. The portion of the text before the first tabulation character will be inserted in the current variable. If there are more textual variables in this paragraph text, then the next portion of the clipboard text will be automatically entered in the field of the next variable, and so on until all variables or the clipboard contents are used up.
The option ![]() toggles the display of the graphic buttons for selecting from the predefined list of values.
toggles the display of the graphic buttons for selecting from the predefined list of values.
The option ![]() toggles the display of the formatting marks (tab, new line, etc.) in the text being edited.
toggles the display of the formatting marks (tab, new line, etc.) in the text being edited.
To confirm the changes you have made, press the option ![]() or click the mouse outside the text area. The option
or click the mouse outside the text area. The option ![]() allows quitting the mode without saving the entered changes.
allows quitting the mode without saving the entered changes.
A provision is made for the variables with a predefined list of values stored in a file for editing or adding values to the list without entering the variable editor. Simply right click ![]() and select the respective item in the coming up context menu.
and select the respective item in the coming up context menu.
Creating and editing multiline text
The Multiline Text, as opposed to the paragraph text, is always located in one rectangular area, whose boundaries extend as the text is being input until the user presses "Enter" for wrapping the text to the new line.
To create a multiline text, use the command "TE: Create Text".
When creating a text, the parameters are automatically used that were set as the default parameters (the option ![]() ). Originally, these parameters use the settings "from document". The text parameters will be applied to the whole content of the given text.
). Originally, these parameters use the settings "from document". The text parameters will be applied to the whole content of the given text.
When editing the contents of the text being created, you can assign specific parameters to its separate elements, for example, to an isolated word or sentence.
To create a multiline text, select the option:
![]() <М> Create Multiline Text
<М> Create Multiline Text
Next, you need to specify the text attachment point. This can be done in three ways: by pointing the mouse anywhere in the document and clicking ![]() , or by specifying the absolute coordinates using the option
, or by specifying the absolute coordinates using the option ![]() , or else by selecting a node for attaching the text. A rectangular area will appear on the screen with a blinking cursor. You can now start inputting the text.
, or else by selecting a node for attaching the text. A rectangular area will appear on the screen with a blinking cursor. You can now start inputting the text.
The options for creating a multiline text are similar to the options for the paragraph text creation. An exception is the additional icons for defining the ways of vertical positioning of the text with respect to the attachment point.
When creating a new text, an icon is always present in the automenu that indicates the default attachment. (This attachment is defined in the text parameters before the text creation.) Usually, this is the attachment at the upper left corner. The list of the enclosed icons will appear if you press and hold ![]() for a short while. Selecting one of these icons will define the position of the text being created or edited with respect to the attachment point as follows. Selecting one of the top attachment settings positions the text below the attachment point; selecting one of the bottom settings positions the text above the attachment point; one of the center settings centers the text with respect to the attachment point.
for a short while. Selecting one of these icons will define the position of the text being created or edited with respect to the attachment point as follows. Selecting one of the top attachment settings positions the text below the attachment point; selecting one of the bottom settings positions the text above the attachment point; one of the center settings centers the text with respect to the attachment point.
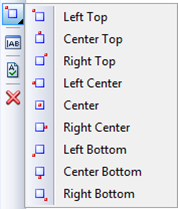
The selected icon will be displayed in the automenu. The icon displayed in the automenu will be applied by default to newly created multiline text. When editing a multiline text, the icon is displayed in the automenu that corresponds to the attachment type of the text being edited. An attachment type for the text can be set without scrolling through the list of the enclosed icons. You can simply keep pressing the option in the automenu. That will rotate the icons and, therefore, the attachment type of the text with respect to the attachment point.
There is another difference of the multiline text from the paragraph text. Moving and rotating the rectangular text area can be done with respect to the text attachment point, which is marked by a cross when rotating.
Multiline text editing is similar to editing the paragraph text, except for the options provided for editing the rectangular text area.
Creating and editing tables
Table creation is based on the multiline text. The command used for this purpose is "TE: Create Text".
Editing tables is none different from its creation. The table editing options are similar to the options of the multiline and paragraph text, except for the options for editing the rectangular text area.
A table can be defined in two ways. One way is by inserting the table in a text (the paragraph text or multiline text). In this case, the table will be placed inside the text. Alternatively, you can create a stand-alone table. In the latter case, you cannot type outside the table borders. Select the option:
![]() <B> Create Table
<B> Create Table
Before creating the table, you can set the default parameters (the icon ![]() ) that will be applied to all newly created tables. The default color defines the font color for typing in the table and the table border color.
) that will be applied to all newly created tables. The default color defines the font color for typing in the table and the table border color.
Next, specify the table attachment point. This can be done in three ways. One way is to click the mouse ![]() at an arbitrary place within the document. The other way is to specify the absolute coordinates using the option
at an arbitrary place within the document. The other way is to specify the absolute coordinates using the option ![]() . Yet another way is to select a node for attaching the table. An empty rectangular text area will then be displayed, along a dialog box, where you can specify some parameters of the table being created. The buttons set “Text” will be displayed on the main toolbar (if it is not locked).
. Yet another way is to select a node for attaching the table. An empty rectangular text area will then be displayed, along a dialog box, where you can specify some parameters of the table being created. The buttons set “Text” will be displayed on the main toolbar (if it is not locked).
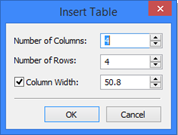
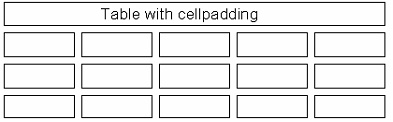
In the dialog box, set the desired number of columns and rows, as well as the combined width of all columns (individual column width can later be defined among the table properties). If the parameter "Column Width" is not set, then the system will automatically set the minimal column width. Upon confirming the specified parameters, the table being created will be drawn in the rectangle. If necessary, you can resize the cells by dragging their borders with the mouse.
Special handles are provided for moving and rotating the table just like the multiline text.
To start typing in the table, place the textual cursor in one of the table cells, and then enter the text.
The text creation options are similar to those for creating the paragraph text. The options defining the table attachment are similar to the attachment options for the multiline text. A table, just like a paragraph text or a multiline text, can be edited in a separate window.
A table's contents can be created by copying the contents of an already populated table or a Word table via the text clipboard. Vice versa: a T-FLEX CAD table can be copied into MS Word.
The following manipulations can be done with the help of the options on the main toolbar (button set “Text”):
![]() Insert Table <F12>. Inserts a table in a text (the paragraph text or multiline text). A dialog box appears, in which you can define the number of columns and rows in the table (see above). This option is available only if the table is inserted in a text or if the parameter is turned off, "Disable text input outside of Table" (see table properties/the tab "Table").
Insert Table <F12>. Inserts a table in a text (the paragraph text or multiline text). A dialog box appears, in which you can define the number of columns and rows in the table (see above). This option is available only if the table is inserted in a text or if the parameter is turned off, "Disable text input outside of Table" (see table properties/the tab "Table").
![]() Split Cells. Splits the selected cells (or the cell with the cursor) into the specified number of rows and columns.
Split Cells. Splits the selected cells (or the cell with the cursor) into the specified number of rows and columns.
![]() Merge Cells. Merges the selected cells into one.
Merge Cells. Merges the selected cells into one.
![]() Split Table. Splits the table into two separate tables. The split is made above the current row, if this is not the first row in the table. This option is available only when the table was inserted in a text or the parameter "Disable text input outside of Table" was turned off when creating the standalone table (see table properties/the tab "Table").
Split Table. Splits the table into two separate tables. The split is made above the current row, if this is not the first row in the table. This option is available only when the table was inserted in a text or the parameter "Disable text input outside of Table" was turned off when creating the standalone table (see table properties/the tab "Table").
![]() Insert row before current. Inserts an empty row before the current row.
Insert row before current. Inserts an empty row before the current row.
![]() Insert row after current. Inserts an empty row after the current row.
Insert row after current. Inserts an empty row after the current row.
![]() Insert rows. Inserts a specified number of empty rows before or after the current row.
Insert rows. Inserts a specified number of empty rows before or after the current row.
![]() Delete rows. Deletes the selected rows (or the row of the cursor).
Delete rows. Deletes the selected rows (or the row of the cursor).
![]() Insert Column Before. Inserts an empty column at the left of the current column.
Insert Column Before. Inserts an empty column at the left of the current column.
![]() Insert Column After. Inserts an empty column at the right of the current column.
Insert Column After. Inserts an empty column at the right of the current column.
![]() Insert Columns. Inserts a specified number of empty columns before or after the current column.
Insert Columns. Inserts a specified number of empty columns before or after the current column.
![]() Delete Columns. Deletes the selected columns (or the current column).
Delete Columns. Deletes the selected columns (or the current column).
![]() Database. Inserts the contents of the internal database or a reference to a database into the table. Upon calling this option, a dialog box appears on the screen that allows selecting the name of one of the existing databases. Then, the list of the database fields appears in the "Columns" pane of the database.
Database. Inserts the contents of the internal database or a reference to a database into the table. Upon calling this option, a dialog box appears on the screen that allows selecting the name of one of the existing databases. Then, the list of the database fields appears in the "Columns" pane of the database.
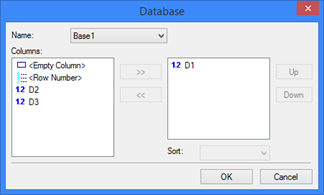
The data type (integer, real, text) is marked left of the field name. To enter the contents of a database field into a table cell, select the field name and press the graphic button [>>]. The field name will then be carried over into the right pane to prevent a repeated selection (except for the field keeping the ID number of the database record). The number of the selected database fields may not be greater than the number of the table columns. The order of the field names in the list of selected corresponds to the order of filling in the table columns (the first field contents is entered in the first column, and so
on). To delete data from a column, select the respective field name and press the graphic button [<<]. To modify the order of the data in the table, use the graphic buttons [Up], [Down]. A sorting rule can be assigned to any particular database field, except for the record number (none, ascending, descending). Upon confirming the selected fields by pressing the [OK] graphic button, the table will be filled with the respective values from the database.
If the database contents were changed, the table contents can be refreshed using the option:
![]() Refresh from Database. Refreshes the table contents according to the changes in the database.
Refresh from Database. Refreshes the table contents according to the changes in the database.
![]() Select Table. This option selects all cells in a table.
Select Table. This option selects all cells in a table.
![]() Table Properties. Calls the table properties dialog box.
Table Properties. Calls the table properties dialog box.
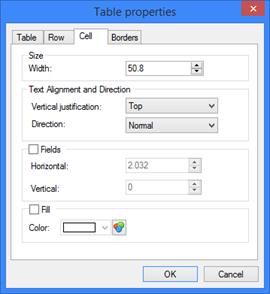
Table properties
"Table" tab
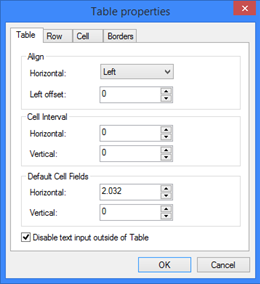
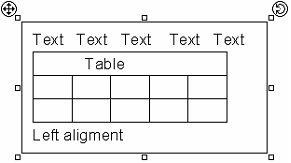
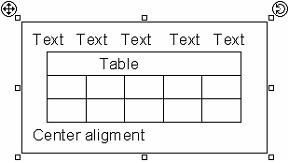
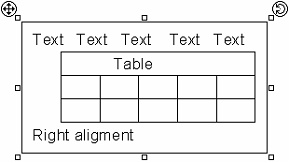
This tab allows defining the parameters that affect the whole table. Align - Horizontal. Aligns the table horizontally within the text rectangular area. The alignment options are "Left", "Center", "Right". The "Left" alignment option enables the offset parameter that defines the distance from the left side of the text rectangle to the table. Since standalone tables are created based on the multiline text, the dimensions of the text rectangular area depend on the input data. The values of this group of parameters are meaningful (and displayed) only in the case when some text was entered outside the table, thus increasing the size of the text rectangular area as compared to the table size. (See the description of the parameter "Disable text input outside of Table".)
Cell interval. This parameter defines horizontal or vertical padding of the cells.
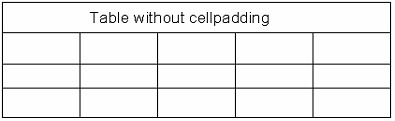
Default Cell Fields. Sets the amount of padding between the text being input and the cell boundaries. This parameter affects all table cells except those whose padding was defined separately on the tab "Cell".
Disable text input outside of Table. This parameter allows creating standalone tables. If not set, then the system is in the multiline text creation mode that allows inputting text outside the table. In this way, the table being created will be inside a multiline text. Once at least one character is typed outside the table, this parameter becomes inaccessible. If the table appears in the beginning of a text and you need to type a text before the table, place the text cursor in the beginning of the first table cell and press <Enter>. To return to creating a standalone table, delete all character typed outside the table, leaving outside just one empty line, and then set this parameter. (The tables that you insert in a text when creating a multiline or paragraph text, have this parameter turned off.)
"Row" tab
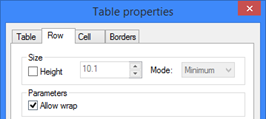
The "Size" group of parameters defines the height of the table rows:
Height. Sets the height value of the selected rows in the table. If this parameter is not set then the height of the rows is defined automatically depending on the maximum font height (by the printed characters), also accounting for the maximum amount of padding across the cells in a row. The parameter "Height" is not set for the rows of a newly created table and for rows that were added or created as a result of splitting cells.
Mode. This parameter controls the specified value of the row height depending on the kind of text being input:
Minimum. Sets the minimum value of the row height. If the text doesn't fit by the height of the row, the row height is automatically increased.
Exact. Sets a fixed value of the row height. The text that does not fit by height is not displayed and will be visible only if you increase the height of the row.
Multiple. As you input the text, the height of the row will always be a multiple of a specified value.
Allow wrap. Allows carrying the rows of the table over from one text rectangle to the next one, and, consequently, from one page to the next one (in the case of creating or using an existing table within a paragraph text).
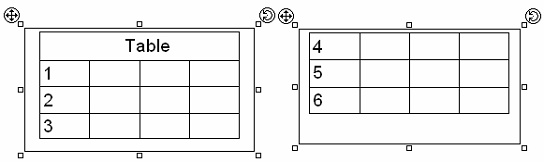
This parameter is set by default for all rows of the newly created tables, as well as the rows being added or created as a result of splitting cells. A row, for which this parameter is not set, will be kept together with the next row. As the table rows are carried over from one text rectangle into the next one, these rows will be carried over together.
"Cell" tab
Column width. Sets the width value of the selected columns. The group of parameters "Text Alignment and Direction" defines text alignment and direction inside each cell: Vertical justification. Defines the vertical alignment of the text inside the selected cell. There are three alignment options – "Top", "Center", "Bottom". Direction. Defines the text direction inside the selected cell. Four direction options are available – "Normal" (from left to right), "From Bottom to Top", "From Top to Bottom", "Upside Down". Fields. Defines the text padding ("Horizontal", "Vertical") inside the selected cells. If the parameter is not set, the padding values are used that were set for all table cells on the tab "Table". Fill. Defines the fill color of the selected cells. |
|
"Borders" tab
This tab allows modifying the borders of the selected rows, columns, cells or the whole table. Each border has a group of attributes that toggle the border display altogether and define the color and the borderline width. The attributes are placed next to the respective borders or pointed at by the witness lines. The first check box toggles the display of the border. The second one sets the border color to the default defined among the text parameters before the table creation. To set a border color different from the default, uncheck the item and select the desired color from the color list (the check is cleared automatically when selecting a color from the list). To restore the default border color, simply check the box again. The parameter "Width" defines the value of the borderline thickness. Its default value is copied from the drawing parameters ("ST: Set Document Parameters…|Lines|Other Lines"). |
|
A preview pane is provided on the tab that reflects on the border parameter changes as the textual cursor is replaced from one cell into another.
Working with dictionary
When creating drawings, you often need to add text elements that require multiple entries or repeat from a drawing to a drawing (such as, for example, technical specifications). T-FLEX CAD makes a provision for this case by including in the installation a standard dictionary with a set of technical requirements. The dictionary is based on a database complying with the Microsoft Access (*.MDB) format, represented by the file …T-FLEX CAD\Program\TFDict.mdb. The user can create custom dictionaries or modify this standard dictionary by manually adding or deleting elements from it. To create a new dictionary file, make a copy of the standard dictionary and save it under a different name, and then modify as desired.
The text elements from the dictionary can be inserted in all types of the text (the string, multiline, paragraph text, table).
The dictionary can be opened while within the text creation and editing commands. To do this, engage the option "Insert text from Dictionary" <F6> with the respective automenu icon ![]() or select the context menu item "Insert/Text" accessible by right clicking
or select the context menu item "Insert/Text" accessible by right clicking ![]() . The dictionary window is always on top of other windows.
. The dictionary window is always on top of other windows.
The following commands are available on the toolbar in various modes*:
![]() Open. Opens the dictionary file. You can open the file for editing or in the "Read Only" mode. The mode is set in the File Open dialog box.
Open. Opens the dictionary file. You can open the file for editing or in the "Read Only" mode. The mode is set in the File Open dialog box.
![]() Add. Creates a folder in the structure pane or a new line of text. A folder or text can be created from the context menu.
Add. Creates a folder in the structure pane or a new line of text. A folder or text can be created from the context menu.
![]() Delete. Deletes the selected objects from the dictionary.
Delete. Deletes the selected objects from the dictionary.
![]() Rename. Renames the selected objects (the names of folders or lines of text). You can activate renaming from the context menu or by clicking
Rename. Renames the selected objects (the names of folders or lines of text). You can activate renaming from the context menu or by clicking ![]() on the selected object.
on the selected object.
![]() Sort. Sorts the current list alphabetically.
Sort. Sorts the current list alphabetically.
![]() Move Up. Moves a line of text up the list.
Move Up. Moves a line of text up the list.
![]() Move Down. Moves a line of text down the list.
Move Down. Moves a line of text down the list.
![]() Keep visible. Allows continuously inserting several elements. The dictionary window is not closed after inserting a text. You can work simultaneously with the text and the dictionary.
Keep visible. Allows continuously inserting several elements. The dictionary window is not closed after inserting a text. You can work simultaneously with the text and the dictionary.
![]() Always on Top. While the option is active, dictionary window will be on top of all other windows.
Always on Top. While the option is active, dictionary window will be on top of all other windows.
![]() Insert into Editor. Inserts the selected text in the drawing (see the description below).
Insert into Editor. Inserts the selected text in the drawing (see the description below).
![]() Copy.
Copy.
![]() Paste.
Paste.
![]() Create formatted text. Calls the text editor (see the description above), where you can specify formatting parameters of the existing text or input new one. The formatted text cannot be edited in the dictionary dialog box. Instead, use the following command:
Create formatted text. Calls the text editor (see the description above), where you can specify formatting parameters of the existing text or input new one. The formatted text cannot be edited in the dictionary dialog box. Instead, use the following command:
![]() Edit formatted text. Calls the text editor window where you can edit formatted text. You can start the text editing mode by double-clicking
Edit formatted text. Calls the text editor window where you can edit formatted text. You can start the text editing mode by double-clicking ![]()
![]() in the editing pane located in the lower right corner.
in the editing pane located in the lower right corner.
![]() Delete formatted text. Deletes all text formatting. Such text can be edited in the dictionary dialog box.
Delete formatted text. Deletes all text formatting. Such text can be edited in the dictionary dialog box.
![]() Add reference database. This option allows including in the dictionary the contents of a database fields (*.mdb). After calling the option, a file browser appears on the screen for selecting the desired database. Note that adding a group with the selected database is done on the current level of the dictionary structure. Upon the creation, the database reference group can be renamed (the default name is composed of the path and the database filename) or moved to another level. Unlike other dictionary folders, the contents of a database by reference cannot be edited or converted into the formatted text. The next step will be defining the database parameters (at creation, this dialog box appears automatically).
Add reference database. This option allows including in the dictionary the contents of a database fields (*.mdb). After calling the option, a file browser appears on the screen for selecting the desired database. Note that adding a group with the selected database is done on the current level of the dictionary structure. Upon the creation, the database reference group can be renamed (the default name is composed of the path and the database filename) or moved to another level. Unlike other dictionary folders, the contents of a database by reference cannot be edited or converted into the formatted text. The next step will be defining the database parameters (at creation, this dialog box appears automatically).
![]() Edit database parameters. The dialog box appears as shown on the diagram.
Edit database parameters. The dialog box appears as shown on the diagram.
The left portion of the dialog contains the list of all fields of the selected table in the database (the table is selected from the list in the item "Table"). In the right hand side pane of the dialog the user places the fields to be used in the dictionary. To add a field, select it in the left pane and press the graphic button [>>]. To delete a field selected in the right thing and press the graphic button [<<]. The graphic buttons [Add All], [Delete All] do this with all elements of the field list. The selected database fields will be placed in the dictionary window in the order they were in the right pane of the dialog. To modify a field position, select it in the right pane of the dialog and move within the list using the buttons [Up], [Down]. The SQL Request field is provided for specifying the selection condition for the fields and records in the database.
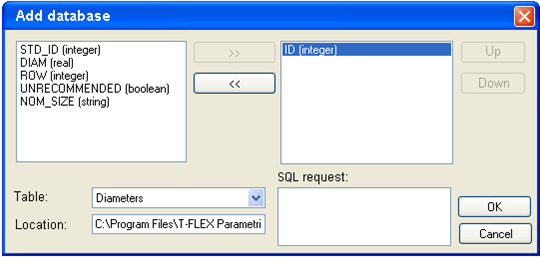
Besides, you can use the commands from the main dialog menu:
File/Add from… Allows merging the database file you've specified into the current dictionary database file.
File/Save as… Allows saving the current dictionary file under a different name.
File/Close. Closes the current dictionary file.
File/Exit. Closes the dictionary dialog box.
The dictionary supports "Drag & Drop" mode for copying and moving records or folders. Point the mouse to a record or folder, and then depress the left mouse button and hold while dragging the selected element to the new place.
Inserting text from dictionary
In the dictionary structure pane, select a group folder. The contents pane will then display the list of text elements, each one being named. The text elements are selected by their names. You can modify the element contents in the editing pane (the lower right pane). Next, select the desired line from the list by double-clicking ![]()
![]() or press
or press ![]() for inserting the selected line. At this moment the text is inserted in the drawing, while the dictionary window closes. To keep inserting the same text, you can copy it on the clipboard by pressing <Ctrl+V>. If only the name is defined for an element, while the contents are empty, then the element name will be inserted in the drawing text.
for inserting the selected line. At this moment the text is inserted in the drawing, while the dictionary window closes. To keep inserting the same text, you can copy it on the clipboard by pressing <Ctrl+V>. If only the name is defined for an element, while the contents are empty, then the element name will be inserted in the drawing text.
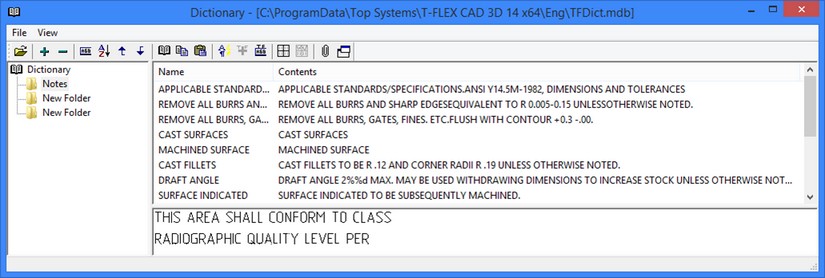
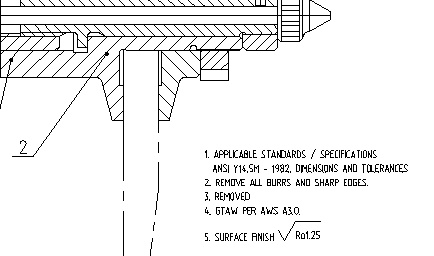
If you need to work with the text without closing the dictionary window, use the option "Continuous text input", or press the respective button ![]() .
.
Creating new records in the dictionary
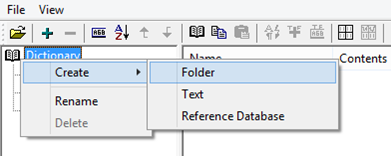
In the left pane, select a header in which you want to create a new folder or text. Select, for example, the folder "Dictionary". To add a subfolder to this folder, press the icon ![]() or select the respective context menu item, invoked by the right mouse click (Create/Folder). As a result, a new subfolder will be created in the folder "Dictionary". The subfolder name will be highlighted for editing, so that you can enter its desired name.
or select the respective context menu item, invoked by the right mouse click (Create/Folder). As a result, a new subfolder will be created in the folder "Dictionary". The subfolder name will be highlighted for editing, so that you can enter its desired name.

To enter a text in the folder, first select the folder. In the context menu accessed by right clicking ![]() , select the item ("Create|Text"). Alternatively, upon selecting the folder, click
, select the item ("Create|Text"). Alternatively, upon selecting the folder, click ![]() in the upper right pane of the dialog and press the icon
in the upper right pane of the dialog and press the icon ![]() . As a result, a new line of text will appear in the contents pane, that can now be named. To enter the contents in this text line, move the pointer to the lower pane and click
. As a result, a new line of text will appear in the contents pane, that can now be named. To enter the contents in this text line, move the pointer to the lower pane and click ![]() . The textual cursor will appear there, allowing to enter the desired text.
. The textual cursor will appear there, allowing to enter the desired text.