T-FLEX CAD has a capability of creating databases. The usage of databases in T-FLEX CAD allows us to realize the whole catalogs of products in one single drawing. It is possible to create elements of structures by specifying their parameters from the databases.
The database of parameters of the bushing can serve as a good example. In T-FLEX CAD there is no need to create several separate drawings for bushings of different diameter. It is sufficient to construct parametric model of the bushing and obtain different modifications of the bushing by specifying the corresponding values from the database for the parameters of construction elements. The process of creation of the database with bushing’s parameters is described below.
GOST 12215-66
|
|||||||
Bushing GOST code 12215-66 |
d |
H |
D |
D1 |
l |
R = c |
Weight, kg per GOST 12215-66 |
7030-0172 |
4 |
6 |
8 |
8 |
1,2 |
0,2 |
0,002 |
7030-0173 |
6 |
8 |
10 |
10 |
1,5 |
0,6 |
0,003 |
7030-0174 |
8 |
10 |
12 |
12 |
1,5 |
0,6 |
0,005 |
7030-0175 |
10 |
12 |
16 |
16 |
1,5 |
0,6 |
0,012 |
In T-FLEX there are two ways of storing the data. The first method – store data in the external file of one of the standard formats (for example, MDB format). Such files can be created with the help of T-FLEX CAD system as well as any other programs designed for this purpose. The second method – store data inside a specific drawing. Databases that are stored together with the drawing are called internal databases, all other databases are called external databases.
There are several variations of how to work with external databases. The way of working with the external database upon which, on the basis of external data file, the database-copy is created in T-FLEX CAD document, which retains connection with the external source-file, is called database by reference. The contents of the database by reference can be updated from the source-file, automatically or upon user’s request. In addition, if the external file is absent the parametric model continues to work using the copy of the database inside the document. When the source-file again becomes available, connection with it is automatically updated. The given way of working with external data files allows different parametric models to refer to the same database.
Another way of working with the external databases is possible upon which the database is not directly downloaded into the T-FLEX CAD document. In this case to get an access to the database content the functions are used.
General information
For creation and editing internal databases and databases by reference we use the command “ID: Edit database”:
Icon |
Ribbon |
|---|---|
|
Parameters → Tools → Database |
Keyboard |
Textual Menu |
<ID> |
Parameters > Database |
The command offers the following capabilities:
●create new internal database;
●create database by reference to external file;
●edit the contents and the header of the existing database;
●save the internal database into the external file of the format dBase or Access;
●transform the database by reference to the internal database;
●delete the database.
When invoking the “Parameters|Database” command, additional window of the current document is created in which the database editor is displayed. The window contains a table of the database (if the document does not have a database, the table will be empty) and the list of databases of the current document with the help of which it is possible to switch from one database to another.

Owing to the fact that the database editor dialog opens in a separate window, it is possible to simultaneously work in the main window of T-FLEX CAD document and in the editor’s window, and also simultaneously edit several databases of a single document.

All main commands for working with the database are included into a special group of the main toolbar – “Database” (it becomes available when working with the database editor):
![]()
|
Create new database |
|
Remove current database |
|
Save database into a file |
|
Update contents of database (only for databases by reference) |
|
Copy to buffer |
|
Copy database to buffer |
|
Insert from buffer |
|
Insert a row before |
|
Insert a row after |
|
Insert rows |
|
Remove rows |
|
Insert a column to the left |
|
Insert a column to the right |
|
Insert columns |
|
Remove columns |
|
Move downwards |
|
Move upwards |
|
Sorting |
|
Select table |
|
Table’s properties |
If the current drawing does not have other databases, then only the “Create new database” command is available. With the help of this command, it is possible to create new internal database or a database by reference.
Creating Internal Database
Creating New Database
To create a new database, invoke the Each database has its own unique name. The name of a database – a string of symbols (no more than 10). It is important to pay attention to the fact that the upper-case and lower-case letters when entering the name lead to creation of different names. The name BASE_1 and base_1 – different names. The same is true for the names of columns of the database. It is also possible to specify the background color for the cells of database’s table with the help of the parameter “Background“. When creating new database the background color is selected in a special field located in the upper part of the “Database properties” window. Different databases can have different background color. When opening another database, the color of the background will change. After pressing [ОК] the “Database properties” window will close. The system automatically transfers to the database table creation mode. The dialog window for specifying parameters of the first column of the created database will appear on the screen: Name. Defines the name, by which the access to the values of a database will be carried out.A field is identified by its name. The length of the field name should not be greater than 10 characters. The field name can be an arbitrary string of letters, numbers and the underline sign ( _ ). The string should begin with a letter. All field names within one database should be unique. Comments. Explanatory text for the column of length of no more than 80 symbols. |
|
|
Type. Defines the information representation format for the given column. Columns can be of one of the following types:
Integer. In this column you can input only integers. The range is from −32768 to 32767 (16-digit sign integer);
Long integer. Integers in the range between −2147483648 and 2147483647 (32-digit sign integer);
Float. In this column you can input only real numbers. Admissible range is from −3.4 ×1038 to +3.4 ×1038 (7 digits);
Double float. Real number in the range from ±5.0 ×10−324 to ±1.7 ×10308 (15−16 digits);
Text. In this column it is possible input any text information.
Length. Defines the maximum admissible number of symbols when entering and editing the value in a column of the textual type.
Alignment. This parameter defines the way of displaying the values in a column: with alignment by the left margin of the column, right margin or the center.
Order number. Shows order number of chosen column in database.
If the “Create next column” flag is selected, after entering the values and pressing [ОК], the column’s properties dialog will appear again which will allow us to specify parameters of the next column, etc. If the flag is disabled, after closing the dialog window the system will transfer to the mode of filling in the database.
Filling in and Editing the Database
After specifying parameters of the database and its columns, on the screen will appear an empty table of the database that contains one line and those columns which were specified by the user.

Note that in the database table there is always an additional, service column with the name “№”. This column contains line numbers of the table.
To create additional lines, it is possible to use the options of the main toolbar:
|
Insert a line before |
|
Insert a line after |
|
Insert lines |
Also, you can create an empty line if you press <Enter>, when the cursor is located at the last line of the table.
To remove the lines, use the option:
|
Delete lines |
All options are repeated in the context menu that can be invoked with ![]() for any string of the table (out of the mode of editing the contents of a specific cell of the table).
for any string of the table (out of the mode of editing the contents of a specific cell of the table).

You can add and remove the columns to/from the database table by using the following options of the main toolbar:
|
Insert a column to the left |
|
Insert a column to the right |
|
Insert columns |
|
Remove columns |
The same options are accessible from the context menu in the area of columns’ headers of the database table:
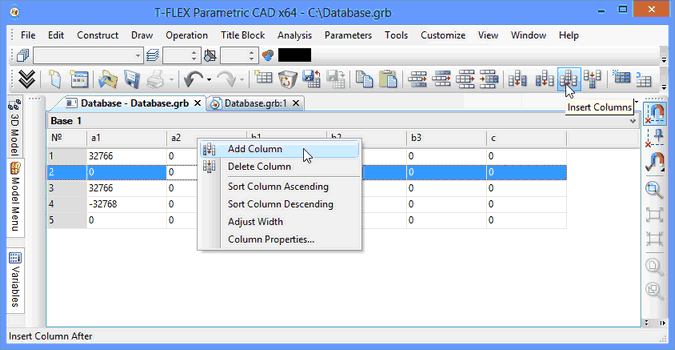
In addition, in the context menu the following commands for a column are available:
●Sort in the ascending order. As a result of applying this command, the lines of the table are displaced in such a way that the contents of the cells of the current column are sorted in the ascending order;
●Sort in the descending order. As a result of applying this command, the lines of the table are displaced in such a way that the contents of the cells of the current column are sorted in the descending order;
●Select width. Selects the width of the current column according to the contents of the column’s cells;
●Column’s properties. Invokes the dialog of column’s parameters (the same as used upon creation of a database). In the dialog you can change the name and the type of already existing and completed column. It should be taken into account that upon changing the column type its contents can be lost. In addition, the change in the column’s name to which the links were already created in the variables’ editor, will lead to the errors in the variables, which can be corrected only by the user.
The column’s parameters dialog can also be invoked without using the context menu, i.e., simply by clicking ![]()
![]() on the column’s header.
on the column’s header.
Moving across the lines when editing the contents of the database is carried out in the following ways:
1.With the help of pointing at the required string with the cursor and pressing ![]() ;
;
2.With the help of pressing the keys <Up> or <Down>. In this case, the cursor moves one line up or down, respectively;
3.With the help of the key <Enter> in any line, except the last one. As a result, the cursor moves to the next line;
4.With the help of pressing the keys <PageUp> or <PageDown>. In this case, the cursor moves one page up or down, respectively, i.e., to the first/last string in the current window;
5.With the help of pressing the keys <End>/<Home>. In this case, transition to the first/last lines of the database table is carried out.
The user can move rows and the data contained in them inside the database table with the help of the following options:
|
Move upwards |
|
Move downwards |
The same actions can be performed by pressing the key combination:
<Ctrl>+<Down> - to move the row downwards
<Ctrl>+<Up> - to move the row upwards
To specify the contents of cells of the data’s table, it is required to enter into the mode of editing the required cell with the help of ![]() . The selected cell is highlighted with an inverted rectangle (the background color becomes the text’s color and vice versa) and the blinking cursor appears in the cell.
. The selected cell is highlighted with an inverted rectangle (the background color becomes the text’s color and vice versa) and the blinking cursor appears in the cell.
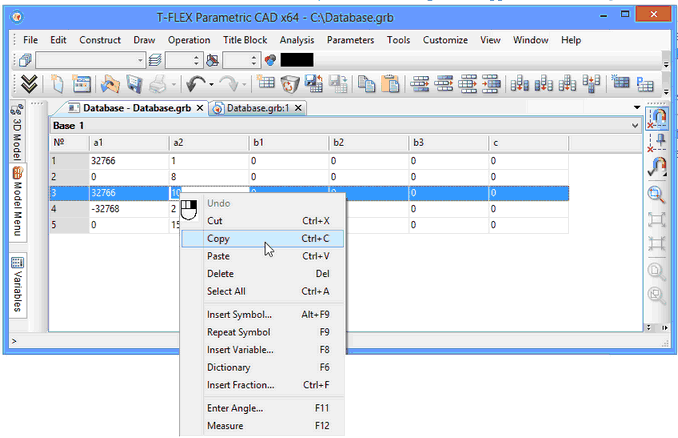
To speed up the work of filling in the database table, it is possible to use the options of copying/insertion. It is possible to copy both the contents of individual cells and the entire strings of the database table. It is allowed to copy both inside a single database and from one database to another, even if the second database is inside another document of T-FLEX CAD.
To copy the contents of a specific cell, it is required first to select the contents and choose the required command from the context menu. Insertion of the copied data into another cell is carried out in a similar way. The commands of insertion of symbols, variables, fractions, etc. are also available in the context menu for the cell’s contents of the data’s table. A detailed description of these commands is given in the “Texts” chapter of this user’s manual.
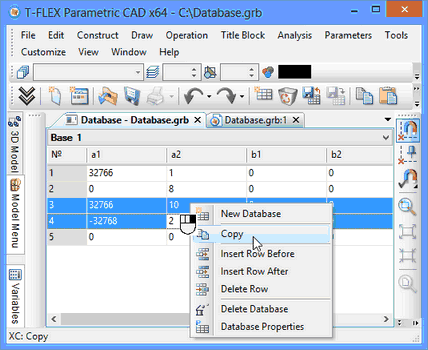
Copying the entire string or several strings simultaneously is carried out in a similar way. To select a string, it is possible to use two options. The first option – indicate the desired string with the help of ![]() , which right away also invokes the context menu with the commands of copying/insertion of strings. The second option – select a string with the help of
, which right away also invokes the context menu with the commands of copying/insertion of strings. The second option – select a string with the help of ![]() , by indicating the very first, service column of the database table, with the name “№”. To select several strings, you can use the selection with the help of <Ctrl> and <Shift>, as is done elsewhere in the system.
, by indicating the very first, service column of the database table, with the name “№”. To select several strings, you can use the selection with the help of <Ctrl> and <Shift>, as is done elsewhere in the system.
For insertion of the copied string/strings, it is sufficient to choose the desired place (string) in the table and invoke the “Insert from clipboard” command from the context menu. Insertion will be carried out after the line at which the cursor was at the moment of invoking the insertion command.
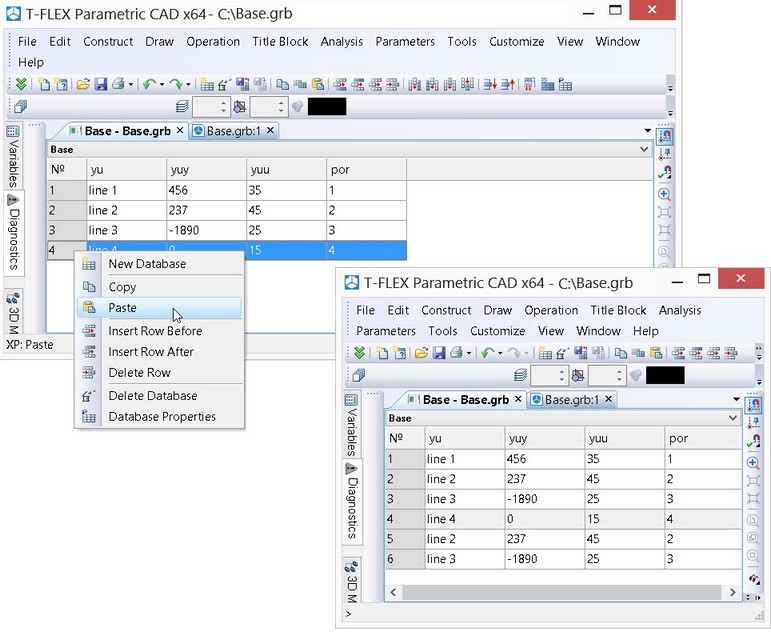
To copy/insert the entire strings, it is also possible to use the commands of the main toolbar ![]() and
and ![]() . It is important to note that these commands work only with the entire strings.
. It is important to note that these commands work only with the entire strings.
The entire contents of the table can be selected for copying with the help of the ![]() command found on the main toolbar (the “Database” group).
command found on the main toolbar (the “Database” group).
For the contents of the cells of the database’s table there is a capability of simultaneous sorting by several columns. Such sorting can be used in order to group the data with equal values in one single column, and then carry out sorting of another column in these groups with equal values.
To sort by several columns there is an option on the main toolbar:
|
Sorting |
After calling this option the dialog window «Sorting» will appear in which it will be possible to indicate the sorting options for several columns.
For example, suppose there is a database of parameters of flange couplings.

It is required to group the data that has equal values in the column isp, then execute sorting of the column d in these groups with equal values.
To do so, on the main toolbar invoke the ![]() option. In the “Sorting” window that appears in the fields of the columns 1 and 2 specify conditions for sorting the values of parameters isp and d, respectively.
option. In the “Sorting” window that appears in the fields of the columns 1 and 2 specify conditions for sorting the values of parameters isp and d, respectively.
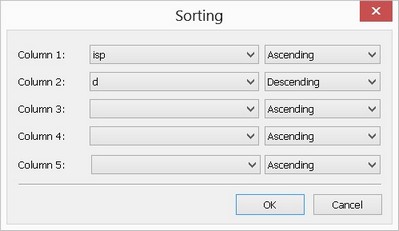
After pressing [ОК], the data of the table will be grouped according to the specified conditions.

Example of Internal Database Creation
Let’s review database creation using the bushing example. First, create a parametric drawing of a bushing with the number of variables matching the number of columns in the table shown on the first page of the chapter. After that we need to create a database and select the desired values from it.
The database creation process will be explained on the example of a bushing. First, let us create parametric drawing of the bushing with the number of variables equal to the number of columns in the table that is shown on the first page of this chapter. After that it is required to create a database and select the desired values from it.
To create a new database, invoke the After pressing [ОК] the “Database properties” window will close. The system will automatically transfer to the mode of creation of a database table. The dialog window for specifying parameters of the first column of the database being created will appear on the screen. Specify for it the name “BUSH_ID” and the type “textual”. The type of a column is selected based on its expected contents. For example, it is clear that the column «Bushing ID» must contain information of the textual type, the column «length» − integer type, and the column «Mass» − float type. |
|
|
Since the “Create next column” flag is enabled in the dialog by default, after the input of data and pressing [ОК] this window will appear again. Specify parameters of the next column in it and so on.
When specifying parameters of the last column, the “Create next column” flag can be disabled. In this case the system will automatically transfer to the mode of filling in the database. If the flag was not disabled, then it is possible just to refuse creation of the new column by pressing [Cancel] in the column’s parameters window that will appear again.
Now we need to fill in the cells. After filling in the first string according to the GOST data, we need to press the <Enter> key – the new empty string will be created and the same actions can be repeated up to the end of the table. Since the data will coincide for certain fields, it is more efficient not to retype the data each time from scratch but perform operation of copying the strings and then edit the contents . If the data coincides for several fields, then it will be more efficient not to retype the data each time from the beginning but instead carry out the operation of copying of rows. Then the contents can be edited.
As a result of your work, the following table should be obtained:
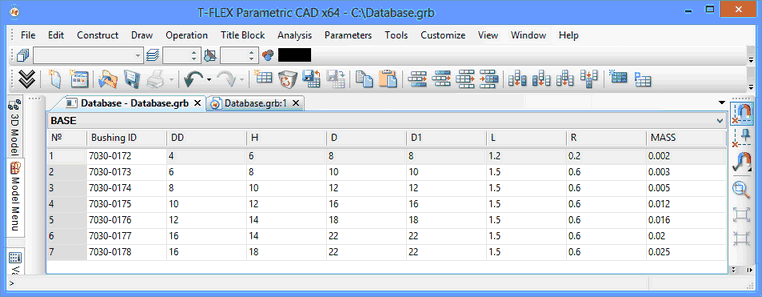
Thus we created the database inside the drawing which is an analog of the table from the database. Now in the variables’ editor it is possible to carry out selection of the required values from this table depending on the controlling parameter (in our case, internal diameter) for recalculation of the model and obtain a drawing of the bushing of the desired size.
Functions for getting values from internal databases
The syntax of referencing a database field is as follows:
<database name>.<field name>
An entry BASE.WEIGHT refers to the field WEIGHT in the database BASE.
There are four functions for accessing values in the internal databases:
REC - gets the number of the record satisfying the given condition;
FREC – gets the number of the record whose contents matches best the specified value;
VAL - gets the value of the field from the record with the specified number;
FIND - gets the value of the field from the record satisfying the given condition.
Function REC
rec ( condition ), where
condition is a Boolean expression assuming the values true or false. The expression can contain members that are themselves calls to the fields of the database.
Example:
rec ( BASE.DD == 4 )
This call means: find the record number in the internal database BASE, satisfying the following condition: the value of the field DD in this record should be equal to 4.
Function FREC
frec ( argument_1, argument_2, argument_3, argument_4 ), where
argument_1 – is the column in the database that is subject to the search. Must have Real or Integer type;
argument_2 – the sought value;
argument_3 – the search option.
Possible options are:
0 – find the nearest value;
-1 – find the nearest floor value;
1 – find the nearest ceiling value.
argument_4 – the parameter indicating the structure of the column subject to the search. It indicates how the values are ordered in the column. The value 0 means the entries are not ordered, forcing the search over all records in the database. The value 1 means the column is ordered ascending or descending. The search completes once the difference between the sought value and the value in the current column of the database is greater than in the previous one.
The parameters argument_3 and argument_4 are optional. If those are not specified, the default values are used:
argument_3 = 0; search for the nearest value;
argument_4 = 0; the column is not ordered;
Function VAL
val ( record_number, database_field ), where
record_number - is an arbitrary numerical expression yielding an integer.
database_field - the reference to the field.
Example:
val ( 4, BASE.H )
This call means: get the value from the record number 4 of the field H in the database BASE.
Function FIND
find ( database_field, condition_1, condition_2, ... )
This function combines the previous two.
The function returns the value of the specified field database_field from the record satisfying the conditions condition_1, condition_2.
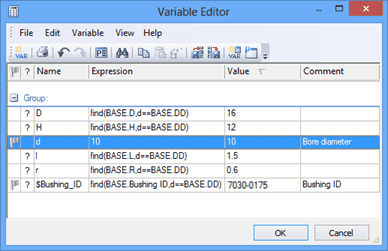
If such record is not found, the function signals the error "Incorrect record number".To get the parameter values for the drawing of the bushing from the internal DB, use the function FIND (). To do this, enter the variable editor by using the command "V: Edit Variables" and define the expressions for the variables as shown on the right hand side diagram. Thus, we have created a parametric drawing of a bushing. The values of the drawing elements will be selected fromthe internal database BASE depending on the value of the inner bushing diameter d. In this way, you create a whole family of bushings for latches and mounting rods per GOST 12215-66 by creating a parametric drawing of the bushing and connecting it to the DB.
By using this example we have reviewed the main steps of creating databases in T-FLEX CAD. Now, let's review the full set of the database editor commands.
Parameterization of databases
The values of cells in databases can be specified as variables and expressions with the help of the «Support parameterization» parameter. This parameter can be enabled when creating the database.
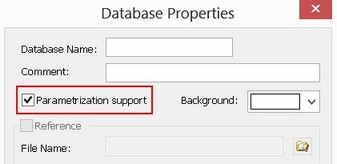
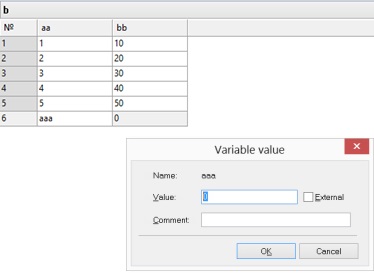
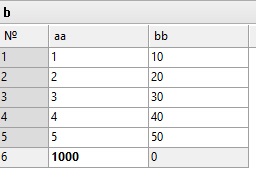
The value of such a cell is recalculated when recalculating parametric model. When being displayed the value of the cell in the table, specified either as a variable or expression, is highlighted with bold font.
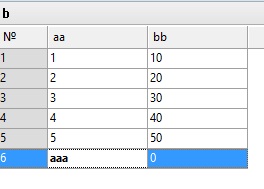
When clicking the cell the expression appears instead of the value and it can be edited.
Along with the functions for working with databases, the value in a cell can depend on other cells.
In the given example the 6th row contains the sum of all five previous rows:

Recursive specification of values is not allowed in this case. In case of appearance of the recursion the cell will be highlighted with red color. In this example this event can occur if the range of rows 1, 5 is removed:

The message about recursion is also sent to the diagnostics window.Cross-like specification of cell’s values from one table to another is also possible, but also without recursion.
Functions for Working with Ranges of Cells in Databases
The functions for working with the ranges of cells should be applied when upon working with databases we need the functionality similar to the work functionality of electronic cells, for example, in Excel.
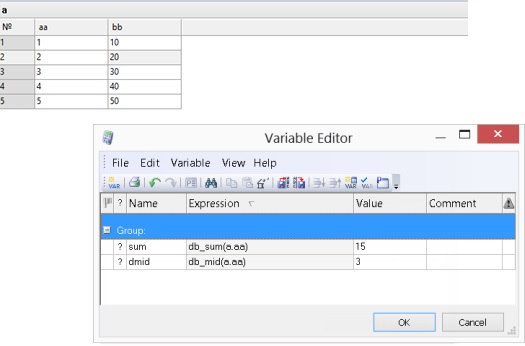
In the variables’ editor there are the following functions for working with the ranges of cells of databases:
●db_sum – evaluation of sum of the cells in an interval
●db_mid – evaluation of the average value in an interval
●db_max – evaluation of the maximum value in an interval
●db_min – evaluation of the minimum value in an interval
Interval can be specified in the following way:
1.Specifying the name of a column in DB. In this example we evaluate the sum and the average value by the column.
2.Specifying the column and initial row number. In this example we evaluate the sum and the average value for the column аа starting from the second row.
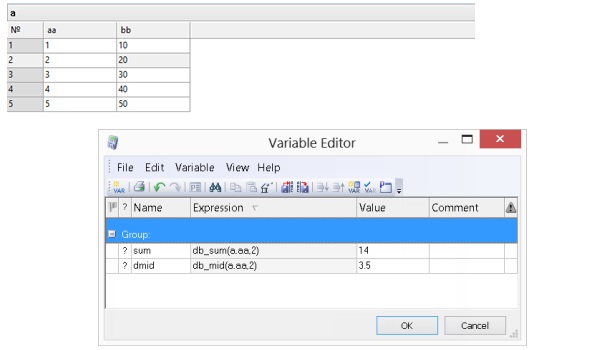
3.Specifying initial and final rows. In this example we evaluate the sum and average value from the 1st to 4th rows.

Databases by Reference
As with internal database creation, to create a database by reference you need to invoke the command For specifying the source file it is required preliminary to enable the “By reference (file)” flag. After that the “File name” field becomes accessible. To select a file, use the |
|
To create a database by reference, it is possible to select the files of the following formats:
●Microsoft Access Files (*.mdb);
●Files of the format dBase (*.dbf);
●Microsoft Excel Files (*.xls);
●FoxPro Files (*.dbf);
●Paradox Files (*.db);
●Text Files (*.txt, *.csv).
When creating the database on the basis of the file of “*.xls” format, it is required to specify additionally that part of the information from the Excel book which will be used as the database’s contents. Selection is carried out with the help of the drop down list of the “Table’s Name” parameter. By default, the system prompts the user to select one of the pages of the Excel document. In this case, as the contents of the created database, the entire page of the Excel book will be used. The columns’ headers will be created on the basis of the first string of the selected page.
When it is required to use only a part of the page’s contents, it is possible to preliminary create the named data domain in the Excel document (select the desired cells in Excel and perform “Insert\Name\Assign”). In this case, when creating the database by reference, this name will also appear in the list of the “Table Name” parameter. The first line of the selected information will also be treated by the system as the string with the columns’ headers of the database table.
When creating the database on the basis of the file of “*.mdb” format, it is required, in addition to the file’s name, specify the table’s name from this file. The contents of the selected table will be transferred to the database being created. The list of all tables in the selected file will automatically be placed in the drop down list of the “Table Name” parameter.
When creating the database on the basis of the file of “*.dbf” and “*.db” formats, you need to specify only the file’s name (the “Table Name” parameter is not available). In addition, the “DOS Coding” flag is available. When this flag is disabled (default state), the system assumes that the format of the external file is Dbase-Windows. When this flag is enabled, the external file is opened only as a file of the format Dbase-DOS. This allows us to correctly open the databases that contain Russian names for the columns and the contents of the text cells.
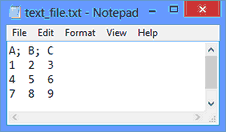
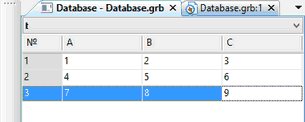
When creating the database by reference on the basis of the file of textual format, this file must have the following structure:
●the first line must contain the column’s names that are delimited by a symbol. The symbol of delimitation is specified in register in JET parameters (HKEY_LOCAL_MACHINE\ SOFTWARE\Wow6432Node\ Microsoft\Jet \х.х\ Engines\ Text \Format - for W7, HKEY_LOCAL_MACHINE\SOFTWARE\Microsoft\Jet\х.х\Engines\Text\Format – for Windows XP, HKEY_LOCAL_MACHINE\ SOFTWARE\ Wow6432Node\ Microsoft \Jet \х.х\Engines\Text\Format\Delimited(,) - for Windows 8 the symbol of delimitation is specified in parentheses of Delimited parameter);
●the following lines contain the records of the database. The contents of the fields in each record are also separated by this symbol.
In the case when the T-FLEX DOCs system is installed on your computer, one more option of creation of the database by reference is available – the database by reference to the T-FLEX DOCs dataset. This is described in more detail in the T-FLEX DOCs user’s manual.
The mode of updating the created database can be selected from the drop down list of the “Mode of update” parameter:
Automatically. Updating the data is carried out when opening the file of the model.
During total recalculation. Updating the data is carried out when performing the total recalculation of the model with the update of references.
Manually. Updating the data is carried out only manually by using the special option “Update contents of database”.
By pressing [Ok] you complete creation of a database by reference. The “Database properties” dialog is closed, and the table of the new database appears on the screen. It can be viewed but editing the contents is not allowed. The access to the data from a database by reference is carried out similar to the access to internal databases, i.e., by using the name of the database by reference similar to the name of the internal database. In this case the syntax of functions remains the same.
Additional Commands of Database’s Editor
Let us review still not mentioned commands of the main toolbar that are designed for working with databases.
The “Delete current database” command ![]() allows us to delete the internal database or the database by reference.
allows us to delete the internal database or the database by reference.
The “Save database into file” command ![]() allows us to copy the internal database into the external file of the format “*.mdb” or “*.dbf”. The database itself does not change, and it remains internal. This option can also be used for the database by reference, in this case the current, internal version of the database will be copied into the external file.
allows us to copy the internal database into the external file of the format “*.mdb” or “*.dbf”. The database itself does not change, and it remains internal. This option can also be used for the database by reference, in this case the current, internal version of the database will be copied into the external file.
The “Update database’s contents” command ![]() is used for databases by reference and allows us to compellingly update (from the file) the contents of the database.
is used for databases by reference and allows us to compellingly update (from the file) the contents of the database.
The “Table’s properties” command ![]() allows us to edit the database’s attributes. For internal databases you can edit the name and the comments. It is also possible to transform it to the database by reference by enabling the corresponding flag and indicating the name of the external source file. The contents of the database that already exists will be lost in this case. For a database by reference by invoking the command
allows us to edit the database’s attributes. For internal databases you can edit the name and the comments. It is also possible to transform it to the database by reference by enabling the corresponding flag and indicating the name of the external source file. The contents of the database that already exists will be lost in this case. For a database by reference by invoking the command ![]() it is possible to change the name, comments and path (including the file’s name) and the table’s name.
it is possible to change the name, comments and path (including the file’s name) and the table’s name.
Functions for getting values from external databases: DBF () and DBFWIN ()
In T-FLEX CAD it is also possible to use the option of working with external databases, when the database is not downloaded directly to the T-FLEX CAD document. In this case to get an access to the database’s contents other functions are used.
The functions DBF() and DBFWIN()are provided for getting data from external databases in DBF format. The difference between the two functions is in the way of handling the ASCII extension fonts. The user decides what function to use depending on the textual data encoding. In the following description, anything said about the function DBF() is also true for the function DBFWIN().
Function syntax:
dbf (arg1, arg2, arg3), where
arg1 - the name of the database. The name of the database can be defined by a string constant, a variable or an expression.
arg2 - the name of the field to get data from. The name of the data field can be defined by a string constant, a variable or an expression.
arg3 - the access condition. You can use string constants, variables and expressions for defining the condition.
Example:
dbf(ІDBF_NAMEІ, ІCOL1І, ІCOL2 = 30І)
The above means: get the value of the field COL1 in the database DBF_NAME under the condition that the value of the field COL2 is equal to 30.
If we were to use an external DB for defining the bushing parameters, then we would have to define the following expressions:

Function for getting values from external databases: MDB ()
The function MDB() is provided for getting data from the external databases in XLS (Access) format.
Function syntax:
mdb (arg1, arg2, arg3, arg4), where
arg1 - the name of the database. The name of the database can be defined by a string constant, a variable or an expression.
arg2 - the name of the table in the database. Can be defined by a string constant, a variable or an expression.
arg3 - the name of the field to get data from. The name of the data field can be defined by a string constant, a variable or an expression.
arg4 - the access condition. You can use string constants, variables and expressions for defining the condition.
Example:
mdb ( "c:\\T-FLEX_USER.mdb", "USER", "NAME", "Code={code}" )
The above means: get the value of the field NAME from the table USER in the T-FLEX_USER database under the condition that the value of the field Code is equal to the value of the variable "code" (equal to 15 in this case). It should be noted that the last argument of the function that specifies record selection criterion can be written in the form of SQL query and must correspond to the statement “WHERE” of the “SELECT” command. If text variables are used when writing the condition, then the expression will look like the following: mdb ("c:\\T-FLEX_USER.mdb", "USER", "NAME", "Job title=\"{$Job}\"").
Because of the slower process of receiving information from the external database the DBF () and MDB () functions should be used only in cases where it is impossible to use the database by reference on the basis of formats“*.xls” and “*.txt”.