A light source is an element serving for rendering three-dimensional objects and helping controlling the lighting of the three-dimensional scene. Light sources are snapped to 3D nodes. Their directions are also defined by 3D nodes. There are three types of light sources - point, directional and projector.
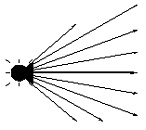
●Spot light source emits the light from one point in all directions over the whole 3D scene.
●Directional light source emits the light in a certain direction over the whole 3D scene.
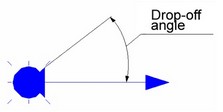
●Projector light source emits a light cone from a given point in a certain direction with the specified drop-off rate.
A light source is displayed as a small "radiant" sphere.

3D window rendering uses simplified lighting calculations: the lightness (and, respectively, the color) of the surface depends only on the angle of the incident light to the surface. The effects of shadowing, reflecting, refracting and scattering of light are not present. To create more realistic scene rendering, use the command "3VY: View Ray Tracing" (see the chapter "Ray tracing").
A light source can be hidden from display while maintaining the lighting effect. By default, lighting of the 3D scene also involves a light source (one or multiple) on the camera, oriented along the viewing direction. The parameters of those light sources are set by the command "3VP: Set View Parameters" (see the chapter "3D View").
One scene allows creation of an arbitrary number of light sources. However, the number of light sources affecting the resulting rendering of the 3D window depends on the type of a video card installed on the computer.
Lately, the number of light sources handled by video cards varies from 8 to 16.
Creating light source
To create a light source, use the command "3L: Create Light Source". The command is called by one of the following ways:
Icon |
Ribbon |
|---|---|
|
View → 3D Model → Light source |
Keyboard |
Textual Menu |
<3L> |
Construct > Light source |
After calling the command, the following options will appear in the automenu, along with the general system options:
![]() <L> Select first 3D Node as Light Source position
<L> Select first 3D Node as Light Source position
![]() <D> Select 3D Node to set direction of Light Source
<D> Select 3D Node to set direction of Light Source
![]() <S> Select 3D Node to set direction of Projector
<S> Select 3D Node to set direction of Projector
![]() <1> Spot Light
<1> Spot Light
To define a light source, you need to create in advance one 3D node for a point light, two 3D nodes - for a directional source or projector.
The steps of creating a light source include:
1. Selecting a 3D node for placing the light source.
2. Selecting a 3D node defining the direction of the light source (for a directional light source or projector).
3. Confirming the light source creation.
Spot (point) light source
After calling the command, the following option automatically sets in the automenu:
![]() <L> Select first 3D Node as Light Source position
<L> Select first 3D Node as Light Source position
Using this option, select a 3D node, in which you plan to place the light source. A point light source will be displayed in the 3D view window at the location of the selected node (initially, the color of the light source is white). After that, you can press the icon ![]() . The point light source will be created in the selected 3D node.
. The point light source will be created in the selected 3D node.


Diagram of light propagation from a spot source
Directional light source
To create a directional light source, upon selecting the first 3D node which is the point of the light source location, pick the automenu icon:
![]() <D> Select 3D Node to set direction of Light Source
<D> Select 3D Node to set direction of Light Source
Select the second 3D node defining lighting direction. A light source will be displayed in the 3D window with an arrow indicating the direction of light emission. After that, you can press the icon ![]() , and the directional light source will be created.
, and the directional light source will be created.


Diagram of light propagation from directional source
Projector
To define a projector light source, after selecting the first 3D node - the location of the light source (the option <L>), pick the option:
![]() <S> Select 3D Node to set direction of Projector
<S> Select 3D Node to set direction of Projector
As in the case of directional light source, specify the projector direction by selecting the second 3D point. A light source will be displayed in the 3D window with a two-headed arrow. Upon the confirmation by the icon ![]() , the projector settles.
, the projector settles.


Diagram of propagation of light from projector
When creating a directional light source or a projector, you can change the type of the light source by selecting the desired option up until confirming the element creation.
An example of all types of the light sources usage can be found in “Flying around object” and “Room” prototypes.
Light source parameters
To define parameters of a light source, bring up the dialog box. This is done by the option:
![]() <P> Set entity parameters
<P> Set entity parameters

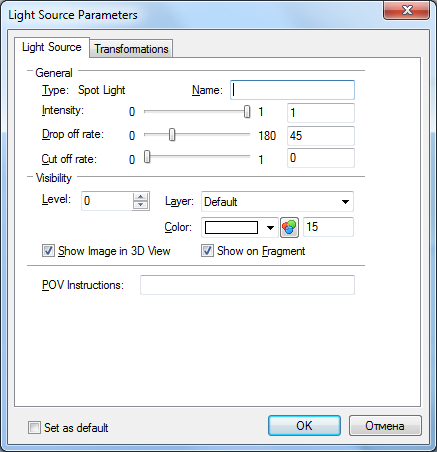
Type. This parameter indicates the type of the light source (spot, directional, projector). It is defined automatically during the construction.
Intensity. Defines the intensity of the light source. The higher the light intensity, the more it affects the image in the 3D window, and the higher is lightness of the resulting image.
Drop off rate. Defines the projector's drop-off angle.
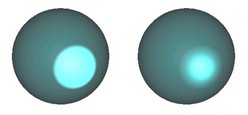
Cut off rate. This rate defines the smoothness of transition from light to dark across the boundary of the projector's light spot. The diagram on the right clearly shows the effect of this parameter with the values 0 and 1 respectively.


The "Visibility" group of parameters is common across the system functionalities and define the modes of displaying a light source on the screen:
Color. The color of the light source. The light source is drawn in this color in the 3D window, and also emits light in this color.
Show Image in 3D View. Checking this parameter makes visible the image of a light source existing in the 3D scene. If the parameter is cleared, the light source will be hidden, but the lighting effect remain. To select, or modify properties of, a light source made invisible in the 3D window, use the model tree.
Show on Fragment. If a model is used as a 3D fragment, then the light source with this parameter set will be exported into an assembly model.
POV Instructions. You can enter instructions in this parameter's field, that will be appended to the end of the description of the light source upon exporting the given file into POV for creating a photorealistic image.