Workplanes


Workplanes |
  
|
A workplane is an auxiliary 3D construction element visualizing the abstract concept of the geometrical plane. The main purpose of a workplane is bringing two-dimensional drawing objects into the three-dimensional space. Such objects are used for creating flat 3D construction elements on their base, such as 3D nodes, 3D profiles, 3D paths, etc.). Each workplane is related with a certain page of a 2D drawing. One can say that workplanes provide a link between 2D drawing pages and the three-dimensional space.
Besides, workplanes are used as auxiliary elements in various 3D operations. For example, they help creating the section plane within a body in the operation "Cut by Section", or position the section plane when creating a section. The normal to a workplane can be used for defining an extrusion direction or a revolution axis, etc.
All workplanes in T-FLEX CAD are divided into two groups: standard and auxiliary. Standard are the T-FLEX CAD workplanes that coincide with, or parallel to, one of the principal coordinate planes of the world coordinate system (XY, YZ, ZX). Such workplanes are commonly used for creating base 3D constructions. However, to create a complete 3D model, using just standard workplanes may not be enough, thus prompting the use of auxiliary workplanes. The latter are created based on other 2D and 3D elements: already existing workplanes, vertices, edges and faces of 3D bodies, 2D projections, etc.
T-FLEX CAD provides a dedicated command for creating workplanes: "3W: Construct Workplane", that allows creating various types of workplanes. Besides that, the system provides mechanisms that speed up creation of workplanes and drawing on those: creation of workplanes in "transparent mode" and drawing directly in the 3D scene in the active workplane mode.
Principles of Working with Workplanes
Let's start getting acquainted with workplanes with the most simple and often used techniques of working with workplanes. Those include creation of standard planes as part of creating a new document (using the standard prototype) and creation of planes based on flat faces of a body. Those do not require use of a special command, allowing creating workplanes in "transparent mode".
When creating a new 3D model based on a standard prototype, the three standard workplanes are created in the model from the beginning – "Front", "Left" and "Top". The image of the three standard planes is displayed in the 3D scene as three intersecting semitransparent rectangles defining the visual borders of the planes.
Transparency of the workplanes can be controlled. In the dialog of parameters for each workplane (see the section “Workplane Parameters”) there is a parameter controlling the degree of transparency of the given workplane view (from totally transparent to totally nontransparent).
Note that viewing the workplanes in a semitransparent or nontransparent mode is possible only when the flag “Disable Workplane Transparency” is turned off in the command “SO: Set System Options”, tab “3D”, button [OpenGL…]. If this flag is turned on, all workplanes are shown as totally transparent. By default, this parameter is turned off.

Note that the workplane borders are shown in the 3D scene for display purpose only, as they are actually infinite.
The outer borders of a workplane in the 3D window are drawn in a solid line, while the inner witness lines – in thin dashed lines. Moving the pointer to a line of a workplane highlights the workplane. A workplane can be selected for further manipulations by clicking ![]() , while right clicking
, while right clicking ![]() calls the context menu for the workplane.
calls the context menu for the workplane.
The number of witness lines in the workplane display can be set in the command "SO: Set System Options", the tab "3D". There, you can also defining the mode of selecting workplanes – by the bounding rectangle lines only or by all displayed lines. A workplane can also be selected in the 3D model tree, in the folder "Workplanes" or in a subtree representing the history of creation of some 3D element based on the workplane. Let's review the main techniques of handling workplanes on a simple example. Suppose, we need to create a 3D profile on the workplane "Top", to use as a base for creating a 3D body. Select the workplane "Top" in the 3D window or in the model tree, and right click |
|
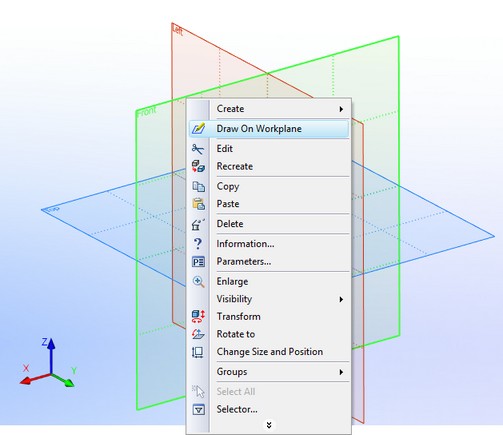
The active workplane mode is intended for applying 2D elements on a plane in the three-dimensional space. When starting the mode of drawing on the active workplane, the 3D scene rotates in such a way, that the selected workplane becomes orthogonal to the viewing direction. From this moment, any relocation/rotation of the 3D scene is blocked. The main toolbar of the T-FLEX CAD (if it is not locked) will be switched to the mode “Workplane”. The 2D drawing commands become accessible in the textual menu.
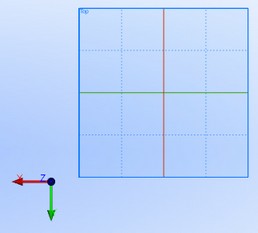
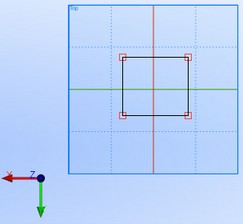
Now, you can draw on the workplane as if on a common 2D drawing page. Let's draw the contour of the future 3D profile directly on the workplane in the 3D window. (To do this, use the command "G: Create Graphic Line" or "SK: Create Sketch".) After that, finish working on the active workplane by simply pressing the option on the main toolbar (or in the context menu upon selection of any element):
![]() <Shift><End> End Drawing On Active Workplane
<Shift><End> End Drawing On Active Workplane
The 3D scene rotate back to its original orientation. The 2D commands will become inaccessible again. Meanwhile, a 3D profile appears on the workplane "Top", repeating the shape of the 2D constructions made by us on the workplane.
The mode of automatic creation of 3D profiles on a workplane supports use of not only graphic lines, but also text and hatch. To create a parametric 3D profile, you should use lines and hatches in the same ways as you do when creating a parametric drawing (by snapping to construction lines).

Further, suppose that the created profile is used in the rotation operation, resulting in a 3D body (see the chapter "Rotation"). Additionally, a hole or slot needs to be created on one of its slanted faces. To do this, you need to create a workplane lying on a face of the body. On this workplane, you will create a 3D profile – the contour of the future hole. The profile can then be extruded to the specified depth and, after that, subtracted by the Boolean operation from the original part. How can you do that? Simply move the pointer to the desired face and call the context menu. If the face is flat (as in our case), then the command "Draw On Face" will be provided in the context menu. Calling this command results in the following: a workplane will be created on the selected face, and activate. Besides, this source face is automatically projected on the created plane (see the chapter "2D projections"). The projection lines and their characteristic points can be used for creating the necessary 2D constructions on the workplane, for example, for defining hatches or construction lines to snap to.

On the newly created plane, let's draw the contour of the hole, and then finish the drawing in the active workplane mode. The 3D contour will then be displayed in the 3D scene on the face we selected, that can be used for constructing the hole.

Note that the workplane created on a face is not displayed in the 3D scene. However, it appears in the 3D model tree. To make such workplane visible in the 3D scene as well, open its parameters dialog box (for example, by calling the context menu of that plane in the 3D model tree) and set the flag "Show in 3D View".


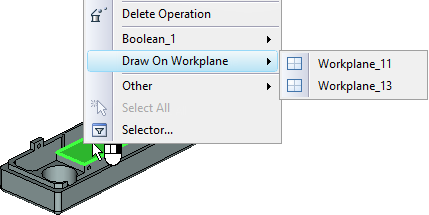
If you select the same face of the body again and call the context menu, you will find in it two similar commands: the already familiar "Draw On Face" and "Draw On Workplane". We already know the purpose of the first one – it creates another workplane based on the selected face. The second one allows activating the already existing workplane, created on the selected face (if you need, for instance, to edit the 2D constructions made on that plane). If several such workplanes are created, the desired one can be selected from the pulldown list.

Thus, you have learned the simplest and most commonly used techniques of creating workplanes. Other workplane creation techniques are used in the cases, when the standard planes and the planes created on the body faces are not enough for solving the posed tasks. Those techniques imply use of the dedicated command. Just before learning those techniques, let us clarify the relation between workplanes and the 2D drawing and review in details working in the active workplane mode.
Workplanes and 2D drawing
Any workplane in the document is linked to a page of the 2D drawing. Any time you create a workplane, a special 2D page of the type "Workplane" is automatically created in the document. The workplane will be displayed on this page as a rectangle defining the visual borders of the plane in the 3D window. The name of the workplane is displayed in the upper left corner of the rectangle.
All 2D constructions made on this page are assumed by the system as lying on the workplane linked to this page. Vice versa, anything created directly on the workplane in the mode of drawing on the active workplane, appears on the linked 2D page of the document. In fact, one can think of a workplane as a 2D page in the 3D space. This rule applies to most workplanes in T-FLEX CAD. The exception is the workplanes created on the base of an existing 2D drawing page and its 2D constructions. No separate page is created for such workplanes. Instead, the link is established with the 2D drawing page that was used for creating the workplanes. Several workplanes of this type can be linked to such page in a 2D drawing. The 2D constructions belonging to this page can be linked to any of such workplanes. Usually, when selecting 2D elements intended for creating 3D elements on a workplane, the system suggests the workplane nearest to those elements, judging by the rectangular borders of the planes.
Therefore, 2D images can be created or edited on a workplane not only in the 3D window in the active workplane mode, but also in the 2D window. To do this, you need to open a drawing page in the 2D window, linked to this workplane. This approach is particularly useful when working with workplanes created in the 2D window, that is, based on an already existing drawing page. Workplanes can be activated only when they're located on a separate page of the 2D drawing. If several workplanes of the described type are linked to one page of a 2D drawing, they cannot be activated.
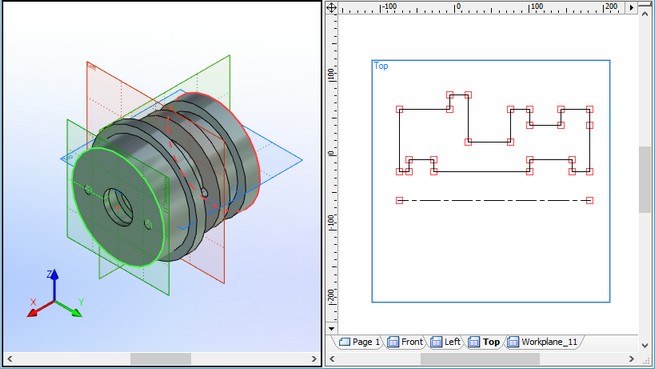
When working with the 2D pages of the workplanes created in the 3D window, first make sure that the display of the auxiliary pages is turned on in the command "PG: Pages", and that the respective pages are displayed in the 2D window.
Working with active workplane
The mode of drawing on the active workplane is intended for placing 2D elements on a plane in the three-dimensional space and their further use in creation of the 3D model. Let's review this working mode in details.
Workplane activation
A workplane can be activated in several ways. All possible ways of activating a workplane are listed here:
1. Drawing on the selected plane. Point the mouse to a workplane and click ![]() . The selected workplane gets highlighted. At this moment, you can start creating elements, using 2D drafting commands. Activate a 2D command. This will activate the workplane. On the main toolbar (if it is not locked) the button set “Workplane” will be shown.
. The selected workplane gets highlighted. At this moment, you can start creating elements, using 2D drafting commands. Activate a 2D command. This will activate the workplane. On the main toolbar (if it is not locked) the button set “Workplane” will be shown.
2. Activation from the context menu. Select a workplane in the 3D window or in the model tree and right click 3. Activation from the list. While the system is in the command waiting mode, point the mouse to an empty space in the 3D scene and right click |
|
4. Activation after creation. When creating a workplane on a face of a solid body, this workplane can be activated automatically. For this, point the mouse to the face to create the workplane on, and right click ![]() . In the coming up context menu, select the item "Draw On Face". A workplane will be created based on the selected face, along with the page to contain all elements belonging to the workplane. The created workplane will be activated.
. In the coming up context menu, select the item "Draw On Face". A workplane will be created based on the selected face, along with the page to contain all elements belonging to the workplane. The created workplane will be activated.
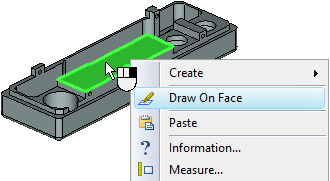

5. Activation from the context menu with plane selection. This is activation of an existing workplane created based on a body face. Point the mouse to a face of the body and right click ![]() . If there are workplanes created on this face, then the coming up context menu will have the item "Draw On Workplane". Selecting this command displays the list of workplanes created on the current face. The workplane selected in this list will be activated.
. If there are workplanes created on this face, then the coming up context menu will have the item "Draw On Workplane". Selecting this command displays the list of workplanes created on the current face. The workplane selected in this list will be activated.
Active Workplane Control
Upon activating a workplane, on the main toolbar (if it is not locked) the button set “Workplane” will be shown. The options on this toolbar allow performing the following actions:
|
Rotate Active Workplane Orthogonal To View Direction |
If the whole 3D scene needs to be rotated while working with the active workplane, use the option:
|
Rotate 3D Seen/Select 3D Elements |
You can also rotate the 3D scene by the mouse while holding down the <Alt> key. While in the 3D scene rotating mode, you can select 3D elements (as for projecting on the workplane, etc.). To continue drawing on the active workplane, turn off this mode.
If you prefer working in the 2D window, you can open the 2D drawing page corresponding to the active workplane. This is done by the option:
|
Open 2D Window With Active Workplane |
The page is displayed in the full-screen mode. It also contains the projection of the selected face. All constructions made on this page are automatically carried over the active workplane. To return to the 3D window, turn off this option.
If you need to project some model elements on the workplane, use the option:
|
Project Elements On Active Workplane |
This option is available only when working in the 3D window. Upon selecting this option, the icons appear in the automenu for selecting 3D model elements (operations, faces, edges) that you need to project on the active workplane. Upon finishing the selection, confirm the projection creation with the icon ![]() .
.
A special option is provided for projecting a 3D node or a body vertex on the active workplane
|
Create Projection of 3D Node or Vertex |
Upon activating this option, simply select the nodes or vertices to project on this workplane.
If the projected elements fall beyond the displayed bounds of the active workplane, their projection on the active workplane will not be displayed in the 3D window. In such a case, it may be convenient to use the 2D window of the active workplane. Alternatively, you can change the size of the workplane.
To align the cutting plane with the active workplane (see the chapter "Working in the 3D view window"), set the option:
|
Move Cutting Plane To Active Workplane |
Additional control over the cutting plane is provided when using the option ![]() .
.
To finish drawing on the active workplane, press the icon:
|
<Shift><End> |
End Drawing On Active Workplane |
If the 3D window is active, you can also point the mouse to an empty area in the 3D scene and right click ![]() . The coming up context menu will have the item "End Drawing On Active Workplane".
. The coming up context menu will have the item "End Drawing On Active Workplane".
While working in the active workplane mode, you can use any construction and 2D element creation commands. If the workplane was created on a body face, then the face projection on this workplane will be automatically created on the drawing page linked to this workplane. While working with 2D drafting commands, you can snap construction and graphic elements to the lines of the projection and their joint points.
In the “Workplane” and “Workplane (draft)” sets of the main toolbar of T-FLEX CAD, the element of control with the list of 3D profiles constructed by graphic lines of the given plane is available. If one of the profiles is selected from this list, the graphic lines that form this profile are automatically displayed on the screen in large size and newly created graphic lines are assigned the color of the selected profile.
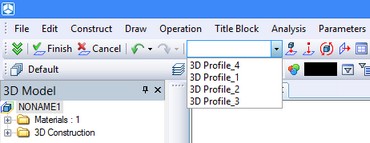
Upon finishing working on the active workplane, the system automatically creates a 3D profile, using the following elements: hatch contours, graphic lines and TrueType-font text. If several hatches or text were created on the 2D page of the workplane, then multiple 3D profiles are automatically created (by the number of identified hatches and/or text).
To finish working on active workplane without creating a 3D profile, use the option:
|
<Alt><End> |
Cancel Drawing On Active Workplane |
While working in the active workplane mode, you can call 3D operation creation commands. In such a case, the system finishes drawing on the workplane, and automatically highlights the created profile if the operation requires profile selection.
Setting View of Workplanes in 3D scene
Appearance of workplanes in the 3D scene is controlled by collection of parameters found in the settings of the system, of the individual document and the workplane itself.
First of all, it is possible to control the transparency of the workplanes (from totally transparent up to totally opaque). Parameter that controls the degree of transparency of an individual workplane is available in the dialog of parameters of the given plane (see the “Parameters of workplanes” section).
At the corner of the rectangle that constitutes the image of the workplane, the name or the type of the given plane is usually indicated. It is possible to hide/show them with the help of the “Workplanes|Draw name” parameter in the dialog of the “ST: Set Document Parameters” command (the “3D” tab). The font that is used for displaying the name of the workplane is specified in the “SO: Set System Options” command, on the “3D” tab.
The font size of the legend on the image of the workplane is not specified explicitly. It is controlled with the “Size|Coordinate systems” parameter on the “3D” tab in the dialog of the “ST: Set Document Parameters” command. The larger the value of this parameter, the larger the font size of the legend will be.
Inside the rectangle of the workplane, the coordinate system of the given plane can be displayed. The visibility of the coordinate system is controlled with the “Show coordinate systems” parameter in the dialog of parameters of the given plane (see the “Parameters of workplanes” section). By default the coordinate system of the workplane is not displayed.
In the “SO: Set System Options” command, the tab “3D”, it is also possible to specify the required number of internal lines on the image of the workplane (the “Workplanes|Number of lines” parameter). There, you can also define the mode of selecting workplanes – by the bounding rectangle lines only or by all displayed lines (the “Workplanes|Selection by all lines” parameter).
Workplane creation
In the beginning of this chapter, we described the most convenient ways of making workplanes – creation of standard planes together with the new document creation (using the standard prototype) and, later, creation of workplanes based on flat body faces. The dedicated command "3W: Construct Workplane" provides wider opportunities for workplane creation:
Icon |
Ribbon |
|---|---|
|
3D Model→ Construct → Model |
Keyboard |
Textual Menu |
<3W> |
Construct > Workplane |
The command allows creating workplanes of the following types:
1. Standard workplane.
2. Workplane parallel to a geometrical plane defined by various 3D elements (face, other workplane, flat edge, LCS, etc.).
3. Workplane passing through a 3D point (3D node, body vertex, path or 3D profile, edge midpoint, etc.).
4. Workplane passing through a 3D line.
5. Workplane orthogonal to a 3D curve.
6. Workplane tangent to a surface.
7. Workplane based on a local coordinate system.
8. A copy of an existing workplane (transformed).
9. Workplane based on a 2D projection.
10. Placed proportionally between two planes or faces.
11. Workplane based on a local 2D view.
Creating workplane parallel to geometrical plane
Creating workplane through a 3D point
Creating workplane through 3D line
Creating workplane orthogonal to 3D curve
Creating workplane tangent to surface
Creating workplane based on LCS
Creating workplane based on 2D projection
Workplane between two planes or faces
Creating workplane for auxiliary 2D view
Workplane size modification
To modify the displayed borders of any workplane that are not attached to 2D constructions, you can use the command "PZ: Set Paper Size":
Icon |
Ribbon |
|---|---|
|
Workplane → Modes → Page size |
Keyboard |
Textual Menu |
<PZ > |
Customize > Page Size |
Modifying the displayed borders of a workplane changes the size of the 2D page created for this workplane.
The command is accessible only when the page is active in the 2D window, whose size needs to be changed, or when the workplane is activated. There is yet another way of calling this command. Move the pointer to the workplane and right click |
|
To modify the size of the workplane, move the pointer to one of the square handles on the workplane border. The pointer will change the appearance, reflecting the current resizing action. Depress |
|
Workplane parameters
As any system elements, the workplanes are assigned a set of parameters. Their values can be defined in the dialog box called by the option:
![]() <P> Set entity Parameters
<P> Set entity Parameters

The workplane parameters dialog box has two tabs: "Workplane" and "Transformation".
The tab "Transformation" is described in details in the chapter "General parameters of 3D elements". The tab "Workplane" contains general system parameters ("Layer", "Color", "Level"), the parameter "Name" (default names are "Workplane_0", "Workplane_1", etc.), which is common across all 3D elements, and several workplane-specific parameters. Those are:
Type. At plane creation, you do not edit the plane type in this dialog box, since the plane type is always predefined. When editing, you can modify the types of standard workplanes only, as, for instance, replacing "Front" by "Left".
Scale. Defines scaling of the 3D construction elements created with the help of this workplane. The default value is "Default", that is, the scale of the 2D drawing page, on which the created workplane is based.
Sometimes, 3D constructions are based on 2D elements drawn to a scale different from the page scale. In this case, the workplane scale needs to be defined equal to the scale of the 2D elements. Suppose, for example, that the scale of a 2D drawing page is equal to 1:25. The main drawing of the part on this page is done to the scale of the page. Suppose, however, that a local view is magnified to the scale 1:4. A workplane is created on this drawing page. To capture the geometrical data of the local view, this workplane should use the same scale as the view, that is, 1:4.
External. Setting this flag allows referencing the element being created in assemblies when inserting the current file as a fragment.
Show in 3D View. This flag controls the display of the workplane in the 3D view.
Show 2D Annotations on 3D View. This parameter allows carrying the annotation elements from a Workplane over to the 3D space. When the flag is set, the annotation elements (dimensions, leader notes, roughness symbols) that were created on that Workplane become displayed in the 3D window, and you can work with them as with the usual 3D annotation elements.
Show all 2D elements in 3D view. When the flag is set, all hatches, graphic lines and other elements of the 2D drawing are displayed in the 3D scene.
Show intersection lines with workplanes. When the flag is set, not only workplane boundaries but also intersection lines with the other model workplanes will be shown.
Intersection lines can be selected to create new construction lines.
Show Coordinate System. This parameter controls the view of the workplane's own coordinate system on its image in the 3D scene. By default, this parameter is turned off, i.e., the coordinate system is not displayed.
Do not delete in Purge command. When the flag is set the workplane will not be deleted, even if it is not used for the operations creation. Option is useful when workplane contains sketch, which removal from the document is undesirable.
Transparency. This parameter allows a user to control the transparency level for the rectangular box of the workplane in the 3D window.
An additional parameter "Offset by Normal" is present in the dialog box of workplanes that were created parallel to geometrical planes defined by appropriate 3D elements. This is the workplane offset distance from the defining geometrical plane.
Manipulators of Workplanes
For convenience of work with workplanes in T-FLEX CAD, special manipulators can be used.
When selecting a workplane in the 3D scene outside the command, on the workplane's image the special manipulators will appear in the form of a rectangle.
Small manipulators in the form of spheres located at the mid-sides of the workplane's rectangle allow us to quickly modify the visible boundaries of the workplane. .

When the cursor is moved to such a manipulator, the size of the manipulator is slightly increased. Working with the manipulator can be carried out in two ways. First, it is possible to point at the manipulator and press ![]() . The selected boundary of the plane will start moving after the cursor. Pressing
. The selected boundary of the plane will start moving after the cursor. Pressing ![]() for the second time will fix the new location of the boundary of the workplane. The second way – by pointing at the manipulator, press
for the second time will fix the new location of the boundary of the workplane. The second way – by pointing at the manipulator, press ![]() and without releasing the pressed mouse button, move the selected boundary of the plane to the desired location. In this case, to fix the new size of the workplane, it is sufficient to release the pressed mouse button.
and without releasing the pressed mouse button, move the selected boundary of the plane to the desired location. In this case, to fix the new size of the workplane, it is sufficient to release the pressed mouse button.
In both cases, when the manipulator is activated, in the system toolbar appear the additional elements for exact specification of the new location of the boundary of the plane being edited.

The large manipulator, which appears at that place where the cursor was at the moment of workplane selection, allows us to quickly move the plane and also create new workplanes. The given manipulator practically consists of two manipulators: sphere at the center – manipulator of translation – serves for the translation of the selected plane parallel to its original location; and the cones – manipulators of copying – allow us to create new planes parallel to the selected one.

After the plane translation manipulator is activated, the image of the plane being edited is “duplicated”. One copy remains at the initial position, the second copy of the plane starts dynamically moving after the cursor. Between them a dimension line that measures the magnitude of the distance between the planes is drawn. After pressing ![]() for the second time (or after releasing the pressed mouse button) the workplane is fixed at the specified location. As in the case of modifying the boundaries of the plane, the exact value of the translation can be specified in the system.
for the second time (or after releasing the pressed mouse button) the workplane is fixed at the specified location. As in the case of modifying the boundaries of the plane, the exact value of the translation can be specified in the system.

Working with the manipulator of copying is carried out in a similar way. The only difference is that as a result of this operation not the original plane but its copy is moved to the specified location. In this way any number of parallel planes can be created.
Working with Workplanes with the Help of Rules of 3D window
When working in the 3D window with the enabled rulers, there are additional capabilities for quick translation and copying of workplanes.
Visibility of rulers in the 3D window can be controlled with the help of the «Customize|Windows|Ruler» command of the text menu. Also, the identically-named command can be used in the context menu that appears upon pressing ![]() and selecting one of the toolbars.
and selecting one of the toolbars.
The rulers in the 3D window allow us to quickly estimate the sizes and distances in the 3D scene. Coordinates shown on the rulers constitute the coordinates on the imaginary plane parallel to the plane of the screen.
In case when the workplane is orthogonal to the plane of the current 3D view and occupies in it the vertical or horizontal location, the special marker on the ruler (![]() or
or ![]() ) will show the location of such a workplane.
) will show the location of such a workplane.
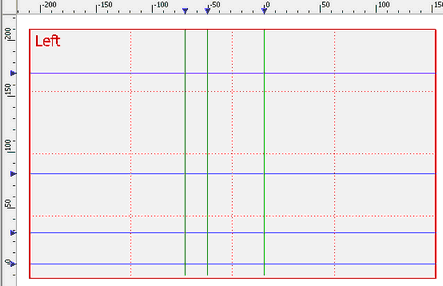
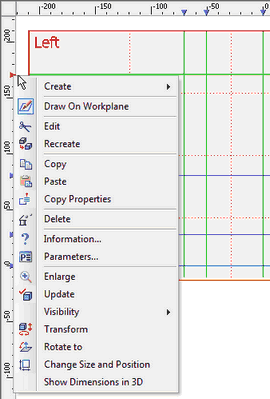
The marker of the workplane is closely linked with the workplane itself. When the cursor is moved to the sign of the marker, the color of the marker is changed to red. Moreover, the workplane itself is highlighted. Pressing ![]() on the sign of the marker invokes the context menu for the plane that corresponds to the given marker.
on the sign of the marker invokes the context menu for the plane that corresponds to the given marker.
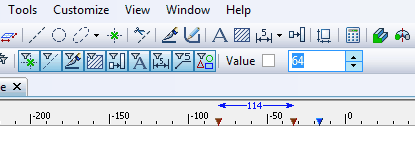
When the marker is selected with the help of ![]() , the mode of translation/copying of the workplane is activated. On the screen the popup dynamical toolbar appears that allows us to specify the exact value of the translation of the plane.
, the mode of translation/copying of the workplane is activated. On the screen the popup dynamical toolbar appears that allows us to specify the exact value of the translation of the plane.
The translation of the selected plane is carried out if, after selection of the marker with the help of ![]() , the user moves the cursor without releasing the pressed mouse button. To fix the new location of the workplane, it is sufficient to release the mouse button.
, the user moves the cursor without releasing the pressed mouse button. To fix the new location of the workplane, it is sufficient to release the mouse button.
Creation of the new workplane – copying – takes place if, after selection of the marker with the help of ![]() , the pressed mouse button is released. Pressing
, the pressed mouse button is released. Pressing ![]() for the second time in this case will fix the location of already the new workplane – copy of the original plane.
for the second time in this case will fix the location of already the new workplane – copy of the original plane.
By using the <Shift> and <Ctrl> keys, it is possible to select several markers at once. Translation and copying in the case of multiple selection are carried out similarly to the selection of one marker. In the context menu the additional commands will be available:
●Distance (available only upon selection of two markers) – this command is used for quick modification of the distance between the workplanes. When invoking the command, the “Distance” window appears in which it is necessary to indicate the required value of the distance. After pressing[OK], the system will displace the corresponding workplanes in such a way that the distance between them becomes equal to the specified value; |
|
●Uniformly (available only upon selection of three or more markers) – this command displaces the planes, which are connected with the selected markers, in such a way that the distance between all adjacent planes becomes the same;
●Array… – create an array of planes (only upon selection of two markers of planes).

In the context menu of the ruler of the 3D window two additional commands are available – “Associated mode” and “Show dimensions”.

The “Associated mode” flag controls the mode of creation of workplanes with the help of tick marks on the rulers. When this flag is enabled, the new workplane is created with the shift with respect to the original workplane. When the flag is disabled, location of the new plane will be fixed in absolute coordinates without snapping to the original workplane.
The “Show dimensions” mode controls the display of distances between the planes. When this flag is enabled, the distances of the selected workplanes between each other (if several of them were selected) and the distances to the first and last workplanes along the given axis are shown on the ruler as dimensions.

Grid of Workplanes
In T-FLEX CAD there is one more auxiliary tool for working with the workplanes – grid of workplanes. The grid of workplanes – is a set of lines of intersections of all workplanes of the model. Intersections are shown with the gray lines. Visibility of the grid is controlled with the “Show/hide grid of workplanes” The nodes of the grid of workplanes can be used for snapping, once they are selected as geometric points in different 3D operations. In this case 3D nodes will automatically be created at the nodes of the grid.
|
|