Fill and Edit Database Content |
  
|
After specifying parameters of the database and its columns, on the screen will appear an empty table of the database that contains one row and those columns which were specified by the user.

Note that in the database table there is always an additional, service column with the name “№”. This column contains line numbers of the table.
To create additional rows, you can use the following commands:
Icon |
Ribbon |
|---|---|
|
Database > Component Links > Insert Row Before |
Icon |
Ribbon |
|---|---|
|
Database > Component Links > Insert Row After |
Icon |
Ribbon |
|---|---|
|
Database > Component Links > Insert Rows |
Also, you can create an empty row if you press <Enter>, when the cursor is located at the last row of the table.
To remove the rows, use the option:
Icon |
Ribbon |
|---|---|
|
Database > Component Links > Delete Rows |
All options are repeated in the context menu that can be invoked with ![]() for any stringrow of the table (out of the mode of editing the contents of a specific cell of the table).
for any stringrow of the table (out of the mode of editing the contents of a specific cell of the table).
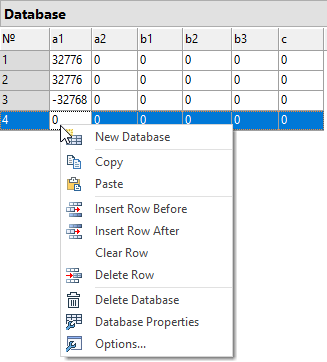
You can add and remove the columns to/from the database table by using the following options of the ribbon:
Icon |
Ribbon |
|---|---|
|
Database > Component Links > Insert Column Before |
Icon |
Ribbon |
|---|---|
|
Database > Component Links > Insert Column After |
Icon |
Ribbon |
|---|---|
|
Database > Component Links > Insert Columns |
Icon |
Ribbon |
|---|---|
|
Database > Component Links > Delete Columns |
The same options are accessible from the context menu in the area of columns headers of the database table:
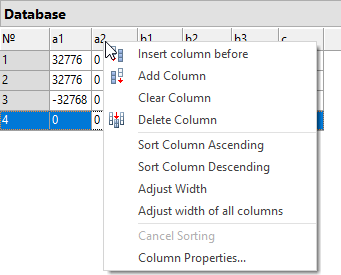
In addition, in the context menu the following commands for a column are available:
•Sort Column Ascending. As a result of applying this command, the lines of the table are displaced in such a way that the contents of the rows of the current column are sorted in the ascending order;
•Sort Column Descending. As a result of applying this command, the lines of the table are displaced in such a way that the contents of the rows of the current column are sorted in the descending order;
•Adjust Width. Selects the width of the current column according to the contents of the column’s cells;
•Adjust width of all columns. Invokes the dialog of column’s parameters (the same as used upon creation of a database). In the dialog you can change the name and the type of already existing and completed column. It should be taken into account that upon changing the column type its contents can be lost. In addition, the change in the column’s name to which the links were already created in the Variable Editor, will lead to the errors in the variables, which can be corrected only by the user.
The column’s parameters dialog can also be invoked without using the context menu, i.e., simply by clicking ![]()
![]() on the column’s header.
on the column’s header.
Moving across the rows when editing the contents of the database is carried out in the following ways:
•With the help of pointing at the required row with the cursor and pressing ![]() ;
;
•With the help of pressing the keys <Up> or <Down>. In this case, the cursor moves one row up or down, respectively;
•With the help of the key <Enter> in any row, except the last one. As a result, the cursor moves to the row line;
•With the help of pressing the keys <PageUp> or <PageDown>. In this case, the cursor moves one page up or down, respectively, i.e., to the first/last row in the current window;
•With the help of pressing the keys <End>/<Home>. In this case, transition to the first/last row of the database table is carried out.
The user can move rows and the data contained in them inside the database table with the help of the following options:
Icon |
Ribbon |
|---|---|
|
Database > Component Links > Move down |
Icon |
Ribbon |
|---|---|
|
Database > Component Links > Move up |
The same actions can be performed by pressing the key combination:
•<Ctrl>+<Down> - to move the row downwards
•<Ctrl>+<Up> - to move the row upwards
To specify the contents of cells of the data’s table, it is required to enter into the mode of editing the required cell with the help of ![]() . The selected cell is highlighted with an inverted rectangle (the background color becomes the text’s color and vice versa) and the blinking cursor appears in the cell.
. The selected cell is highlighted with an inverted rectangle (the background color becomes the text’s color and vice versa) and the blinking cursor appears in the cell.
To speed up the work of filling in the database table, it is possible to use the options of copying/insertion. It is possible to copy both the contents of individual cells and the entire rows of the database table. It is allowed to copy both inside a single database and from one database to another, even if the second database is inside another document of T-FLEX CAD.
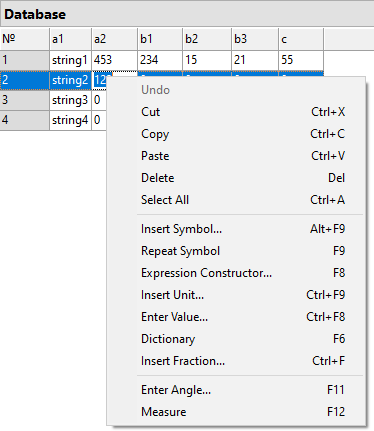
To copy the contents of a specific cell, it is required first to select the contents and choose the Copy command from its contextual menu. Insertion of the copied data into another cell is carried out in a similar way using the Paste command. The commands of insertion of symbols, variables, fractions, etc. are also available in the context menu for the cell’s contents of the data’s table. A detailed description of these commands is given in the Texts section of this user’s manual.
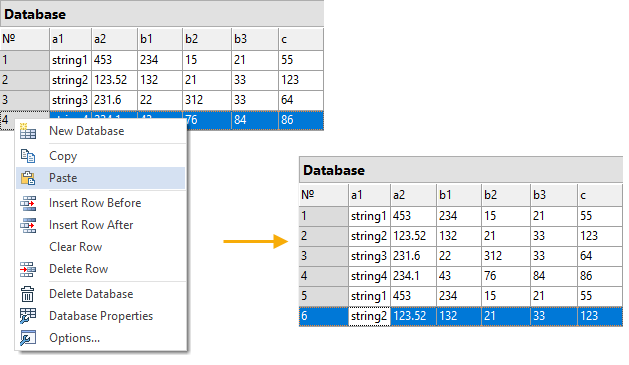
To copy the entire row or several rows simultaneously, select the desired rows, and then call the ![]() Copy command from the contextual menu of the rows or from the ribbon.
Copy command from the contextual menu of the rows or from the ribbon.
When working with databases, this command works with whole rows only.
To select a row, it is possible to use two options. The first option – indicate the desired row with the help of ![]() , which right away also invokes the context menu with the commands of copying/pasting of rows. The second option – select a row with the help of
, which right away also invokes the context menu with the commands of copying/pasting of rows. The second option – select a row with the help of ![]() , by indicating the very first, service column of the database table, with the name “№”. To select several rows, you can use the selection with the help of
, by indicating the very first, service column of the database table, with the name “№”. To select several rows, you can use the selection with the help of ![]() +<Ctrl> and
+<Ctrl> and ![]() +<Shift>, as is done elsewhere in the system.
+<Shift>, as is done elsewhere in the system.
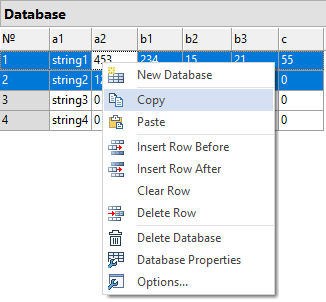
For insertion of the copied rows, it is sufficient to choose the desired place (row) in the table and invoke the ![]() Paste command from the contextual menu of the row or from the ribbon. Insertion will be carried out after the row at which the cursor was at the moment of invoking the
Paste command from the contextual menu of the row or from the ribbon. Insertion will be carried out after the row at which the cursor was at the moment of invoking the ![]() Paste command.
Paste command.
To select the entire contents of the table, use the following command:
Icon |
Ribbon |
|---|---|
|
Database > Component Links > Select Table |
To copy the content of the whole database into the clipboard, use the following command:
Icon |
Ribbon |
|---|---|
|
Database > Component Links > Copy database to clipboard |
When using this command, you do not need to select the cells to be copied - the whole table is copied regardless of the current selection.