Creating Libraries, their Groups and Configurations |
  
|
You can use option New configuration ![]() on the toolbar to create a new library configuration. You can also use Library configuration > New item from the context menu.
on the toolbar to create a new library configuration. You can also use Library configuration > New item from the context menu.
Command Add Folder ![]() / Add Group
/ Add Group ![]() adds a new library/libraries group. The commands are available in context menu of configuration or libraries group. The element is created on the current library configuration hierarchy level.
adds a new library/libraries group. The commands are available in context menu of configuration or libraries group. The element is created on the current library configuration hierarchy level.
When you create library it is necessary to select folder with necessary files.
An example of library explorer elements creation can be found in Example of configuration creation section below.
There are several ways to add a new .grb file into the library:
1.Add file to the catalog, which is linked with the library.
Library Explorer window is automatically updated if document files included into library were deleted, added or renamed. Thus, files added to the folder in Windows Explorer are displayed in the Library Explorer window.
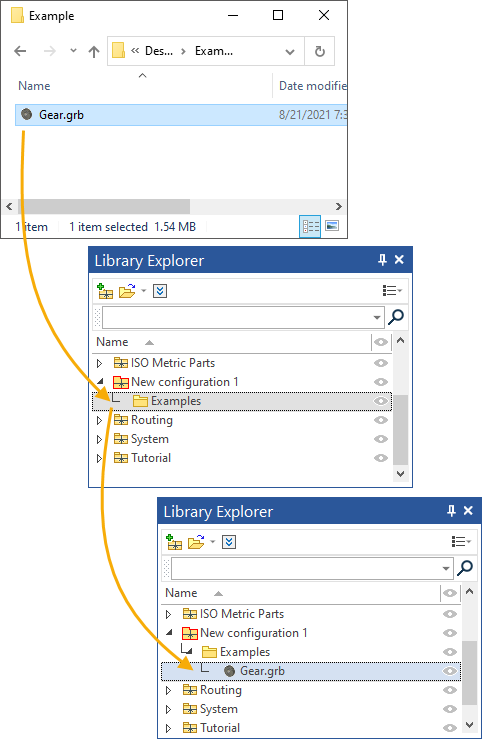
2. Transfer files from Windows Explorer to Library explorer window using Drag’n’drop or Copy/Paste options.
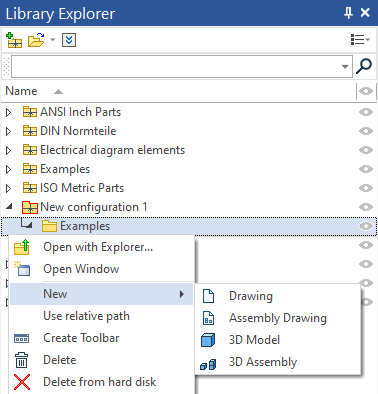
3.Create a new file using one from the prototypes using New option from the context menu.
Moving of Library Explorer Elements
You can move libraries groups, libraries and files using Drag’n’Drop mechanism. For example, to move several files into another library, first select the group of files (hold down <Shift> or <Ctrl> as appropriate). Then, move the cursor over the highlighted files and press ![]() . Next, hold the left mouse button down and drag the group of files into another library. This amounts to performing first Cut, and then Paste command.
. Next, hold the left mouse button down and drag the group of files into another library. This amounts to performing first Cut, and then Paste command.
Cut ![]() , copy
, copy ![]() , paste
, paste ![]() . These commands are available in context menus to move/copy libraries, libraries groups and files.
. These commands are available in context menus to move/copy libraries, libraries groups and files.
If a file is dragged into the drawing window, it will be inserted as a fragment. Dragging a file icon into the menu or toolbar area opens it for editing.
If you move the file icon to the menu and toolbars area, it will be opened for editing.
Example of configuration creation
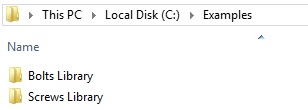
We need to create a new configuration and add Bolts Library and Screws Library into it. The folders include all necessary files and are stored on the disk.
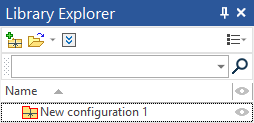
1.Create a new configuration using New Configuration ![]() command from the toolbar.
command from the toolbar.
2.Create libraries group using Add group ![]() from the configuration context menu.
from the configuration context menu.
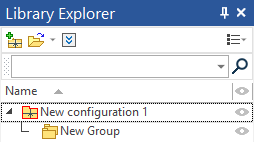
3.Rename the created libraries group using Rename ![]() command from the context menu.
command from the context menu.
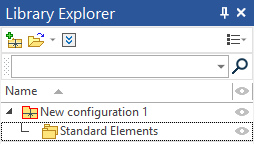
4.Select Add Folder ![]() item from context menu of the libraries group. Select Library Folder dialog will appear. Select folder and press Select Folder. The selected folder with all its files will be added to library explorer.
item from context menu of the libraries group. Select Library Folder dialog will appear. Select folder and press Select Folder. The selected folder with all its files will be added to library explorer.
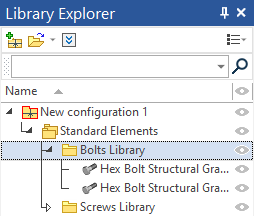
All the files that will be subsequently added to the selected catalogs will also be displayed in library explorer.
5.Save the configuration after adding all necessary libraries. Configurations are stored in textual tws file, which contains information about included libraries. To save the configuration, use Save as ![]() command from the context menu of the configuration and select folder where it will be stored. You can also change name of the configuration upon saving.
command from the context menu of the configuration and select folder where it will be stored. You can also change name of the configuration upon saving.
It is recommended to store configuration files and their libraries folders on the same level.

Specifying Relative Paths to the Catalog
A relative path to the library or libraries group catalog can be specified with respect to the installation home of the T-FLEX CAD application, or with respect to the configuration file that includes this library. A relative path allows use of symbols “*”, “..” and “.”.
The symbol “*” in the beginning of the path stands for the path to the T-FLEX CAD home.
The symbol “.” denotes the path to the folder of the library configuration file.
The symbol “..” means ascending one level up the folder.
Suppose, for example, that the T-FLEX CAD application is installed in the С:\Program Files\T-FLEX Parametric CAD 3D folder, and a library configuration is stored in the file С:\Library\A library1.tws. In this case, the relative paths to libraries and groups of libraries are written out as follows:
Path relative to T-FLEX CAD home folder |
Path relative to the library configuration file |
Absolute path |
*\Library\Bolts |
.\..\ Program Files\T-FLEX Parametric CAD 3D\Library\Bolts |
C:\Program Files\T-FLEX Parametric CAD 3D\Library\Bolts |
*\..\..\Screws |
.\..\Screws |
C:\Screws |
*\..\..\Library\Rods |
\Rods |
С:\Library\Rods |
*\..\..\Library\Bolts\Normal |
\Bolts\Normal |
С:\Library\Bolts\Normal |
In the case of inputting a path to a non-existent folder, the system changes library icon to grey folder.
You can change paths using one of the following ways:
Activate Path column displaying in library explorer. Here you can change path to the folder.
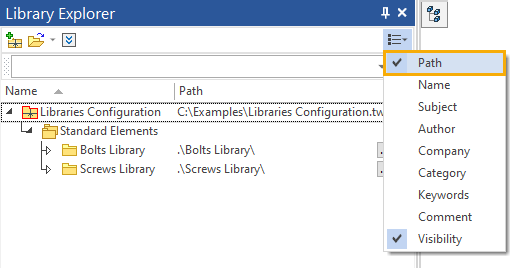
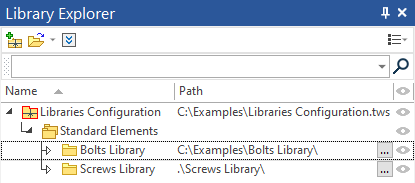
Since the configuration file is on the disk at the same level as the libraries, the path to the files will be displayed as .\Screws Library\.
If necessary, you can display the full path by entering it in the appropriate field:
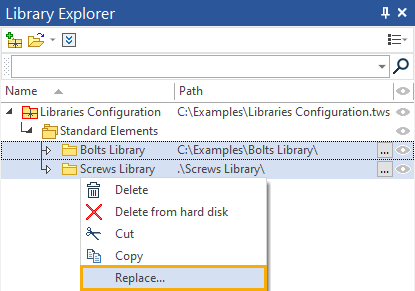
Change paths for several libraries at once. You need to select the libraries with hold down <Ctrl> and select Replace… item in their context menu.
Replace Library Path dialog appears. Here you can input an old path or its part and replace it with a new one.
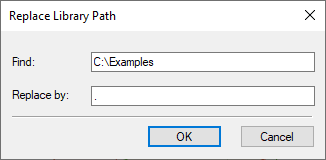
After that select Save option in the context menu of the configuration to save configuration changes. Relative paths will be saved in the configuration file.