Manage 2D View |
  
|
The command can be called in one of the following ways:
Icon |
Ribbon |
|---|---|
|
View > Zoom > Zoom Area |
Keyboard |
Textual Menu |
<ZW>, <F3> |
View > Zoom > Zoom Area |
The command can also be called from the View Toolbar in 2D or 3D window.
This command can be used for panning and scaling the visible area.
An arbitrary area of the drawing can be zoomed on by specifying two opposite corners of a box. Move the cursor to one corner of the area to be zoomed on, and press and hold ![]() . A rectangle starts rubberbanding after the cursor. Drag it, selecting the desired area by box, and then release the button
. A rectangle starts rubberbanding after the cursor. Drag it, selecting the desired area by box, and then release the button ![]() .
.
Following options become available in the automenu upon calling the command:
|
<P> |
Set command options |
|
<I> |
Zoom In |
|
<O> |
Zoom Out |
|
<L> |
Pan Left |
|
<R> |
Pan Right |
|
<U> |
Pan Up |
|
<D> |
Pan Down |
|
<A> |
Zoom Model to paper size |
|
<M> |
All Objects |
|
<W> |
Set absolute window coordinates |
|
<T> |
Actual Size |
|
<BackSpace> |
Set previous window coordinates |
|
<S> |
Save current window coordinates |
|
<Esc> |
Exit command |
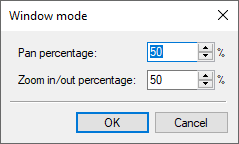
The Window mode dialog pops-up upon selecting the ![]() option. There you can customize panning and scaling increments defined as percentage of the window's size. These parameters are applicable not only to the Zoom Area command but also to main camera keyboard shortcuts usage.
option. There you can customize panning and scaling increments defined as percentage of the window's size. These parameters are applicable not only to the Zoom Area command but also to main camera keyboard shortcuts usage.

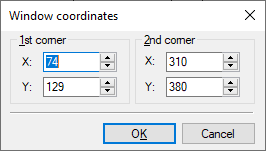
The Window coordinates dialog pops-up upon selecting the ![]() option. There you can set position of the working window in coordinates of the active drawing sheet. This option works in 2D window only.
option. There you can set position of the working window in coordinates of the active drawing sheet. This option works in 2D window only.

The Window dialog pops-up upon selecting the ![]() option. There you can type in the Window Number, using one of the numbers from 0 to 9. Current position of the working window is saved under the specified number upon clicking OK. You can call the previously saved position by pressing the corresponding numerical key on the keyboard. It works only when Zoom Area command is active. Saved positions are common for all documents in the current session. They are not written in document files and are cleared upon quitting the T-FLEX CAD.
option. There you can type in the Window Number, using one of the numbers from 0 to 9. Current position of the working window is saved under the specified number upon clicking OK. You can call the previously saved position by pressing the corresponding numerical key on the keyboard. It works only when Zoom Area command is active. Saved positions are common for all documents in the current session. They are not written in document files and are cleared upon quitting the T-FLEX CAD.

Additional Zoom Area commands
Most automenu options of the Zoom Area command are also available as separate commands listed below:
The command can be called in one of the following ways:
Icon |
Ribbon |
|---|---|
|
View > Zoom > By Page Size |
Keyboard |
Textual menu |
<ZA>, <Ctrl>+<Shift>+<Home> |
View > Zoom > By Page Size |
The command can also be called from the View Toolbar in 2D window.
This command reframes the working window according to the drawing format size.
The command can be called in one of the following ways:
Icon |
Ribbon |
|---|---|
|
View > Zoom > All objects |
Keyboard |
Textual Menu |
<ZM>, <Ctrl>+<Shift>+<End> |
View > Zoom > All objects |
The command can also be called from the View Toolbar or by double-clicking on the middle mouse button ![]()
![]() in 2D or 3D window.
in 2D or 3D window.
This command reframes the working window in such way that it fits all elements of 3D model or drawing (except some 2D constructions that are not associated with graphic lines).
The command can be called in one of the following ways:
Icon |
Ribbon |
|---|---|
|
View > Zoom > Zoom In |
Keyboard |
Textual Menu |
<ZI>, <Ctrl>+<Shift>+<PageUp> |
View > Zoom > Zoom In |
Zooms in the working window. Zooming increment is set in the Zoom Area command.
The command can be called in one of the following ways:
Icon |
Ribbon |
|---|---|
|
View > Zoom > Zoom Out |
Keyboard |
Textual Menu |
<ZO>, <Ctrl>+<Shift>+<PageDown> |
View > Zoom > Zoom Out |
Zooms out the working window. Zooming increment is set in the Zoom Area command.
The command can be called in one of the following ways:
Icon |
Ribbon |
|---|---|
|
- |
Keyboard |
Textual Menu |
<ZU>, <Ctrl>+<Up> |
View > Zoom > Pan Up |
Pans up the image in the working window. Panning increment is set in the Zoom Area command.
The command can be called in one of the following ways:
Icon |
Ribbon |
|---|---|
|
- |
Keyboard |
Textual Menu |
<ZD>, <Ctrl>+<Down> |
View > Zoom > Pan Down |
Pans down the image in the working window. Panning increment is set in the Zoom Area command.
The command can be called in one of the following ways:
Icon |
Ribbon |
|---|---|
|
- |
Keyboard |
Textual Menu |
<ZR>, <Ctrl>+<Right> |
View > Zoom > Pan Right |
Pans right the image in the working window. Panning increment is set in the Zoom Area command.
The command can be called in one of the following ways:
Icon |
Ribbon |
|---|---|
|
- |
Keyboard |
Textual Menu |
<ZL>, <Ctrl>+<Left> |
View > Zoom > Pan Left |
Pans left the image in the working window. Panning increment is set in the Zoom Area command.
The command can be called in one of the following ways:
Icon |
Ribbon |
|---|---|
|
View > Zoom > Actual size |
Keyboard |
Textual Menu |
<ZT> |
View > Zoom > Actual size |
This command allows you to display the image of the active window (2D view or 3D view) according to their actual dimensions.
The command can be called in one of the following ways:
Icon |
Ribbon |
|---|---|
|
- |
Keyboard |
Textual Menu |
<ZC> |
View > Zoom > Zoom by Coordinates |
This command is only available fro 2D window.
The Window coordinates dialog pops-up upon calling the command. There you can set position of the working window in coordinates of the active drawing sheet. It works in a similar way as in the ![]() option of the Zoom Area command.
option of the Zoom Area command.

The command can be called in one of the following ways:
Icon |
Ribbon |
|---|---|
|
- |
Keyboard |
Textual Menu |
<ZP> |
View > Zoom > Previous |
Restores the working window previous position.
See Also: