Using Keyboard and Mouse |
  
|
User interaction with T-FLEX CAD 3D is mostly performed via mouse. Functions of mouse buttons depend on context and on whether they're used in 2D or 3D window. Most common cases of using the mouse are listed below.
The described mouse buttons' functions are set by default, but can be customized. For more information, refer to the System Options.
•Pointing the cursor at an icon or a menu line invokes a ScreenTip (tooltip with a short info about a command or an option). Pressing ![]() then launches a command or applies an option represented by this icon or a menu line.
then launches a command or applies an option represented by this icon or a menu line.
•In 3D window dragging the mouse while holding ![]() rotates the camera. In this mode the cursor changes it's appearance to
rotates the camera. In this mode the cursor changes it's appearance to ![]() . Doing the same while holding the <Shift> button replaces rotation with zooming in (upon mouse pull) or out (upon mouse push). In this mode the cursor changes it's appearance to
. Doing the same while holding the <Shift> button replaces rotation with zooming in (upon mouse pull) or out (upon mouse push). In this mode the cursor changes it's appearance to ![]() .
.
•In 2D window dragging the mouse while holding ![]() selects objects via frame or curve selection.
selects objects via frame or curve selection.
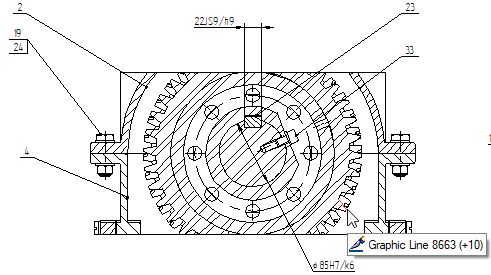
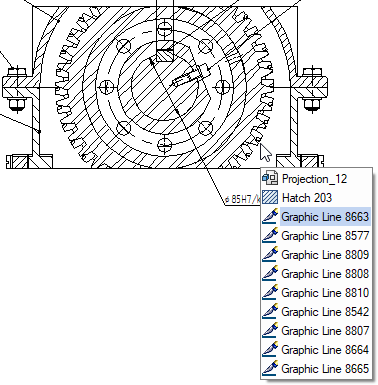
•When object snap is on, pointing the cursor at an element, which fulfills an active set of filters, highlights that element (highlight color depends on a type of an element). Holding the cursor in this position invokes a tip, which contains an icon of element's type, a name of an element and sometimes a number in brackets. This number is a quantity of elements which are located behind the current cursor position and fulfill active filters (an element nearest to the camera is selected by default). Holding the cursor in this position a little longer expands a list of aforementioned elements. You can switch between elements in the list by scrolling![]() . When desired element is highlighted click
. When desired element is highlighted click ![]() to select this element. You can also select elements by instantly clicking
to select this element. You can also select elements by instantly clicking ![]() , without waiting for a tip to appear.
, without waiting for a tip to appear.
•Selecting an element by clicking ![]() in 2D window or in the drawing on workplane mode invokes a command for editing selected element.
in 2D window or in the drawing on workplane mode invokes a command for editing selected element.
•Selecting an element by clicking ![]() in 3D window outside the drawing on workplane mode invokes a dynamic toolbar.
in 3D window outside the drawing on workplane mode invokes a dynamic toolbar.
•Double click ![]()
![]() on a 2D or 3D element invokes the Element Parameters dialog, if no 3D modeling command is currently active.
on a 2D or 3D element invokes the Element Parameters dialog, if no 3D modeling command is currently active.
•Double click ![]()
![]() in 3D window confirms a 3D modeling command, if such command is active and its mandatory parameters are defined.
in 3D window confirms a 3D modeling command, if such command is active and its mandatory parameters are defined.
•Sequential clicking ![]() on 2D or 3D elements while holding the <Shift> button allows to select multiple elements.
on 2D or 3D elements while holding the <Shift> button allows to select multiple elements.
•Element can be excluded from multiple selection by clicking ![]() on it while holding the <Ctrl>.
on it while holding the <Ctrl>.
•2D elements can be repositioned by drag&drop (click ![]() and drag the mouse without releasing the
and drag the mouse without releasing the![]() ). Drag&drop works in the same way on a multiple selection of 2D elements.
). Drag&drop works in the same way on a multiple selection of 2D elements.
•
•Drag&drop can also be used for managing libraries and customizing toolbars and dialog boxes.
•Clicking ![]() an input box sets the input focus into such input box, so then you can input a value via keyboard or select a corresponding support element
an input box sets the input focus into such input box, so then you can input a value via keyboard or select a corresponding support element
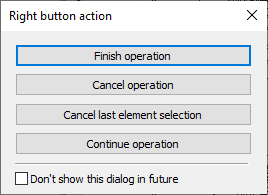
•While within a command, pressing ![]() cancels the last action or the whole command. Some commands (e.g.: spline, hatch) allow user to select an action upon clicking
cancels the last action or the whole command. Some commands (e.g.: spline, hatch) allow user to select an action upon clicking ![]() :
:
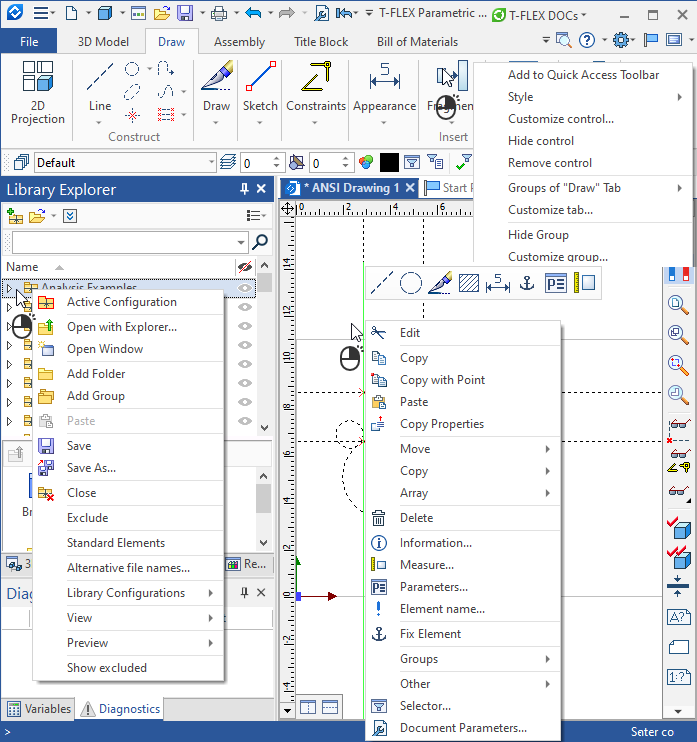
•If no command is active, pressing ![]() invokes a contextual menu. The menu is composed of the commands currently available for the particular element. Content of the contextual menu depends on where the cursor is pointing (area of the 3D scene, a model element, the command area of T-FLEX CAD, such as a dialog box, a menu, or a toolbar). To launch a command point the cursor at the corresponding line of the context menu and press
invokes a contextual menu. The menu is composed of the commands currently available for the particular element. Content of the contextual menu depends on where the cursor is pointing (area of the 3D scene, a model element, the command area of T-FLEX CAD, such as a dialog box, a menu, or a toolbar). To launch a command point the cursor at the corresponding line of the context menu and press ![]() .
.
•A dynamic toolbar is also displayed when invoking the contextual menu by clicking ![]() in 2D or 3D windows.
in 2D or 3D windows.
•Dragging the mouse while holding ![]() selects objects via frame or curve selection both in 2D and 3D windows.
selects objects via frame or curve selection both in 2D and 3D windows.
Using mouse wheel (middle mouse button)
•Scrolling ![]() down zooms in the camera, scrolling
down zooms in the camera, scrolling ![]() up zooms out the camera.
up zooms out the camera.
•Dragging the mouse while holding ![]() pans the camera. The cursor in this mode changes appearance to
pans the camera. The cursor in this mode changes appearance to ![]() .
.
•Scrolling ![]() performs the standard functions of scrolling in the appropriate field of dialog boxes.
performs the standard functions of scrolling in the appropriate field of dialog boxes.
•Double clicking ![]()
![]() in 2D or 3D window applies Zoom Limits.
in 2D or 3D window applies Zoom Limits.
The keyboard is used for inputting numerical and string values into various input boxes. Additionally the keyboard can be used for calling commands or switching options via hotkeys.
Calling commands from keyboard, using an icon, from textual menu
Most T-FLEX CAD commands have keyboard shortcuts which are either key combinations, where buttons should be pressed simultaneously, or key sequences (keyboard accelerator sequences), where buttons shoud be pressed one by one sequentially. The textual menu lines contain hotkey combinations (but not sequences) for a related command if it is assigned. The combination can be changed for any command. For detailed description, refer to the Keyboard. Customizing toolbars and keyboard.
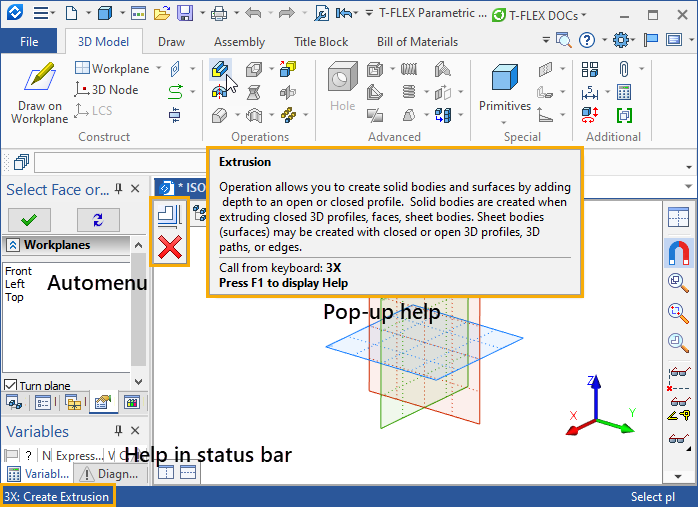
Key sequences and command names are displayed in ScreenTips (pop-up help) and in the message field of the status bar.
Most commands have additional options and sub-commands accessible via the automenu and hotkeys. Hotkeys are displayed in tooltips, invoked by hovering the cursor over an option's icon.
Confirming actions of 3D element creation
Unlike 2D elements, a 3D element creation takes several steps. Not all of these steps are required. To complete an element definition, use the Finish input option by clicking on the ![]() icon or using the <Ctrl>+<Enter> shortcut. This option becomes accessible only when all mandatory parameters of operations are defined.
icon or using the <Ctrl>+<Enter> shortcut. This option becomes accessible only when all mandatory parameters of operations are defined.
When calling a command, notice initial parameters. Some commands remember the last used set of parameters, while others revert to default.
Canceling and exiting a command
Exiting a command is done by pressing <Esc> key or ![]() . Alternatively, use the
. Alternatively, use the ![]() automenu icon.
automenu icon.
If launched 3D command is in its initial state (no elements selected, no parameters changed), then calling another 3D command makes the former command quit. However, if something has been selected within the former command then the newly launched command does not close the former one and becomes nested. Once done with the nested command, the system returns into the former command. This is one of the differences between 3D and 2D command. It only works in 3D outside the drawing on workplane mode. To return to the command-standby mode, close subsequently all active commands. Instant exiting from all nested commands is done by simultaneously pressing <Shift>+<Esc>. A 3D command quits automatically upon calling any 2D command.
<F1> |
Call Help |
<F2> |
Switch on/off Object Snap |
<F7> |
Refresh screen |
<F11> |
Enter/exit Full Screen mode |
<Alt>+<F4> |
Exit the T-FLEX CAD |
<Ctrl>+<N> |
|
<Ctrl>+<Shift>+<N> |
|
<Ctrl>+<O> |
|
<Ctrl>+<P> |
|
<Ctrl>+<R> |
|
<Ctrl>+<W> |
|
<Ctrl>+<S> |
|
<Ctrl>+<Y>, <Ctrl>+<Backspace> |
Redo (outside an active command) |
<Ctrl>+<Z>, <Alt>+<Backspace> |
Undo (outside an active command) |
<Ctrl>+<C>, <Ctrl>+<Insert> |
Copy selected elements to the system clipboard |
<Ctrl>+<V>, <Shift>+<Insert> |
Paste elements from the system clipboard |
<Esc> |
Cancel last action inside active command or quit command |
<Shift>+<Esc> |
Quit all commands at any nesting level |
<Space> |
Call last used command. Used commands are remembered independently for 2D window, 3D window inside draw on workplane mode and 3D window outside draw on workplane mode |
Sequentially switches input focus between available controls in dialog windows and in parameters tool window (the parameters window should be active) |
Shortcuts for setting parameters of elements fixate a value of a parameter, corresponding to the current cursor position within a view window, and set the input focus into the parameter's input box, so then you can input an arbitrary value via keyboard. These shortcuts can only be used for those parameters, that have a checkbox in addition to an input box. Fixating a value is performed along with enabling of the parameter's checkbox. Using the shortcut for the second time disables the fixation of the value and disables the checkbox.
<X> |
Set X coordinate |
<Q> |
Set dX offset |
<Y> |
Set Y coordinate |
<W> |
Set dY offset |
<L> |
Set length of element or distance |
<A> |
Set angle of element |
<R> |
Set radius of circle or circular arc, |
<D> |
Set diameter of circle or circular arc |
<Ctrl>+<F> |
Switch drawing mode |
<Ctrl>+<G> |
Switch on/off Grid snap |
<Alt>+<F6> |
Open Grid tab in Document Parameters |
<PageUp> |
Switch to the previous page |
<PageDown> |
Switch to the next page or add a new page |
Notice, that in 3D window <PageUp> and <PageDown> buttons have different purpose. |
|
Main camera shortcuts for both 2D and 3D windows)
<F3> |
Call Zoom Area command for managing 2D view |
<Shift>+<Ctrl>+<Home> |
Call By Page Size command |
<Shift>+<Ctrl>+<End> |
Call Zoom Limits command |
<Ctrl>+<Left>, <Ctrl>+<Right>, <Ctrl>+<Down>, <Ctrl>+<Up> |
Pan the camera in corresponding direction along screen plane |
<Shift>+<Ctrl>+<PageDown> |
Zoom out |
<Shift>+<Ctrl>+<PageUp> |
Zoom in |
Main camera shortcuts for 3D window outside draw on workplane mode only
When using hotkeys, 15° and 90° angles of rotation are set by default. You can customize these values on the 3D tab of the System Options.
|
<Right> |
Rotate camera by 15° left/right around vertical axis |
<Down>, <Up> |
Rotate camera by 15° down/up around horizontal axis |
<PageUp> |
Rotate camera by 15° clockwise |
<PageDown> |
Rotate camera by 15° counterclockwise |
Notice, that in 2D window <PageUp> and <PageDown> buttons have different purpose. |
|
<Shift>+<Ctrl>+<Left>, <Shift>+<Ctrl>+<Right> |
Rotate camera by 90° left/right around vertical axis |
<Shift>+<Ctrl>+<Down>, <Shift>+<Ctrl>+<Up> |
Rotate camera by 90° down/up around horizontal axis |
<Ctrl>+<Num1>, <Ctrl>+<Num2>, <Ctrl>+<Num3>, <Ctrl>+<Num4>, <Ctrl>+<Num5>, <Ctrl>+<Num6>, <Ctrl>+<Num7>, <Ctrl>+<Num8>, <Ctrl>+<Num9>, <Ctrl>+<Num0> |
Apply one of standard View Points (this also works in draw on workplane mode) |