Icon |
Ribbon |
|---|---|
|
3D Model → Create → Linear array |
Keyboard |
Textual Menu |
<3AL> |
Operation > Linear array |
To define the direction vector of a linear array in the first direction, use the following automenu options:
![]() <D> Select first direction
<D> Select first direction
This option allows defining the direction vector by one 3D element (a straight edge, a face, etc.).
The options below allow defining the direction vector by two 3D points:
![]() <F> Select first direction starting point
<F> Select first direction starting point
![]() <S> Select first direction ending point
<S> Select first direction ending point
Undoing selection in either case is done by the option:
![]() <K> Reset first direction selection
<K> Reset first direction selection
Similar options are provided in the automenu for defining the second direction vector:
![]() <J> Select second direction
<J> Select second direction
![]() <T> Select second direction starting point
<T> Select second direction starting point
![]() <O> Select second direction ending point
<O> Select second direction ending point
![]() <L> Reset second direction selection
<L> Reset second direction selection
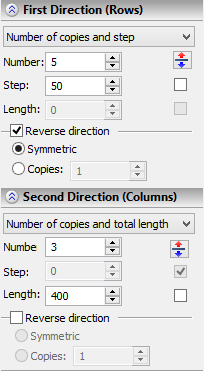
The array size is defined in the operation properties window similarly for both direction vectors. The array parameters in the first direction are defined in the section "First Direction (Rows)", in the second direction – in the section "Second Direction (Columns)". The buttons ![]() in each section help quickly flip the direction of the respective vector without redefining it. The first entry in each section is a combo box for selecting the parameters to define: "Number of copies and step", "Total length and step" and "Number of copies and total length". Depending on the choice you have made, the following entries for defining the respective parameters will be provided below: "Number" – allows defining the number of copies in in the given direction, "Step" and "Length" – define, respectively, the step and the array length in the given direction. To have the step or the array length be automatically calculated from the vector length, set the flag next to the respective parameter. In this case, the input box becomes inaccessible. To create array copies in the backward direction along the direction vector, set the flag "Reverse direction" in the properties window section corresponding to the desired vector. In this case, the switch becomes accessible for defining the number of copies in the backward direction. To have as many copies as in the forward direction, choose "Symmetric". To define a different number of copies in the backward direction, switch to "Number" and enter the desired number of copies.
in each section help quickly flip the direction of the respective vector without redefining it. The first entry in each section is a combo box for selecting the parameters to define: "Number of copies and step", "Total length and step" and "Number of copies and total length". Depending on the choice you have made, the following entries for defining the respective parameters will be provided below: "Number" – allows defining the number of copies in in the given direction, "Step" and "Length" – define, respectively, the step and the array length in the given direction. To have the step or the array length be automatically calculated from the vector length, set the flag next to the respective parameter. In this case, the input box becomes inaccessible. To create array copies in the backward direction along the direction vector, set the flag "Reverse direction" in the properties window section corresponding to the desired vector. In this case, the switch becomes accessible for defining the number of copies in the backward direction. To have as many copies as in the forward direction, choose "Symmetric". To define a different number of copies in the backward direction, switch to "Number" and enter the desired number of copies.

Using draggers in linear and circular arrays
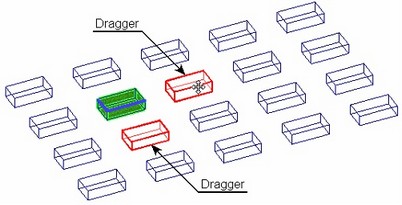
You can use draggers to define array parameters (number of copies, step and total length of the array in each direction) in both the linear and the circular arrays. Those allow, depending on the way of defining array parameters, setting either the number of copies, or the step, or else the total length (total angle) of the array.
The draggers appear as array elements painted Red (by default). As the pointer approaches a dragger's image, it changes to ![]() or
or ![]() (depending on the parameter controlled by the dragger). If at this moment you start dragging the mouse with the
(depending on the parameter controlled by the dragger). If at this moment you start dragging the mouse with the ![]() button depressed, then the wireframe preview of the operation being created will start rubberbanding, while the value of the respective parameter will be adjusting in the properties window.
button depressed, then the wireframe preview of the operation being created will start rubberbanding, while the value of the respective parameter will be adjusting in the properties window.

See also: Array Types, Array Classes, Limitations and Exclusions, Creating 3D Arrays