Creating 3D Arrays |
  
|
Creating 3D Arrays |
|
The following commands are used for creating an array:
Keyboard |
Textual Menu |
Icon |
<3AL> |
"Operation|Array|Linear" |
|
<3AR> |
"Operation|Array|Circular" |
|
<3AN> |
"Operation|Array|By Points" |
|
<3AP> |
"Operation|Array|By Path" |
|
<3AA> |
"Operation|Array|Parametric" |
|
The user interface of the above commands is similar. Therefore, the further description applies to all arrays, unless specifically mentioned.
To create any array, upon calling the respective command, do the following steps:
1. Select the type of the array to be created (array of construction elements, array of operations, array of Bodies, array of faces);
2. Select source objects of the array;
3. Select the guiding elements and define the main array parameters (the actions performed at this step depend on the type of the array being created);
4. Define advanced array parameters. The set of available modes controlled by those parameters depends on the array class – see the section "Array classes. Specifics of each class of arrays";
5. Define limitations and exclusions (if necessary and possible);
6. Confirm array creation (![]() in the automenu or in the properties window).
in the automenu or in the properties window).
Selecting array type and array source objects
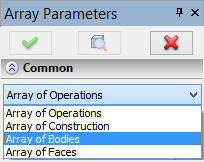
The array type selection is done in the properties window of the respective command. The section "Common" of the properties window begins for all arrays with a combo box for selecting the required type.
The item "Array of faces" is not available in the combo box of the parametric array.
Depending on the selected type, one of the following options for selecting the array source objects will be provided in the automenu:
![]() <N> Select construction
<N> Select construction
![]() <N> Select source 3D operation (for arrays of operations)
<N> Select source 3D operation (for arrays of operations)
![]() <N> Select source 3D operation (for arrays of Bodies)
<N> Select source 3D operation (for arrays of Bodies)
![]() <N> Select faces to copy or their boundary edges or loops
<N> Select faces to copy or their boundary edges or loops
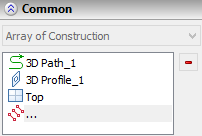
The selected objects will be put into the list of the array source objects in the operation properties window.
To resume selection of source objects at any stage of array creation, simply focus on the pane of the source elements list. The selection option will turn on automatically.
To undo selection of some of the selected objects, click it in the list and press the button ![]() .
.
Note that once the first object to be arrayed is selected, the entry defining the array type becomes inaccessible. To change the array type, you need to remove all 3D objects from the list of the array source objects. Only after that, you will be able to select another array type.
3D construction elements and operations are selected by simply picking those either directly in the 3D scene (by ![]() ) or in the model tree. To select a 3D Body, you can pick any of the operations contributing to this Body (again, either in the 3D scene, if that is possible, or in the 3D model tree). The Last operation of the given Body will be automatically put in the list of the selected objects.
) or in the model tree. To select a 3D Body, you can pick any of the operations contributing to this Body (again, either in the 3D scene, if that is possible, or in the 3D model tree). The Last operation of the given Body will be automatically put in the list of the selected objects.
Selection of source objects for an array of faces requires more close consideration.
Selecting source set of faces for array of faces
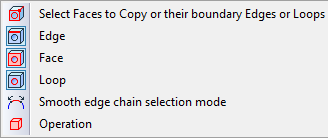
The pulldown list of the option for selecting a set of faces to copy ![]() allows choosing the way of selecting: direct selection of faces, selection of their bounding edges, selection of the operation (the same filters are duplicated by the system toolbar).
allows choosing the way of selecting: direct selection of faces, selection of their bounding edges, selection of the operation (the same filters are duplicated by the system toolbar).
The first item of the pulldown list ![]() turns on all filters simultaneously.
turns on all filters simultaneously.
To select the operation that created the desired set of faces, activate the filter ![]() . This filter has higher priority than other filters in the list. Therefore, if any other filter is turned on simultaneously with the operation selection filter
. This filter has higher priority than other filters in the list. Therefore, if any other filter is turned on simultaneously with the operation selection filter ![]() , such as, for instance, the face selection filter
, such as, for instance, the face selection filter ![]() , then the operation will be put in the list of the source objects for arraying, regardless of what was selected by the user – an operation or a face. That means, if a face is picked in the 3D scene, then the whole operation that created that face is put into the list of objects to array. This property of the
, then the operation will be put in the list of the source objects for arraying, regardless of what was selected by the user – an operation or a face. That means, if a face is picked in the 3D scene, then the whole operation that created that face is put into the list of objects to array. This property of the ![]() filter allows quick selection of operations by a pick on an edge or face.
filter allows quick selection of operations by a pick on an edge or face.
To enable selection of individual faces for the set to array, the ![]() option should be turned on, while the option
option should be turned on, while the option ![]() – off.
– off.
To select edges (or a chain of edges at once) surrounding the desired set of faces, turn on the filters ![]() (for individual edge selection) and/or
(for individual edge selection) and/or ![]() ,
, ![]() (for selecting a whole chain of edges). Meanwhile, the option
(for selecting a whole chain of edges). Meanwhile, the option ![]() must be turned off.
must be turned off.
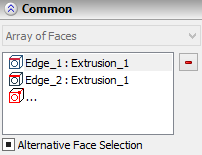
Which set of faces from the two possible sets, defined by the specified chain of edges, will be selected as the source object for the array, is determined by an additional flag "Alternative Face Selection" in the properties window.
The flag has three states: on by default ![]() , on
, on ![]() and off
and off ![]() . To let the system choose the set of faces automatically (by the least area condition), set the flag in the default state
. To let the system choose the set of faces automatically (by the least area condition), set the flag in the default state ![]() . If the further manipulations with the 3D model will alter the balance of the areas, the system will automatically switch to the other set of faces as the source object of the array.
. If the further manipulations with the 3D model will alter the balance of the areas, the system will automatically switch to the other set of faces as the source object of the array.
In the cases, when you want to specify one of the two possible sets of faces explicitly, use the two other states of the flag (on ![]() and off
and off ![]() ). Each of those will correspond with a particular set of faces. Which set of faces corresponds to which particular state of the flag is arbitrarily defined by the system upon specifying the set of edges. In this case, no future changes in the model will affect the set of faces being arrayed.
). Each of those will correspond with a particular set of faces. Which set of faces corresponds to which particular state of the flag is arbitrarily defined by the system upon specifying the set of edges. In this case, no future changes in the model will affect the set of faces being arrayed.
Defining the guiding elements and main array parameters