Construction Circle with Two Tangents, Using Radius |
  
|
Construction Circle with Two Tangents, Using Radius |
|
1. Call the ![]() Circle command.
Circle command.
2. Select a first line for the circle to be tangent to. You can select a construction line (straight, circle, ellipse, spline, 2D path, offset curve, function spline) or a graphic line (straight, circle or circular arc). A line can be selected in one of the following ways:
•Move the cursor over the desired line, using object snappings, and press ![]() or <Enter>. In case of selecting a graphic line, a coinciding construction lines (straight or circle) is created automatically, and the current circle is based on such construction line.
or <Enter>. In case of selecting a graphic line, a coinciding construction lines (straight or circle) is created automatically, and the current circle is based on such construction line.
•Activate one of the following automenu options:
|
<L> |
Select tangent line |
|
<C> |
Select tangent circle |
|
<E> |
Select tangent ellipse |
|
<S> |
Select tangent spline |
If the option is activated via keyboard, then the construction line of the corresponding type nearest to cursor gets selected instantly.
If the option is activated via mouse, then you have to additionally press ![]() within drawing window for selecting the nearest line.
within drawing window for selecting the nearest line.
In addition to splines, the spline selection option allows selecting 2D paths, offset curves and function splines.
3. Select a second line for the circle to be tangent to. Selection is available for lines of the same types as in the previous step. A line can be selected in one of the ways described above.
When selecting a 2D path, passing of the circle through one of the path's nodes can be interpreted as a tangency.
4. Set the desired tangency configuration, if necessary. Use the following automenu option for switching between possible tangency configurations:
|
<Z> |
Change construction tangency |
Tangency configurations are also switched automatically, when moving the mouse, depending on which configuration allows the circle to pass closer to the cursor.
5. Snap tangency configuration to a node, if necessary.
If one of the selected lines is an ellipse, spline, 2D path, offset curve or function spline, then manual switching of the tangency configuration and snapping it to a node is not available.
6. Specify a radius or diameter of the circle in one of the following ways:
•Type a value via keyboard. Values are typed into input boxes of the parameters window. The Radius input box is active by default. In order to switch between Radius and Diameter, press <Tab> or click the desired input box with![]() . You may also input a variable name instead of a numerical value. If the specified value is not possible considering the tangency with the previously selected lines, then the message will appear:
. You may also input a variable name instead of a numerical value. If the specified value is not possible considering the tangency with the previously selected lines, then the message will appear:
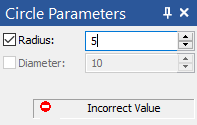
In such case, you should input a different value.
In order to finish the input, press <Enter> or click ![]() anywhere within drawing window.
anywhere within drawing window.
•Place the cursor at an arbitrary point of drawing window without snapping to existing elements and then press ![]() or <Enter>. The radius and diameter of the circle will be calculated so, that the circle passes through such point or as close to it as possible.
or <Enter>. The radius and diameter of the circle will be calculated so, that the circle passes through such point or as close to it as possible.
Regardless of the way of definition, radius and diameter are saved in circle parameters and can be edited later.


Example of creating a circle tangent to ellipse and spline


Example of creating a circle based on the same elements with different radius
After creating a circle the command returns to the initial state.