2D Snappings |
  
|
When creating and editing 2D elements, the Filter toolbar located at the upper edge of the drawing window contains icons of special 2D snappings, which allow to snap to a particular point of an element, align the resulting element horizontally or vertically with a point of an existing element, create normal and tangent lines without applying constraints. In some commands 2D snappings are provided instead of filters of elements type, in other commands both are available.
![]()
The set of available 2D snappings depends on the current command.
![]()
The full set of all possible snappings is available in the Sketch command:
|
<Alt>+<I> |
Point on Graphic Line |
|
<Alt>+<D> |
Point on Construction (is not enabled by default) |
|
<Alt>+<P> |
Construction Intersection |
|
<Alt>+<R> |
Coordinate System Origin |
|
<Alt>+<M> |
Line Midpoint |
|
<Alt>+<B> |
Graphic End Points |
|
<Alt>+<C> |
Circle/Arc Center |
|
<Alt>+<A> |
Arc Angle 90, 180, 270 degrees |
|
<Alt>+<V> |
Horizontal/vertical tangent |
|
<Alt>+<H> |
Horizontal/Vertical |
|
<Alt>+<O> |
Orthogonal |
|
<Alt>+<S> |
Graphics Continuation |
|
<Alt>+<T> |
Tangent to Graphic Line |
|
<Alt>+<N> |
Snap to 3D Elements (not active for the drawing). |
Keyboard shortcuts listed above are applicable only within the temporary snaps dialog ![]() (see below).
(see below).
Icons of active snappings are highlighted. In order to activate or deactivate a particular snapping, click its icon with ![]() . By clicking
. By clicking ![]() the
the ![]() icon , you can disable and enable all 2D snappings at once.
icon , you can disable and enable all 2D snappings at once.
To temporarily disable the 2D snappings, you can use the <Ctrl> key. While the key is pressed, the snapings do not work.
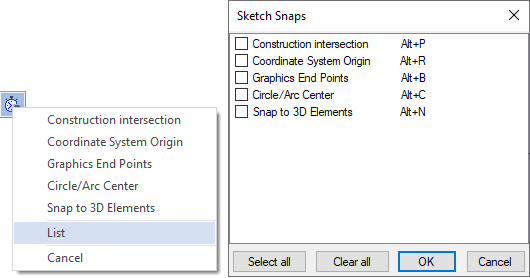
Often snappings interfere with each other: It's hard to find the right one among the automatically offered binding snapping. Then you can temporarily set only one necessary snapping. To do this, there is an icon ![]() on the snapping toolbar that displays a list of all the snappings from which you need to select the one you need. After you select the temporal snapping, all other snappings will be inactive, until creation is finished using
on the snapping toolbar that displays a list of all the snappings from which you need to select the one you need. After you select the temporal snapping, all other snappings will be inactive, until creation is finished using ![]() . After the construction is completed, all the snappings that are active in the snapping toolbar are available again. You can select a temporary snapping using hot keys. To set multiple snappings, use the List button in the context menu. After clicking the button, the context menu is replaced by a dialog window in which several time snaps can be enabled at once.
. After the construction is completed, all the snappings that are active in the snapping toolbar are available again. You can select a temporary snapping using hot keys. To set multiple snappings, use the List button in the context menu. After clicking the button, the context menu is replaced by a dialog window in which several time snaps can be enabled at once.

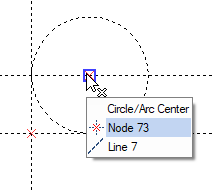
If several object snapping options are found at a given point, the system allows the user to select the necessary snapping (or a combination of two snaps). To do this, after placing the cursor at the necessary point, do not move it for a while. Then a tooltip will appear next to the cursor, which will indicate the total number of object snapping found by the system. Using the mouse wheel, you can sort through these snaps. Clicking will select the snap that will be used to create or edit the current 2D element.

The object snapping proposed by the system can be fixed using the <Space> key.

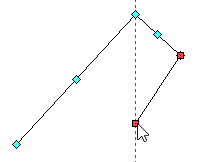
When the drawing is complex enough and there are many constructions, in order to activate the binding to those constructions that you need, you should move the cursor to the element (or several elements) in relation to which you want to create binding in the sketch command mode. If the required binding is active on the bindings toolbar, then an accurate dashed line will be drawn from the element. Next, we put a characteristic point with help of .
Examples of 2D Snappings Usage
Circle in the center of a rectangle
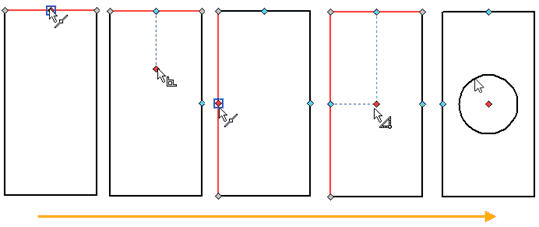
Suppose we are given a rectangle and need to create a circle in its center.

You need to make sure that the middle of the graphic line ![]() and the perpendicular
and the perpendicular ![]() snappings are active. Call the Circle command and move the cursor to the middle of the upper side of the rectangle. The snapping to the center of the graphic line is activated. You move the cursor down, and the perpendicular snapping icon appears. The dashed line is connects the cursor and the midpoint of the upper rectangle side at the normal angle. The snapping is "remembered". Now we move the cursor to the middle of the left side of the rectangle. The snapping to the middle of the graphic line is activated. You should move the cursor to the right. When the cursor is in the area close to the center - the first snapping is automatically aligned from the middle of the upper side along the normal downward. The intersection of two perpendiculars from the middle of the sides is the center of the rectangle. Click
snappings are active. Call the Circle command and move the cursor to the middle of the upper side of the rectangle. The snapping to the center of the graphic line is activated. You move the cursor down, and the perpendicular snapping icon appears. The dashed line is connects the cursor and the midpoint of the upper rectangle side at the normal angle. The snapping is "remembered". Now we move the cursor to the middle of the left side of the rectangle. The snapping to the middle of the graphic line is activated. You should move the cursor to the right. When the cursor is in the area close to the center - the first snapping is automatically aligned from the middle of the upper side along the normal downward. The intersection of two perpendiculars from the middle of the sides is the center of the rectangle. Click ![]() to specify the point of the center of the circle. Next, enter the radius of the circle and press <Enter>, in order to finish the drawing.
to specify the point of the center of the circle. Next, enter the radius of the circle and press <Enter>, in order to finish the drawing.
Quarter of a circle
Let us create a quarter of the circle, as shown in the figure.

Call the 2 points arc command. First, you need to make sure that the snapping to the end points of the graphic line ![]() , the snapping to the center of the circle
, the snapping to the center of the circle ![]() and the snapping when creating arcs to the angles of 90, 180 and 270 degrees
and the snapping when creating arcs to the angles of 90, 180 and 270 degrees ![]() are active. Then we specify the first point arbitrarily by pressing
are active. Then we specify the first point arbitrarily by pressing ![]() in the drawing window. Next, enter the angle of 45° in the parameters window: this means that the second point of the arc will be built on a line passing through the first point, at an angle of 45° with respect to the horizontal. We press
in the drawing window. Next, enter the angle of 45° in the parameters window: this means that the second point of the arc will be built on a line passing through the first point, at an angle of 45° with respect to the horizontal. We press ![]() , thereby setting the second point of the arc.
, thereby setting the second point of the arc.
A dynamically changing arc appears under the cursor. The cursor position determines the radius of the arc. Moving the cursor, we find the snapping to the arc by 90 °: the dashed lines that limit a quarter of a circle appear. Click to complete the arc. You should switch to the construction of the straight line segment. If Continuous line input has been enabled, the first point of the segment will already be at the extreme point of the arc. If the continuous input mode was not enabled, then we move the cursor to the edge of the arc, so that the snapping to the end points of the line is activated. Press ![]() to enter the first point of the segment. The second point of the segment appears under the cursor. The line is dynamically rebuilt according to the position of the cursor. If you can not find the snapping to the center of the arc, you must point the cursor to the arc. The algorithm for finding snappings should "understand" that we want to create snapping to the arc. You should move the cursor to the center of the arc. Once the cursor is near the center, the snapping is activated. The center point will be highlighted with a square marker and a snapping to center icon will appear. Press
to enter the first point of the segment. The second point of the segment appears under the cursor. The line is dynamically rebuilt according to the position of the cursor. If you can not find the snapping to the center of the arc, you must point the cursor to the arc. The algorithm for finding snappings should "understand" that we want to create snapping to the arc. You should move the cursor to the center of the arc. Once the cursor is near the center, the snapping is activated. The center point will be highlighted with a square marker and a snapping to center icon will appear. Press ![]() to enter the second point of the segment. Depending on whether the continuous input mode is enabled or not, the first point of the next segment will be already defined or it should be set independently. After specifying the first point of the segment, we move the cursor down, toward the other extreme point of the arc. The snapping to the end points of the graphic line is activated again. Press
to enter the second point of the segment. Depending on whether the continuous input mode is enabled or not, the first point of the next segment will be already defined or it should be set independently. After specifying the first point of the segment, we move the cursor down, toward the other extreme point of the arc. The snapping to the end points of the graphic line is activated again. Press ![]() , in order to finish the drawing.
, in order to finish the drawing.