Create 2D Fragment |
  
|
Command call:
Icon |
Ribbon |
|---|---|
|
Assembly > Assembly > Create 2D Fragment |
Keyboard |
Textual Menu |
|
|
The command may also be called from the automenu of the existing fragment insertion command using the following option:
|
<C> |
Create Fragment in Assembly Context |
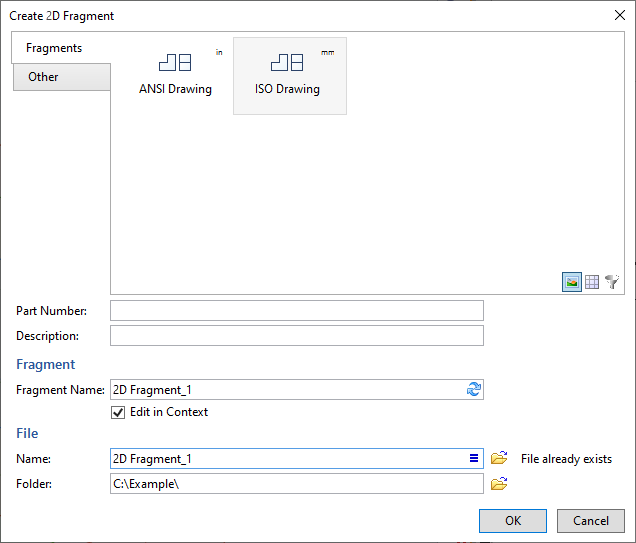
It allows to create a new document from one of the prototypes available in the system and insert such document into the current one as a 2D fragment. The inserted fragment can then be opened in context of assembly. Thus you can design an assembly using the "Top-down" method.

In the command's dialog, you should specify a desired prototype and press OK. The initial content and parameters of the resulting document coincide with content and parameters of the prototype. When opening the created document for the first time outside context of assembly, the system opens a window of the document with the same set of view windows and same tab of the ribbon, that were open at the moment of saving the selected prototype.
The list of prototypes available in the upper section of the dialog is common for several commands. Changes made in one of the commands affect the content of the list in others. Information on editing the list can be found in the description of the ![]() Save as Prototype command.
Save as Prototype command.
Only two tabs of the list are displayed in the ![]() Create 2D Fragment command: Fragments and Others, where the content of the first one is filtered in order to exclude non-drawing prototypes.
Create 2D Fragment command: Fragments and Others, where the content of the first one is filtered in order to exclude non-drawing prototypes.
Additionally, you may specify following parameters in the lower section of the dialog:
•Part Number and Description
Content of these input boxes will be recorded in eponymous columns of resulting document's product composition. If Part Number and Description are specified in product composition of a prototype, these boxes will be filled automatically, upon selecting such prototype. You may edit auto-filled values, if necessary. In order to restore an auto-filled value use the ![]() Update by Selected Prototype button at right side of an input box.
Update by Selected Prototype button at right side of an input box.
•Fragment Name
This parameter is not used for 2D fragments.
•Edit in Context
If the checkbox is enabled, the fragment will be opened in context of the current assembly upon creation.
•Name
Name of the resulting document's file. If Part Number and/or Description are filled (see above), the default name is generated automatically using them. You may edit auto-generated name, if necessary. In order to restore an auto-generated name use the ![]() Update by Selected Prototype button at right side of an input box. The format of auto-generated name can be customized using the
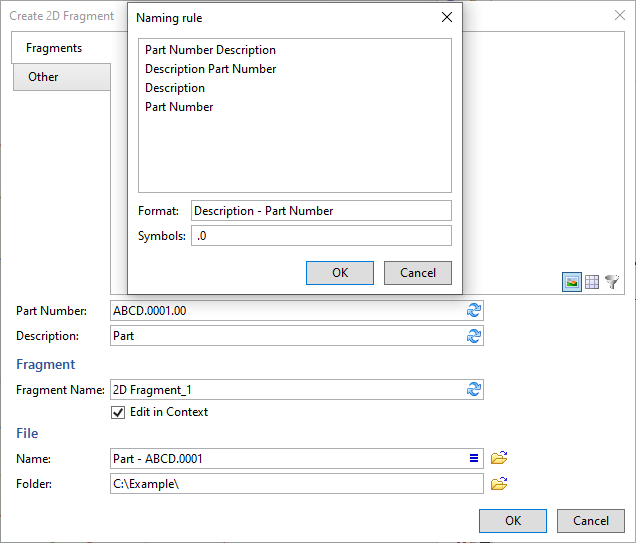
Update by Selected Prototype button at right side of an input box. The format of auto-generated name can be customized using the ![]() Naming rule button at the right side of the input box. The button invokes the following dialog:
Naming rule button at the right side of the input box. The button invokes the following dialog:

In the list in the upper section of the dialog, you can select one of the options defining the order of using Part Number and/or Description in auto-generated name.
In the Format input box, you can supplement the selected option by adding symbols before, after or between Part Number and/or Description.
In the Symbols input box you can specify symbols to be omitted from the end of the resulting name.
The example of the naming rule usage is shown in the picture above.
The ![]() Select button located to the right of the Name input box invokes the standard file selection dialog, where you can select an existing file to be replaced by the resulting one. Upon selecting a file, Name and Folder input boxes get filled automatically, and the "File already exists" notice appears to the right of the Name input box.
Select button located to the right of the Name input box invokes the standard file selection dialog, where you can select an existing file to be replaced by the resulting one. Upon selecting a file, Name and Folder input boxes get filled automatically, and the "File already exists" notice appears to the right of the Name input box.
If you leave the Name box empty, the name of the resulting document will be generated by adding an index number to the name of the selected prototype. Index numbers are counted from 1 for all documents created from this prototype within the current T-FLEX CAD session.
•Folder
Path to the resulting file. The ![]() Select button located to the right of the input box invokes the standard folder selection dialog. In case of using the folder selection dialog, the Folder box gets filled automatically in accordance with the location of the selected folder. In case of inputting a path via keyboard, the "Incorrect path" notice appears to the right and the input box gets highlighted in red, if the specified path cannot be found.
Select button located to the right of the input box invokes the standard folder selection dialog. In case of using the folder selection dialog, the Folder box gets filled automatically in accordance with the location of the selected folder. In case of inputting a path via keyboard, the "Incorrect path" notice appears to the right and the input box gets highlighted in red, if the specified path cannot be found.