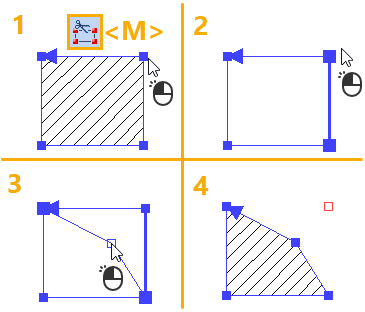
Editing Point of Hatch Contour |
  
|
Upon selecting a segment in the hatch contour editing mode, pressing ![]() within drawing window launches editing a nearest point of the selected segment (the starting one or the ending one). The selected point starts following the cursor. Set the desired position of the point by moving the cursor and confirm the input by pressing
within drawing window launches editing a nearest point of the selected segment (the starting one or the ending one). The selected point starts following the cursor. Set the desired position of the point by moving the cursor and confirm the input by pressing ![]() or <Enter>. Same as when defining a new contour, the point can be snapped to existing 2D nodes, to intersections of construction lines and ending points of graphic lines. Upon selecting an intersection of construction lines or an ending point of a graphic line, a connected 2D node is automatically created there.
or <Enter>. Same as when defining a new contour, the point can be snapped to existing 2D nodes, to intersections of construction lines and ending points of graphic lines. Upon selecting an intersection of construction lines or an ending point of a graphic line, a connected 2D node is automatically created there.

1 - Selecting a segment of contour to be edited
2 - Selecting a point of segment to be edited
3 - Specifying position of the selected point
4 - Result of editing
As the point follows the cursor, following options are available in the automenu:
|
<Ctrl>+<F> |
Within the connected drawing mode ![]() , clicking
, clicking ![]() an empty space of the drawing window selects the nearest existing 2D node or intersection of construction lines.
an empty space of the drawing window selects the nearest existing 2D node or intersection of construction lines.
Within the free drawing mode ![]() , clicking
, clicking ![]() an empty space of the drawing window creates a free 2D node there.
an empty space of the drawing window creates a free 2D node there.
|
<Q> |
|
|
<N> |
Select Node |
Upon activating this option, pressing ![]() within drawing window snaps the selected point of the contour to the nearest 2D node.
within drawing window snaps the selected point of the contour to the nearest 2D node.
|
<Del> |
Delete Contour point |
This option deletes the current point of the contour and, therefore, the current segment.
|
<Esc> |
Cancel selection |
This options clears the point selection.