Straight Construction Line as Axis of Symmetry between Two Lines |
  
|
1. Call the ![]() Line command.
Line command.
2. Activate the following automenu option
|
<U> |
Create Axis of Symmetry |
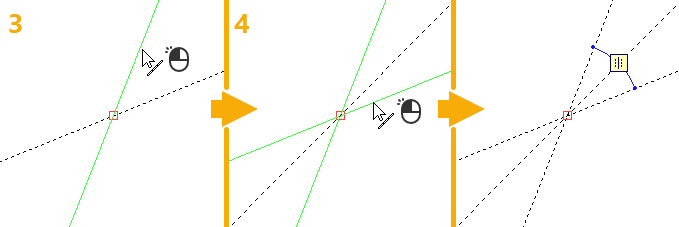
3. Select a first straight line defining axis. It may be either a construction or a graphic line. A line may be selected in one of the following ways:
•Move the cursor over the desired line, using object snappings, and press ![]() or <Enter>. In case of selecting a graphic line, a coinciding straight construction line is created automatically, and the current line is based on such construction line.
or <Enter>. In case of selecting a graphic line, a coinciding straight construction line is created automatically, and the current line is based on such construction line.
•Use the following automenu option:
|
<L> |
Select related Line |
This option is active by default, upon selecting the axis of symmetry, so in order to select a construction line nearest to the cursor, you just have to click ![]() within drawing window or press <L> or <Enter>.
within drawing window or press <L> or <Enter>.
4. Select a second straight line defining axis. Selection is available for lines of the same types as in the previous step. A line can be selected in one of the ways described above. Preview of the resulting axis appears upon moving the cursor over a line.

The relation mark ![]() located at the axis of symmetry connects the symmetric lines and indicates their symmetry.
located at the axis of symmetry connects the symmetric lines and indicates their symmetry.
After creating a line, the command returns into the default mode.
An axis of symmetry may also be created in the process of creating a parallel line (through node, using distance or tangent to curve). To do so, make sure that the axis of symmetry creation mode is active after selecting a source line for creating a parallel. Then select a second line. In result, an axis of symmetry will appear between the selected lines. The second line selection will be cleared and the first line selection will be kept. Axis of symmetry creation option will remain active. Next, you can continue selecting "second" lines, thus creating any number of axes. Upon creating all desired axes, finish the parallel line creation by selecting a node, specifying a distance or selecting a tangent curve.