Commands for Working with Tables |
  
|
When editing tables following commands are available in the Text tab of the ribbon, as well as on the Table toolbar in the Text Editor, :
Icon |
Ribbon |
|---|---|
|
Text > Table > Select Table |
Selects all cells of the table.
Table Properties
Icon |
Ribbon |
|---|---|
|
Text > Table > Table Properties |
Calls the table properties dialog.
Icon |
Ribbon |
|---|---|
|
Text > Edit > Split Cells |
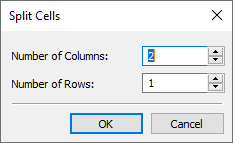
Opens a dialog, where you should specify the Number of Columns and the Number of Rows into which the selected cells will be split after clicking OK.

Icon |
Ribbon |
|---|---|
|
Text > Edit > Merge Cells |
Merges the selected cells into one.
Icon |
Ribbon |
|---|---|
|
Text > Edit > Split Table |
This option is available if the table is inserted into a multiline text or paragraph text. Splits the current table into two separate tables along the upper border of the current cell. When multiple cells are selected, the command is not available.
Icon |
Ribbon |
|---|---|
|
Text > Rows > Insert Row Before |
Inserts an empty row before the current row.
Icon |
Ribbon |
|---|---|
|
Text > Rows > Insert Row After |
Inserts an empty row after the current row.
Icon |
Ribbon |
|---|---|
|
Text > Rows > Insert Rows |
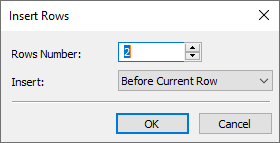
Opens a dialog, where you should specify the Rows Number that, after clicking OK, will be inserted Before Current Row or After Current Row, depending on the value selected in the Insert field.

Icon |
Ribbon |
|---|---|
|
Text > Rows > Delete Rows |
Deletes the rows that the selected cells belong to.
Icon |
Ribbon |
|---|---|
|
Text > Columns > Insert Column Before |
Inserts an empty column at the left of the current column.
Icon |
Ribbon |
|---|---|
|
Text > Columns > Insert Column After |
Inserts an empty column at the right of the current column.
Icon |
Ribbon |
|---|---|
|
Text > Columns > Insert Columns |
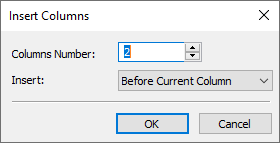
Opens a dialog in which you should specify the Columns Number that, after clicking OK, will be inserted Before Current Column or After Current Colum, depending on the value selected in the Insert field.

Icon |
Ribbon |
|---|---|
|
Text > Columns >Delete Columns |
Deletes the columns that the selected cells belong to.
Icon |
Ribbon |
|---|---|
|
Text > Database > Database |
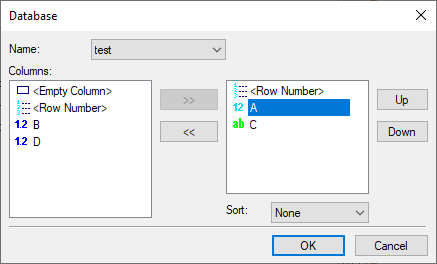
Allows you to insert into table the contents of any of the databases available in the current document (both internal and added by reference to an external file). After calling the option, the Database dialog box appears on the screen. In the upper part of the window there is the Name drop-down list, in which you can select any of the databases available in the current document.
Then a list of columns of the selected database appears in the Columns field on the left. The data type in the column (![]() integer,
integer, ![]() real,
real, ![]() text) is indicated by an icon to the left of the field name. The
text) is indicated by an icon to the left of the field name. The ![]() <Empty Column> and
<Empty Column> and ![]() <Row Number> are also available. To display the values of a database column in the table, select the column in the left list using
<Row Number> are also available. To display the values of a database column in the table, select the column in the left list using ![]() and move it to the right list using the [>>] button. The
and move it to the right list using the [>>] button. The ![]() <Empty Column> and
<Empty Column> and ![]() <Row Number> are not moved to the right list, but are copied to it, so you can add them to the table several times. The column can be removed from the right list using the [<<] button.
<Row Number> are not moved to the right list, but are copied to it, so you can add them to the table several times. The column can be removed from the right list using the [<<] button.

The number of selected database columns cannot exceed the number of table columns. The order of the columns in the right list corresponds to the order of the columns to be filled in the table (the contents of the database column top in the list, is entered in the leftmost column of the table, etc.). To change the order of the columns in the right list, use the Up and Down buttons located to the right of the list.
The order in which the database contents are displayed in the table rows can be changed by sorting the database by one of the columns. To do this, select the ![]() column in the right list and set the necessary sorting method in the Sort field (None,
column in the right list and set the necessary sorting method in the Sort field (None, ![]() Ascending,
Ascending, ![]() Descending order).
Descending order).
The table is filled vertically from top to bottom, starting from the row containing the cell active at the time of the command call. The lines above will remain blank. If the database contains more rows than are available in the table, new rows will be added automatically.
The table is filled horizontally from right to left, always starting from the leftmost column, regardless of which cell was active at the time the command was called.
After clicking OK, the table will be filled with the corresponding values from the database.
The contents of the table associated with the database are updated automatically during regeneration.
Icon |
Ribbon |
|---|---|
|
Text > Database > Update from Database |
It is used to update the contents of the table, if the contents of the linked database have been changed.