Paragraph Text |
  
|
Paragraph text can be created using the following automenu option within the Text command:
|
<R> |
Create paragraph text |
Paragraph text lays within one or several bounding rectangles. Size of rectangles is fixed. Different rectangles of a single text may be placed on different pages.
If text content doesn't fit the current line within bounding rectangle's width, it gets wrapped to the next line automatically. You may add a new line manually by pressing <Shift>+<Enter>, or add a new paragraph by pressing <Enter>. Sometimes the content can not be wrapped to the next line, e.g. when width of a character or inserted element (picture, 2D fragment, formlimit, roughness) exceeds the width of the bounding rectangle. In such cases, depending on the fit settings, it's either the width of the rectangle is automatically increased, or the content that didn't fit is ignored.
If inputted lines do not fit the height of the current bounding rectangle, they get wrapped to the next one. If there's no next rectangle, then, depending on the fit settings, it's either the height of the current rectangle is automatically increased, a new rectangle is automatically added, a font size is automatically reduced, or the content that didn't fit is ignored.
When ignoring a content that didn't fit a width of a rectangle, the ignored part is still displayed on a drawing/WP and remains printable.
When ignoring a content that didn't fit a height of a rectangle, the ignored part is not displayed on a drawing/WP outside the text content editing mode and becomes non-printable.
If deleting some of the text content leaves a bounding rectangle (except the first one) empty, then, depending on the fit settings, such empty rectangle might be either kept or automatically deleted. Automatic deletion of a rectangle may be combined with automatic deletion of a corresponding page.
The content of paragraph text can be inputted directly on a drawing page/active WP or in the text editor.
Font parameters may be defined individually for each character. Paragraph parameters may be defined individually for each paragraph.
Creating a paragraph text
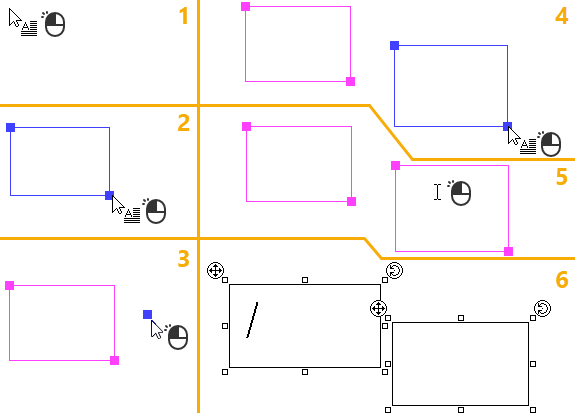
Upon selecting a paragraph text option in the automenu of the Text command, you need to define a first anchor point in one of the ways described in the Position and Orientation of Text section. Upon defining a first anchor point, a preview of a first bounding rectangle appears. One of rectangle's angles coincides with the first anchor point, the opposite angle follows the cursor. Next you need to define a second anchor point. Upon defining a second anchor point, the second angle of the first bounding rectangle coincides with it, and the preview of a third point (i.e. first angle of the second bounding rectangle) starts following the cursor. Thus, you can defined multiple bounding rectangles for the same text. However, a single rectangle is enough to create a text. Defining anchor points and, therefore, bounding rectangles goes on until you click ![]() within the boundaries of any of the created rectangles. Then the creation of text get finished and the system switches to text content editing mode.
within the boundaries of any of the created rectangles. Then the creation of text get finished and the system switches to text content editing mode.
Creating the paragraph text with two bounding rectangles by pointing anchor points' positions with the mouse is shown on the figure below:

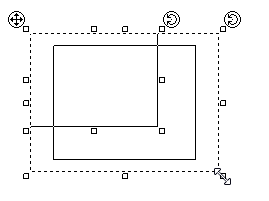
Upon switching to the text content editing mode, the appearance of bounding rectangles changes as follows:
•Rectangles become bigger due to additional offsets intended to ease the content editing.
The offsets are set in document parameters (Document Parameters > Page > View > Text frame size).
•Manipulators for moving ![]() and rotating
and rotating ![]() the text appear at top corners of rectangles.
the text appear at top corners of rectangles.
•Square manipulators ![]() for changing rectangle's size appear at key points (start, middle and end) of each edge.
for changing rectangle's size appear at key points (start, middle and end) of each edge.
In order to re-size a rectangle, move the cursor over one of its ![]() manipulators. The cursor's appearance will change to
manipulators. The cursor's appearance will change to ![]() ,
, ![]() ,
, ![]() or
or ![]() depending on the resizing direction controlled by the selected manipulator. Then click and hold
depending on the resizing direction controlled by the selected manipulator. Then click and hold ![]() , while moving the cursor. Preview of rectangle's new size will start following the cursor. The preview consists of two contours - big dashed and small continuous. Continuous contour represents the real size of the rectangle based on its anchor points. Dashed contour represents the one, that will get displayed within the text content editing mode, and is bigger due to additional offsets intended to ease the content editing. Establish the necessary size of the rectangle and release
, while moving the cursor. Preview of rectangle's new size will start following the cursor. The preview consists of two contours - big dashed and small continuous. Continuous contour represents the real size of the rectangle based on its anchor points. Dashed contour represents the one, that will get displayed within the text content editing mode, and is bigger due to additional offsets intended to ease the content editing. Establish the necessary size of the rectangle and release ![]() to confirm resizing.
to confirm resizing.

Next you can start inputting the text content. For the most part, the text content is inputted using the keyboard. Optionally, you may insert various elements into text using the automenu or the contextual menu of text content. Throughout inputting the content, dialog windows described in the Fit Settings of Paragraph Text may appear.
When editing content of a paragraph text, following options are available in the automenu:
|
<Ctrl>+<Enter> |
Finish input |
|
<Ctrl>+<X> |
Cut |
|
<Ctrl>+<C> |
Copy |
|
<Ctrl>+<V> |
Paste |
|
|
|
|
|
|
|
<F9> |
|
|
<F10> |
|
|
<Ctrl>+<F5> |
|
|
<F11> |
|
|
<Ctrl>+<F11> |
|
|
<Esc> |
Cancel |
As you finished inputting the content and customizing the parameters of the current text, press ![]() , <Ctrl>+<Enter> or
, <Ctrl>+<Enter> or ![]() . In result, editing of the current text gets finished and the system proceeds to creating a next text.
. In result, editing of the current text gets finished and the system proceeds to creating a next text.
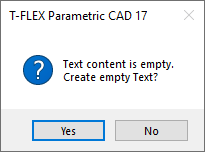
If after creating a text you finish its editing without inputting any content, then the system asks the question:

Answering No deletes the empty text object.
Answering Yes keeps the empty text object. You can edit it later.
If you edit an already created empty text and leave it empty again, the question doesn't appear.