Inserting Special Symbols into Text |
  
|
When editing text content, you can insert a special symbol into it in the following ways:
•using dedicated commands for inserting particular characters;
•from the symbols insertion dialog (supports custom symbols);
Dedicated commands for inserting particular symbols
When editing text content in a 2D or 3D view window, the following commands are available in the automenu:
|
<Alt>+<F2> |
Insert Diameter |
|
<Alt>+<F3> |
Insert Degree |
|
<Alt>+<F4> |
Insert Plus-Minus |
|
|
Non-breaking Space |
|
|
Non-breaking Hyphen |
|
|
Line Break |
|
|
Page Break |
In addition, some of these commands are available in the context menu:
Symbol![]()
![]() Diameter;
Diameter;
Symbol![]()
![]() Degree;
Degree;
Symbol![]()
![]() Plus Minus.
Plus Minus.
When editing the text content in the editor, all of the aforementioned commands are available in the Standard toolbar, as well as in the Insert section of the drop-down menu.
Regardless of which font is set for the current position of the text cursor, these commands insert characters using the font set for the characters in the document parameters (Document Parameters > Page > Symbols > Characters > Font). The default font is T-FLEX Symbol Type A. If you change the font in the document settings, the font of previously inserted characters will also change. On the same tab of the document parameters dialog, you can change the code of the characters inserted by the commands for inserting diameter, degree and plus-minus. This may be required when using a font, where codes for these characters differ from codes in the default font.
When editing the text content in a 2D or 3D view window, the following command is available in the automenu:
|
<Alt>+<F9> |
Insert Special |
It is also available in the contextual menu: Symbol ![]()
![]() Special....
Special....
When using text input boxes in various T-FLEX CAD commands, including the input box of string text content in the parameters dialog, this command is available in the contextual menu of input box (Insert symbol... <Alt>+<F9>).
When editing the text content in the editor, this command is available on the Standard toolbar, as well as in the drop-down menu (Insert > Special...).
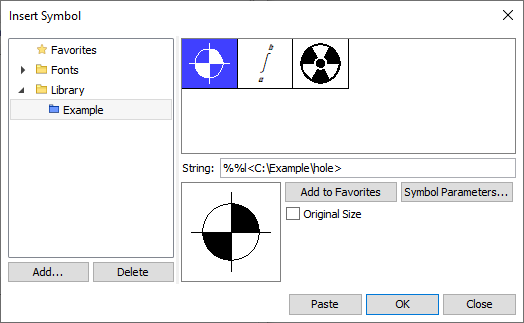
Calling the command invokes the Insert Symbol dialog window:

The structure of the symbols catalog is displayed in the left side of the dialog. The upper level of the catalog contains following sections:
•Favorites
You can add particular symbols here, both standard and custom.
•Fonts
Contains standard set of symbols of the font selected for symbols in the document parameters (Document Parameters > Page > Symbols > Characters > Font). The default font is T-FLEX Symbol Type A. If you change the font in document parameters, the font of previously inserted symbols will also change.
•Library
Contains symbol libraries added to the current library configuration and folders added directly to the symbols catalog. The dialog supports custom symbol libraries. Detailed info on creation and usage of custom symbols can be found in the Custom Symbols section.
A folder can be selected in the catalog by clicking it with ![]() .
.
In order to add an arbitrary folder to the catalog, click the Add... button and select path to the desired folder using the standard Windows Explorer interface. In order to delete a folder, select it in the catalog and click the Delete button.
The list of symbols contained by a selected folder is displayed to the right of the catalog. Symbols can be selected in the list by clicking ![]() .
.
Following elements are displayed below the list:
•String
Code of the selected symbol. In input boxes of T-FLEX CAD interface texts are displayed with non-applied formatting, so this code is displayed instead of the symbol itself. In 2D and 3D windows texts are displayed with applied formatting, so the code gets replaced by the corresponding image of the symbol. Content of multiline text, paragraph text and table is inputted with applied formatting directly in 3D or 3D window, or in editor. Content of string text is inputted with non-applied formatting in the parameters dialog.
Symbols belonging to a font have simple numerical codes assigned via the following pattern:
%%-123
where: %% – prefix;
"-" – sign of ignoring font angle (see below);
123 – number of symbol.
Symbols belonging to a library have complex codes assigned via the following pattern:
%%l<<Path>File|Page;$A="XXX";B="0">
where: %% – prefix;
l – size of the symbol (%%l - relative, %%L – original (see below));
<Path> – name of the library (if the symbol belongs to library) or path to symbol folder (if the symbol belongs to a folder added directly to the catalog using the Add button);
File – name of the symbol file
Page – name of the symbol page (specified only if the symbol file contains more than one page of the Normal type);
$A="XXX";B="0" – names of external variables ($A and B) and their values (XXX and 0); specified only if values were changed from the default ones saved in symbol file.
•Preview of the selected symbol
•Add to Favorites
Adds the selected symbol into the Favorites section of the catalog. In order to delete a symbol from favorites, double click it with ![]() .
.
•Symbol Parameters...
Invokes the dialog of selected symbol's external variables.
•Original Size
This checkbox is disabled by default, so the size of symbols is defined by target text's font parameters. If you enable this checkbox, symbols will be inserted using the size of the symbol in its document considering the application of values set in external variables dialog. Moreover, upon inserting a symbol, you can change its scale, color and vertical offset, using the Size and Position command, which can be found in contextual menu of symbol in formatted text.
•Ignore Font Angle
This checkbox replaces the Initial size checkbox for symbols from the standard set. The checkbox is enabled by default, so the symbol is inserted without applying the italic slope regardless of target text's font parameters.
Following buttons are displayed at the bottom of the insert symbol dialog:
•Paste
Insert the symbol selected in the dialog into the text. The dialog stays open.
•OK
Insert the symbol selected in the dialog into the text and closes the dialog.
•Close
Closes the dialog without inserting symbol.
Non-parametric symbols (i.e. the ones without external variables) may also be inserted by double-clicking them in the list with ![]()
![]() . For parametric symbols double click
. For parametric symbols double click ![]()
![]() invokes external variables dialog.
invokes external variables dialog.
When editing the text content in a 2D or 3D view window, the following command is available in the automenu:
|
<Alt>+<F5> |
Open Character Map |
It is also available in the contextual menu: Symbol![]()
![]() Other...
Other...
When editing the text content in the editor, this command is available on the Standard toolbar, as well as in the drop-down menu (Insert > Other...).
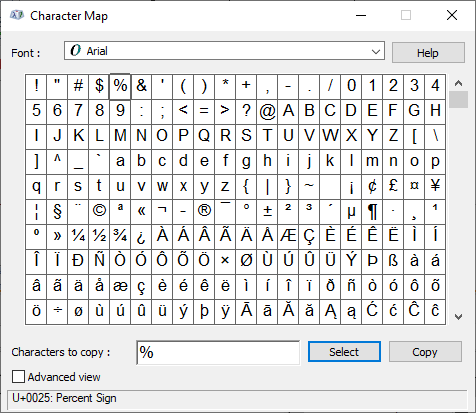
Calling the command invokes the Character Map window:

Select the font name In the Font drop-down list. The table will show all the characters of this font. Use the scroll bar to move through the table.
Point ![]() to the symbol in the table and click the Select button. The specified symbol will appear in the Characters to copy input box, and the symbol code and its name (if the font contains symbol names) will be displayed in the bottom line of the window. Thus, you can select the required number of characters, and then click the Copy button (all characters in the field Characters to copy will be written to the clipboard). After that, the table window can be closed or left open. An open symbol table window does not block working with other windows and T-FLEX CAD commands. Next, in a 2D window or text editor, use the cursor to indicate the position in the text where you want to place the contents of the clipboard, and use the Paste
to the symbol in the table and click the Select button. The specified symbol will appear in the Characters to copy input box, and the symbol code and its name (if the font contains symbol names) will be displayed in the bottom line of the window. Thus, you can select the required number of characters, and then click the Copy button (all characters in the field Characters to copy will be written to the clipboard). After that, the table window can be closed or left open. An open symbol table window does not block working with other windows and T-FLEX CAD commands. Next, in a 2D window or text editor, use the cursor to indicate the position in the text where you want to place the contents of the clipboard, and use the Paste ![]() command (<Ctrl>+<V>) to paste the selected characters into the text.
command (<Ctrl>+<V>) to paste the selected characters into the text.
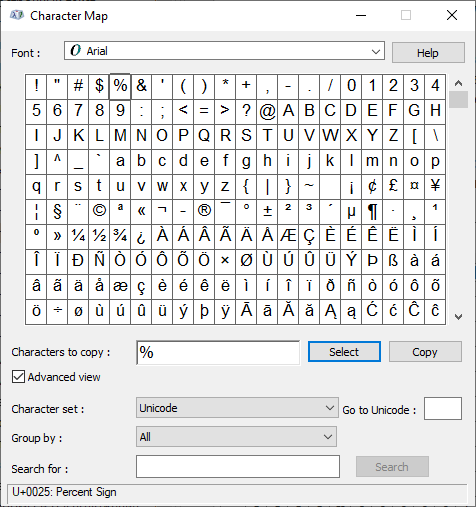
When the Advanced view checkbox is enabled, the following controls appear at the bottom of the Character Map window:

•A drop-down list in which you can select a Character set displayed in the table.
•The Go to Unicode field, which allows you to search for a character by its code. Place the cursor in this field, click ![]() , enter the code from the keyboard and press <Enter>. The corresponding symbol will be the first in the table, and all preceding symbols will be unavailable. To return to the normal view of the table, enter the code 0 and press <Enter>.
, enter the code from the keyboard and press <Enter>. The corresponding symbol will be the first in the table, and all preceding symbols will be unavailable. To return to the normal view of the table, enter the code 0 and press <Enter>.
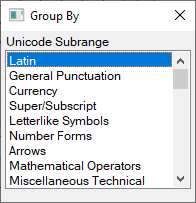
•The Group By drop-down list. Select the grouping principle. The Group By window will appear next to the character map window with a list of available groups. Only the symbols of the selected group will be displayed in the character map window.

•The Search for input box. Allows you to search for characters by name (if the font contains symbol names). Enter a search query and click the Search button located to the right of this field. The table will show the search results.
Topics in this section: