Table |
  
|
The table creation mode of the ![]() Text command can be called in one of the following ways:
Text command can be called in one of the following ways:
Icon |
Ribbon |
|---|---|
|
Draw > Appearance > Table Assembly (2D) > Additional > Table Sheet Metal (2D) > Appearance > Table Remarks > Remarks > Table Workplane > Appearance > Table |
Keyboard |
Textual Menu |
<TE>><B> |
|
Automenu of the |
|
<B> |
Create Table |
Alternatively, the table can be inserted into paragraph text or multiline text within their content editing mode using the following command:
Icon |
Ribbon |
|---|---|
|
Text > Table > Insert Table |
Table Creation
When creating a separate table, you first need to set its anchor point using one of the methods described in the Position and Orientation of Text section.
When inserting a table into the text, its position depends on the position of the text cursor at the moment of calling the Insert Table command.
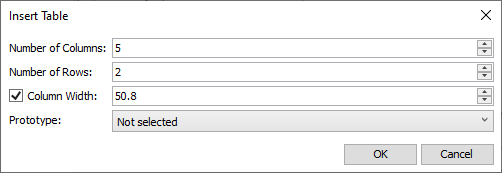
Next, the Insert Table dialog will appear:

In the dialog box, set the required Number of Columns and the Number of Rows, as well as the Column Width (you can set the individual width for each column later in the table parameters or using the mouse). If you disable the Column Width checkbox, the system will set the minimum possible column width.
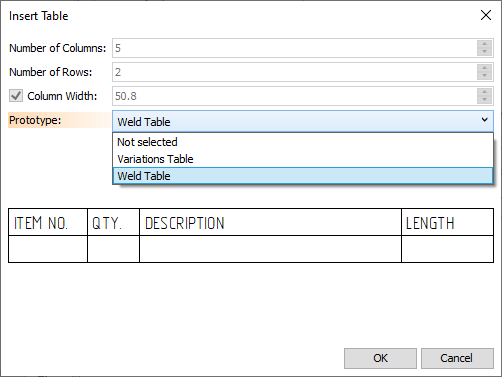
You can also create a table based on a prototype. To do this, select a Prototype in the drop-down list. As a result, the Number of Columns, Number of Rows and Column Width input boxes will become inactive, and a preview of the selected prototype will appear at the bottom of the dialog.
The list of prototypes in the ![]() Table command is based upon the content of the Tables tab of the common list of prototypes used in several commands. Information on editing the list can be found in the description of the
Table command is based upon the content of the Tables tab of the common list of prototypes used in several commands. Information on editing the list can be found in the description of the ![]() Save as Prototype command. In addition to the standard prototypes supplied with the system, you can create custom prototypes. To do this, create a 2D fragment containing one table and save it as prototype. As a result, the saved prototype will be available in the drop-down list when inserting tables.
Save as Prototype command. In addition to the standard prototypes supplied with the system, you can create custom prototypes. To do this, create a 2D fragment containing one table and save it as prototype. As a result, the saved prototype will be available in the drop-down list when inserting tables.

After confirming the set parameters, the created table will be drawn on the page, and the system will switch to the mode of editing its contents.
When editing a content of a table in the drawing window, a frame is displayed around the external borders of the table. The offset between the borders and the frame is set in document parameters (Document Parameters > Page > View > Text frame size).
You can move and rotate the table using manipulators, as described in the Position and Orientation of Text section. It also describes the options of the text's position in relation to its anchor point.
The cell sizes can be changed using the mouse or using the table parameters dialog. To change the size of the cells using the mouse, to move the cursor over the border you want to move. The cursor changes appearance to ![]() (for vertical borders) or
(for vertical borders) or ![]() (for horizontal borders). Click and hold
(for horizontal borders). Click and hold ![]() while moving the mouse. The border will follow the cursor. Move the border to the necessary position and release
while moving the mouse. The border will follow the cursor. Move the border to the necessary position and release ![]() . The left vertical and upper horizontal borders of the table cannot be moved. Changing cell sizes using the properties dialog is described in the Table Properties section.
. The left vertical and upper horizontal borders of the table cannot be moved. Changing cell sizes using the properties dialog is described in the Table Properties section.
To fill in a cell, place the cursor over it and click ![]() . A text cursor will appear in the cell in the form of a blinking vertical line, corresponding in height to the height of the text line. After that, you can enter the text of the cell from the keyboard or insert an element into the cell. The position of the text cursor corresponds to the position of the inputted character/inserted element. Also, the text cursor can be moved around the table using the arrows on the keyboard.
. A text cursor will appear in the cell in the form of a blinking vertical line, corresponding in height to the height of the text line. After that, you can enter the text of the cell from the keyboard or insert an element into the cell. The position of the text cursor corresponds to the position of the inputted character/inserted element. Also, the text cursor can be moved around the table using the arrows on the keyboard.
Symbols and elements in cells, as well as entire cells, can be selected by moving the mouse while holding down ![]() , or by pressing the arrows on the keyboard while holding down the <Shift> key. You can also select the entire table using the keyboard shortcut <Ctrl>+<A> or the Select All command in the context menu of the text content.
, or by pressing the arrows on the keyboard while holding down the <Shift> key. You can also select the entire table using the keyboard shortcut <Ctrl>+<A> or the Select All command in the context menu of the text content.
The contents of the table can be created by copying through the clipboard the contents of a previously filled T-FLEX CAD table, or a table from Word or Excel. And vice versa: the T-FLEX CAD table can be copied to Word or Excel.
When editing the table contents, the following options are available in the automenu:
|
<Ctrl>+<Enter> |
Finish input |
|
<Ctrl>+<X> |
Cut |
|
<Ctrl>+<C> |
Copy |
|
<Ctrl>+<V> |
Paste |
|
|
|
|
|
|
|
<F9> |
|
|
<F10> |
|
|
|
|
|
<F11> |
|
|
<Ctrl>+<F11> |
|
|
<Esc> |
Cancel |
Also, when editing tables, you can use the contextual menu of the text content and the commands available on the Text ribbon tab.
After all the necessary content is inputted and all the required parameters are set, press ![]() , <Ctrl>+<Enter> or
, <Ctrl>+<Enter> or ![]() . As a result, editing of the current table will be completed and the system will proceed to creating the next one.
. As a result, editing of the current table will be completed and the system will proceed to creating the next one.
Topics in this section: