Constraints > Tangent |
  
|
Constraints > Tangent |
|
Command call:
Icon |
Ribbon |
|---|---|
|
Draw > Constraints > Constraint > Tangent Workplane > Constraints > Constraint > Tangent |
Keyboard |
Textual Menu |
<SC>><T> |
|
Parameters window of the |
|
<T> |
Tangent |
The constraint can be created between any two sketch lines, except straight line segments. If there are no additional constraints, then there are infinite number of possible tangency configurations. The point of contact will be defined randomly.
If positions of both objects are not fixated by other constraints, then the object to be moved upon applying a tangent constraint depends on type of objects.
When creating a constraint between objects of any type, except splines, the object selected second will be moved.
When creating a constraint between two splines, both objects will be moved.
When creating a constraint between a spline and an object of any other type, the non-spline object will be moved.
If position of the second object is fixated, then the first one will be moved. If positions of both objects are fixated, then the new constraint will throw an error.
If the object to be moved doesn't have fixated points, then it keeps its initial geometry upon moving.
When moving splines, their shape changes arbitrarily. Objects of other types tend to keep their shape upon moving, except cases, where some of their points are fixated. In such cases, instead of moving the whole object, only its non-fixated points are moved, which causes changes in object's geometry. If the tangency cannot be ensured only by movement of one of the objects due to fixation of its points, then non-fixated points of another object can be also moved, which causes changes in geometry of both objects.
The constraint allows to select multiple second objects.
If the tangent objects do not reach each other, then a thin dashed line extending them to the tangency point will be displayed, upon selecting their tangent constraint or moving cursor over it.
Icon of constraint is displayed near constrained objects' tangency point.
By default, a numerical index of a constraint is displayed near its icon in drawing. Indexes display may be disabled in system options.
Examples
Tangency of Ellipse and two Circles
Let us be given an ellipse and two circles. Select the Tangent constraint.
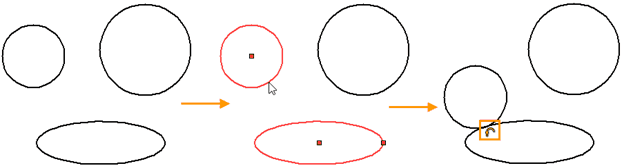
By pressing ![]() , select the ellipse first and a circle next. Since the ellipse was selected first, it will keep its position, while the circle will be moved. The tangency can be applied from either side of the ellipse and the circle. As a rule, the constraint is created in such a way that the elements move along the shortest distance, i.e. in a straight line to the nearest possible point of contact. For example, if the initial position of the circle was different, then the point of contact would be different.
, select the ellipse first and a circle next. Since the ellipse was selected first, it will keep its position, while the circle will be moved. The tangency can be applied from either side of the ellipse and the circle. As a rule, the constraint is created in such a way that the elements move along the shortest distance, i.e. in a straight line to the nearest possible point of contact. For example, if the initial position of the circle was different, then the point of contact would be different.
Finish input using ![]() or <Ctrl>+<Enter>. An icon indicating the constraint of the tangency appears next to the point of contact. Next, by analogy, select the following two elements: ellipse and the second circle. As we finish input, a new constraint appears. Again, as in the first case, the circle moved to the nearest point of contact.
or <Ctrl>+<Enter>. An icon indicating the constraint of the tangency appears next to the point of contact. Next, by analogy, select the following two elements: ellipse and the second circle. As we finish input, a new constraint appears. Again, as in the first case, the circle moved to the nearest point of contact.

Create a Tangent constraint between two circles. We act by analogy: select the circle with the help of ![]() , complete the input with
, complete the input with ![]() or <Ctrl>+<Enter>. The third constraint has been created. In the Model Elements window, you can see the created constraints.
or <Ctrl>+<Enter>. The third constraint has been created. In the Model Elements window, you can see the created constraints.
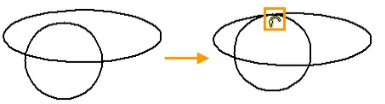
By changing the initial position of the elements, you can define the sides of the tangency. For example, it is possible that the tangency between all three lines will be at a single point.

Segment Tangent to Arc at Given Point
Let an arc and a straight line segment be given. It is necessary to make the segment tangent to the arc at the point of the beginning of the arc.
To begin with, we will create a Coincidence constraint, so that the starting point of the arc is always on a segment. To do this, call the coincidence constraint creation command and select a segment and a point with the help of ![]() . Then finish input of constraint objects. The elements will move, so that the starting point of the arc lies on the straight line on which the segment lies.
. Then finish input of constraint objects. The elements will move, so that the starting point of the arc lies on the straight line on which the segment lies.

Now create a tangency. Select the Tangent type of constraint, then with the help of ![]() select the arc fist and the segment second. Finish input using
select the arc fist and the segment second. Finish input using ![]() or <Ctrl>+<Enter>. The segment moves, the arc keeps its position, the geometry of both objects remains unchanged.
or <Ctrl>+<Enter>. The segment moves, the arc keeps its position, the geometry of both objects remains unchanged.
Now, upon any further editing of objects' geometry, the segment (or the line on which the segment lies) will be tangent to the arc at the point of the beginning of the arc.
