Stepped Radial Dimension |
  
|
Stepped Radial Dimension is useful, when dimensioning circles and circular arcs of a big radius. It allows to create a small portion of dimension line enough for placing a dimension value, instead of drawing the line through the whole radius.
Creating a single stepped radial dimension on a line of any type
In order to create such dimension, upon calling the ![]() Dimension command, activate the following automenu option:
Dimension command, activate the following automenu option:
|
<Y> |
Radial Dimension with stepped line |
Activating this option sets selection filters in such way, that only circles and circular arcs can be selected. Construction and graphic lines are both available for selection. Select a circle or arc by clicking it with ![]() . The preview of the dimension appears, while dimension symbol, dimension linking, group of stepped dimensions creation options and common options of 2D elements creation commands become available in the automenu.
. The preview of the dimension appears, while dimension symbol, dimension linking, group of stepped dimensions creation options and common options of 2D elements creation commands become available in the automenu.
When using the common automenu option for changing the dimension symbol, the stepped dimension gets converted into a generic radial dimension. In order to change the symbol without changing the layout of the dimension line, use the parameters window. When editing a stepped radial dimension, the automenu contains special options for switching between radius and diameter without affecting the layout of the dimension line:
|
<D> |
Click to toggle radius/diameter mode |
|
<R> |
Click to toggle radius/diameter mode |
As the preview of the dimension appears, the snapping point of the dimension line follows the cursor, while the line itself rotates around the center of the selected circle/arc, thus following the snapping point. If the snapping point is inside the circle and the distance between the point and the circle exceeds the minimal possible length of the dimension line, the end of the line coincides with the point, which means, you can change the length of the line by moving the point. If the point is inside the circle and the distance between the point and the circle is lower than the minimal possible length of the dimension line, or if the point is outside the circle, the dimension line is created with minimal length and the position of the snapping point only affect the position of of the line without affecting the length. Dimension value is placed at the middle of the outer radial portion of the dimension line. The snapping point might be either placed at an arbitrary point, or coincided with a 2D node, endpoint of a graphic line, or intersection of construction lines (a connected 2D node is automatically created at selected intersection). The associative link is established between the dimension and the selected element (2D node/endpoint of a graphic line), so, upon further changes in position of the selected element, the position of dimension line's snapping point changes accordingly. When editing the dimension, such link may be broken using the following automenu option:
|
<K> |
Break relations |
Upon activating this option you have to re-define the position of the snapping point.
Set the desired position of the snapping point by moving the cursor, and confirm the input by pressing ![]() or <Enter>. The dimension will be created. Upon creating a dimension, the command stays in the stepped radial dimensions creation mode.
or <Enter>. The dimension will be created. Upon creating a dimension, the command stays in the stepped radial dimensions creation mode.

Manipulators of stepped radial dimension
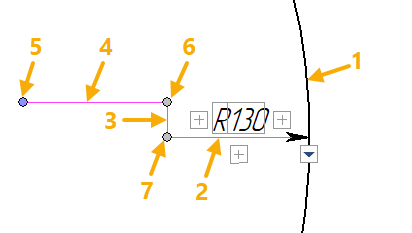
Initially, when creating a dimension, the size and position of the dimension line's step are default. When editing dimension, you can change these parameters using the special manipulators. Manipulators are displayed upon selecting a dimension, or upon moving the cursor over a dimension. Click a manipulator with ![]() . The corresponding point of the dimension line will follow the cursor. Set the desired position of the point and confirm it by pressing
. The corresponding point of the dimension line will follow the cursor. Set the desired position of the point and confirm it by pressing ![]() or <Enter>.
or <Enter>.

1 - circle
2 - outer radial portion of the dimension line
3 - step of the dimension line
4 - inner radial portion of the dimension line
5 - manipulator of dimension line's snapping point and length
6 - manipulator of step's position
7 - manipulator of step's size
Quick creation of a stepped radial dimension on a construction circle
Upon launching the ![]() stepped radial dimension creation mode, a circle may also be selected using the following automenu option:
stepped radial dimension creation mode, a circle may also be selected using the following automenu option:
|
<C> |
Select Circle |
Upon activating this option, clicking ![]() anywhere in the drawing selects a construction circle nearest to the point of clicking and instantly creates a stepped radial dimension on such circle. The dimension line of the resulting dimension will be snapped to the point of clicking. Upon creating a dimension, the command stays in the stepped radial dimensions creation mode.
anywhere in the drawing selects a construction circle nearest to the point of clicking and instantly creates a stepped radial dimension on such circle. The dimension line of the resulting dimension will be snapped to the point of clicking. Upon creating a dimension, the command stays in the stepped radial dimensions creation mode.
Creating a group of stepped radial dimensions
Upon launching the ![]() stepped radial dimension creation mode and selecting a circle/arc, the following option becomes available in the automenu:
stepped radial dimension creation mode and selecting a circle/arc, the following option becomes available in the automenu:
|
<X> |
Create Group of Radial Dimensions |
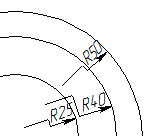
Upon activating this option, the first dimension will be created as usual. Then the command continues creation of stepped radial dimensions with the same snapping point as the first dimension. When creating these dimensions, the snapping point cannot be changed, so the manipulator of step's size follows the cursor, instead of the snapping point. This mode is helpful, when dimensioning concentric circles/arcs.

If the snapping point of the first dimension was defined by a 2D node or an endpoint of a graphic line, then all dimensions in the group get snapped to the same node or endpoint. If the position of the first dimension was defined by an arbitrary point, then a 2D node gets automatically created at such point, and all dimensions get snapped to such node.
In order to finish the creation of stepped radial dimensions' group, use the following automenu option:
|
<Esc> |
Return to previous mode |
When editing a dimension within a group with a common snapping point, you can make such dimension independent of others and set its own snapping point using the following automenu option:
|
<K> |
Break relations |
Upon activating this option, the snapping point of the current dimension should be re-defined.