Defining Element's Parameters |
  
|
General principles for setting element parameters
In the commands for creating and editing items in the menu for setting parameter values, there are various options for values.
•The parameter value is set as a constant. For example, in the text parameters, the angle is set to 0.
•The parameter value is replaced by a string From document. This means that the parameter value will be substituted from the corresponding parameter in the Document parameters command. For example, the Style > Standard parameter in the dimension parameters menu will be substituted from the Dimensions > Standard dimensions of the Document parameters command. Using the default parameters is very convenient for quickly changing elements of the entire drawing as a whole. For example, if you use the default parameters for dimensions, you can change the parameters on the Dimensions tab of the Document parameters command to completely change the way dimensions are displayed and, accordingly, the entire drawing. And you can change the thickness of all the main lines in the drawing by changing the Line thickness > Main tab in the Document parameters command.
•The values of most numerical parameters in the parameter dialogs for various elements can be set using variables and expressions. In this case, the parameter value will be determined by the value of the variable or the value of the expression. In this case, you can change the value of the corresponding element parameter by changing the values of variables. Using this mechanism, you can change any parameters of T-FLEX CAD elements: the size of text strings, the angle of characters, the size of arrows and image lines, and so on. You can use variables to define drawing parameters that are set in the Document parameters command: scale, paper size, font size, and so on. You can use variables to define the system visibility levels of elements that are set in the Levels command.
Specifics of Setting Parameters Using Variables
•When specifying numeric parameters using a variable, you must enter the variable name or expression without any auxiliary characters. For example: A or A + B
•When specifying string parameters using variables, you must enter the variable name or an expression enclosed in curly braces. For example: {$ NAME} or {A + B}
•When specifying string parameters in curly braces, you can enter both real variables and text variables.
If, when setting a parameter using variables, you specified the name of a new variable, then after exiting the menu you need to set the value of the variable being created.
Defining parameters when creating an element
The most convenient way of defining element's parameters during its creation is using ![]() the parameters tool window. Some of element's parameters are mandatory to be defined by the user, others are initially applied with default values. Then the user can confirm the element's creation with default parameters or change parameters' values for the current element if necessary.
the parameters tool window. Some of element's parameters are mandatory to be defined by the user, others are initially applied with default values. Then the user can confirm the element's creation with default parameters or change parameters' values for the current element if necessary.
The detailed information on Default Parameters is available in the corresponding section.
In most elements' creation commands you can invoke ![]() element's parameters dialog using the automenu option:
element's parameters dialog using the automenu option:
|
<P> |
Set entity parameters |
Usually, the dialog invoked by this option is the same as the dialog invoked from contextual menus of existing elements (see below). Therefore, specified parameters are only applied to the first element created after clicking OK in the dialog. In order to apply specified parameters as defaults, you need to enable the Set as default checkbox. However, in some commands (e.g.: graphic line, text) the parameters dialog invoked from the automenu doesn't contain the Set as default checkbox. In such cases specified parameters are automatically applied as defaults for all further created elements of the same type.
Some of the parameters may also be defined using the ribbon or the system toolbar.
Parameters window of some commands contain the Show Dialog for Each Element option. If it's enabled, the parameters dialog is invoked automatically for each element upon its creation.
Changing parameters of an existing element
Parameters of an already existing element can be changed using:
•![]() parameters tool window without transparent editing;
parameters tool window without transparent editing;
•![]() parameters tool window with transparent editing;
parameters tool window with transparent editing;
•![]() element's parameters dialog, invoked from element's contextual menu or from the dynamic toolbar.
element's parameters dialog, invoked from element's contextual menu or from the dynamic toolbar.
The detailed information on 3D elements' parameters dialogs is available in the Common Parameters of 3D Elements section.
The detailed information on 2D elements' parameters dialogs is available in sections describing each particular type of 2D elements.
Some parameters may also be changed using the ribbon or the system toolbar.
Changing parameters for different types of elements
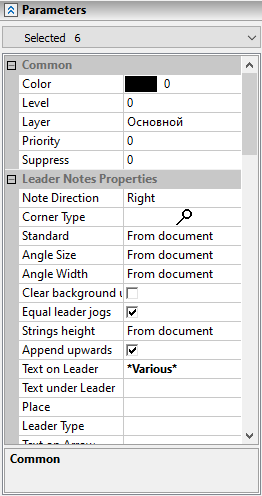
The parameters window is used to simultaneously change the parameters of elements in the command standby mode. In contrast to working in editing commands for various elements, you can simultaneously change the parameters of elements of different types.
When the command is in standby mode, the Parameters window displays a dialog for changing parameters of selected items. By default, the dialog is inactive. To activate the dialog, just go to the parameters window and expand the Parameters tab in it. After that, any selection of items will display their parameters in the parameters window. To open the dialog automatically, you can call the Parameters command from the context menu after selecting items.
You can close dialog's active mode by collapsing the Parameters tab.
It should be noted that when one element is selected, calling the Parameters command from the context menu will open the parameters dialog in a separate window for this element.
The dialog for changing the parameters of selected elements, displayed in the parameters window, consists of two parts: the main one - Parameters and the auxiliary one - Parameter Sets.
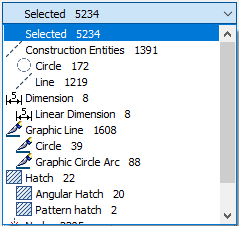
The main part contains a table of parameters of editable elements. By default, all selected elements are considered editable. The upper Selected field shows the total number of selected items. You can restrict the list of editable elements to elements of the same type by selecting it in the drop-down list of this field. In this case, the property table will contain only the properties of elements of the selected type. The changes you make will also not affect the entire group of selected elements, but only the elements of the specified type.
By default, the table shows all parameters of the elements that are being edited. You can use the Only Common checkbox to restrict table contents to their Common parameters.
To change the parameters of elements, just mark the desired parameters in the table, set the required values in the field on the right, and click ![]() or
or ![]() button at the top of the window.
button at the top of the window.


When you select the button ![]() Finish input, the changes made are applied to the selected elements. Working with the selected elements stops, and the selection of elements is canceled.
Finish input, the changes made are applied to the selected elements. Working with the selected elements stops, and the selection of elements is canceled.
The ![]() Apply changes button also allows you to apply your changes. However, in this case, working with the selected elements does not stop. This button is convenient to use when you need to set different parameters for different groups of elements from the selected set.
Apply changes button also allows you to apply your changes. However, in this case, working with the selected elements does not stop. This button is convenient to use when you need to set different parameters for different groups of elements from the selected set.
The ![]() Exit command button allows you to cancel your changes and finish working with the selected set of elements. You can also cancel your changes and work with the current set of elements by simply clicking
Exit command button allows you to cancel your changes and finish working with the selected set of elements. You can also cancel your changes and work with the current set of elements by simply clicking ![]() in the drawing.
in the drawing.
An additional button From Element allows you to select an item on the screen whose parameter values will be used as the current values of the parameters to edit. To do this, you must first specify the parameters in the table whose values you want to take from the object. Then click ![]() and use to specify the desired element on the screen. The values of the marked parameters will be set according to the values of the parameters of the specified object.
and use to specify the desired element on the screen. The values of the marked parameters will be set according to the values of the parameters of the specified object.
The auxiliary part of the parameters editing dialog - Parameter Sets - allows you to save the current set of parameters with a specific name for later use.
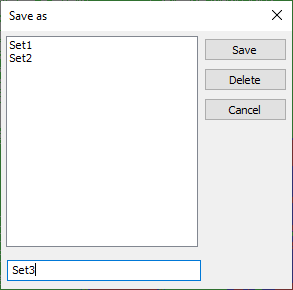
To save a combination of parameters as a Parameter Set, click Save. A dialog box appears on the screen where you can specify the name of the new set. All existing named parameter sets are displayed in the upper field of the dialog. By selecting ![]() one of the sets, you can delete it using the Delete button.
one of the sets, you can delete it using the Delete button.
In the lower field of the dialog, enter a name for the saved set. After entering the name, click Save. The dialog window will close and the saved set will appear in the drop-down list of sets. The Cancel button closes the dialog box without saving the new set.
To load a saved set, just select it from the drop-down list of sets.


See also:
•Copiyng Parameters of 2D Elements
•Common Parameters of 3D Elements