Edit Operation of 2D Elements Copying |
  
|
All elements created by moving or non-associative copying can be edited as generic 2D elements.
Associative copies also can be edited as generic 2D elements, but editing of their nodes is not available.
A whole operation of associative copying can be edited using the special command:
Icon |
Ribbon |
|---|---|
|
- |
Keyboard |
Textual Menu |
<EY> |
Edit > Draw > Copy |
Additionally, the command can be called from the contextual menu of a copying operation and from the the contextual menus of individual copies.
Upon calling the command, select the operations to be edited. Copying operations of any type including arrays can be selected for editing. Select a single operation, by clicking ![]() either the operations itself it in the
either the operations itself it in the ![]() Model Elements window, or resulting copies in the 2D window. Clicking
Model Elements window, or resulting copies in the 2D window. Clicking ![]() an empty space within the 2D window automatically selects the nearest operation of a suitable type. Multiple elements can be selected at once using frame or curve selection. Moreover, <Shift> +
an empty space within the 2D window automatically selects the nearest operation of a suitable type. Multiple elements can be selected at once using frame or curve selection. Moreover, <Shift> + ![]() on an element adds it to the selection and <Ctrl> +
on an element adds it to the selection and <Ctrl> + ![]() excludes it from the selection. Alternatively, you can select all copying operations on the current page using the following automenu option:
excludes it from the selection. Alternatively, you can select all copying operations on the current page using the following automenu option:
|
<*> |
Select All Elements |
Upon selecting multiple operations, the following option is available in the automenu:
|
<Del> |
Delete selected Element(s) |
Upon selecting a single operation, its resulting elements are outlined in 2D window by a continuous blue frame, source elements are outlined by dashed blue frame and a transformation vector (or a standalone anchor point in the cases of scaling, rotating or a circular array) is displayed.
Following options available in the automenu for a single operation editing:
|
<Enter> |
Finish Editing |
|
<P> |
|
|
<O> |
|
|
<G> |
|
|
<H> |
|
|
<S> |
|
|
<I> |
|
|
<Del> |
Delete selected Element(s) |
Parameters of copying operation
When editing a copying operation, its parameters are displayed in the parameters window, same as when creating an operation. So you can edit any of the parameters. Moreover, a parameters dialog of the selected operation can be called using the following automenu option:
|
<P> |
Set selected Element(s) Parameters |
The layout of the dialog depends on the type of operation - array, copy with symmetry, copy without symmetry.
Associative copies resulting from the selected operation can be exploded, i.e. converted into independent elements. Exploding deletes the copying operations. Following automenu options can be used for exploding:
|
<O> |
Explode Copy |
Upon activating this option, copies become generic 2D elements and lose associative links with source elements and between each other, as if the ![]() Explode Copy mode was used.
Explode Copy mode was used.
|
<G> |
Explode Copy keeping relations |
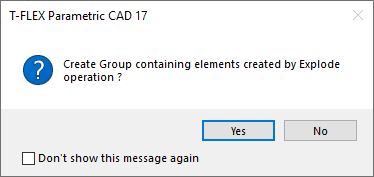
Upon activating this option, copies become generic 2D elements and lose associative links with source elements, but retain links between each other, as if the ![]() Explode Copy keeping relations mode was used. Upon calling this command, the system asks, if it should "Create Group containing elements created by Explode operation?"
Explode Copy keeping relations mode was used. Upon calling this command, the system asks, if it should "Create Group containing elements created by Explode operation?"
If the exploded operation IS NOT an array, then the question is asked once. Answering "Yes" combines all resulting elements into a single group. Answering "No" explodes copy without grouping.
If the exploded operation IS an array, then the question is asked several times according to the number of copies in array. In result, each copy, for which the "Yes" answer was selected, becomes a separate group of elements.

When editing a ![]() Copy with Translation,
Copy with Translation, ![]() Copy with Rotation,
Copy with Rotation, ![]() Copy with Scale,
Copy with Scale, ![]() Copy with Translation and Rotation, following automenu option is available:
Copy with Translation and Rotation, following automenu option is available:
|
<H> |
Select Clipping Hatch |
Upon activating this option, you have to select ![]() a hatch, that will be used as copies clipping contour.
a hatch, that will be used as copies clipping contour.
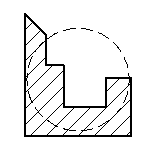
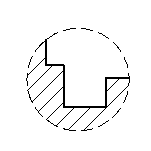
If the clipping hatch is used for this purpose only, we recommend making it Invisible. The diagram shows a copy image before and after selecting an invisible hatch for clipping..


If the clipping is already applied, the following automenu option can be used to cancel it:
|
<K> |
Cancel selection of clipping Hatch |
The following automenu option can be used for changing the set of operation's source elements:
|
<S> |
Edit copied elements list |
This option activates the source elements selection mode similar to the one activated upon calling a copy command. Upon confirming the selection ![]() , the system returns to the main interface of the editing command
, the system returns to the main interface of the editing command
Copying operation's anchor points can be re-defined. To do so, select ![]() either one of the points of the transformation vector, or a standalone anchor point (for scaling, rotating and circular array). The selected point starts following the cursor. In the meantime, the appearance of resulting copies in the 2D window and coordinates of the selected point in the parameters window get dynamically changed depending on the cursor's position. Set the desired position of the point and click
either one of the points of the transformation vector, or a standalone anchor point (for scaling, rotating and circular array). The selected point starts following the cursor. In the meantime, the appearance of resulting copies in the 2D window and coordinates of the selected point in the parameters window get dynamically changed depending on the cursor's position. Set the desired position of the point and click ![]() or press <Enter> to confirm it. This finishes the editing of the current operation, so the command switches to the mode of selecting operations for editing.
or press <Enter> to confirm it. This finishes the editing of the current operation, so the command switches to the mode of selecting operations for editing.
While the anchor point follows the cursor, following options are available in the automenu:
|
<T> |
Create Node at point |
If this option is active, then, upon confirming a new position of the point, a 2D node gets created there.
|
<N> |
Select Node |
if this option is active, then clicking ![]() in the 2D window in order to confirm point's position snaps this point to an existing 2D node nearest to the clicking location. This creates an associative link between the node and the copying operation, i.e. the result of copying automatically changes upon future changes in node's position. Anchor points can be snapped to a 2D node without activating this option, associative link is created anyway. However, selecting a 2D node without activating the corresponding option requires clicking
in the 2D window in order to confirm point's position snaps this point to an existing 2D node nearest to the clicking location. This creates an associative link between the node and the copying operation, i.e. the result of copying automatically changes upon future changes in node's position. Anchor points can be snapped to a 2D node without activating this option, associative link is created anyway. However, selecting a 2D node without activating the corresponding option requires clicking ![]() directly over the node.
directly over the node.
|
<U> |
Move along X axis |
|
<V> |
Move along Y axis |
These options are active by default. Deactivating them enables the checkbox of the corresponding coordinate in the parameters window, fixes coordinate's value and blocks movement of the point along the corresponding axis. So it is helpful fro defining horizontal or vertical translation.
When editing anchor points of the Copy with Symmetry operation, the automenu contains option for selecting a line defining the axis of symmetry:
|
<Alt>+<L> |
Select Line |